This post contains affiliate links. Please see our disclosure policy.
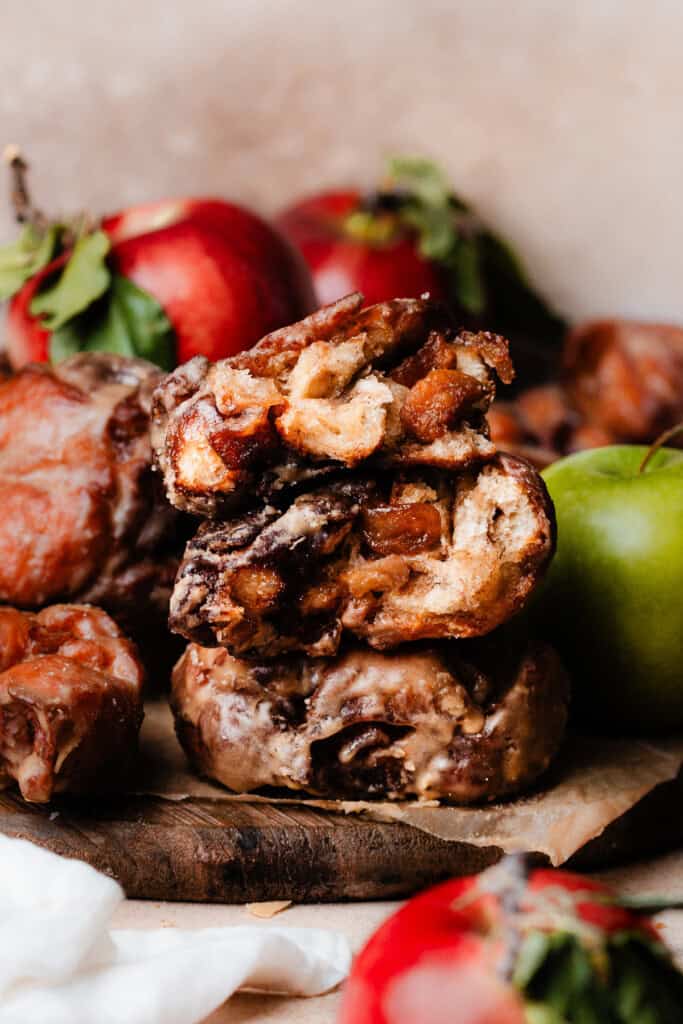
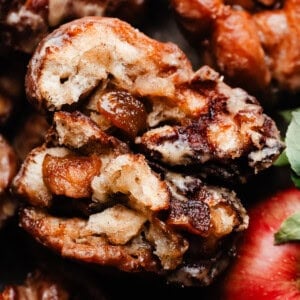
Homemade Apple Fritters are surprisingly simple to make and they taste like fall bliss! They’re light & fluffy on the inside, crisp on the outside, drenched in buttery apple cider glaze, and stuffed with caramelized, spiced apple pieces. Make these once and you’ll never turn to a store bought fritter again!

This recipe was originally published in October of 2019. I just updated it (Sept ’24) with new photos and extra success tips. The dough recipe has not changed but I tweaked the apple filling and glaze a bit, to add more flavor!
Table of Contents
Why you’ll love these Apple Fritters:
- Fluffy & Tender Fritters – The dough fries to pillowy soft perfection on the inside, with a hint of crispiness on the outside edges.
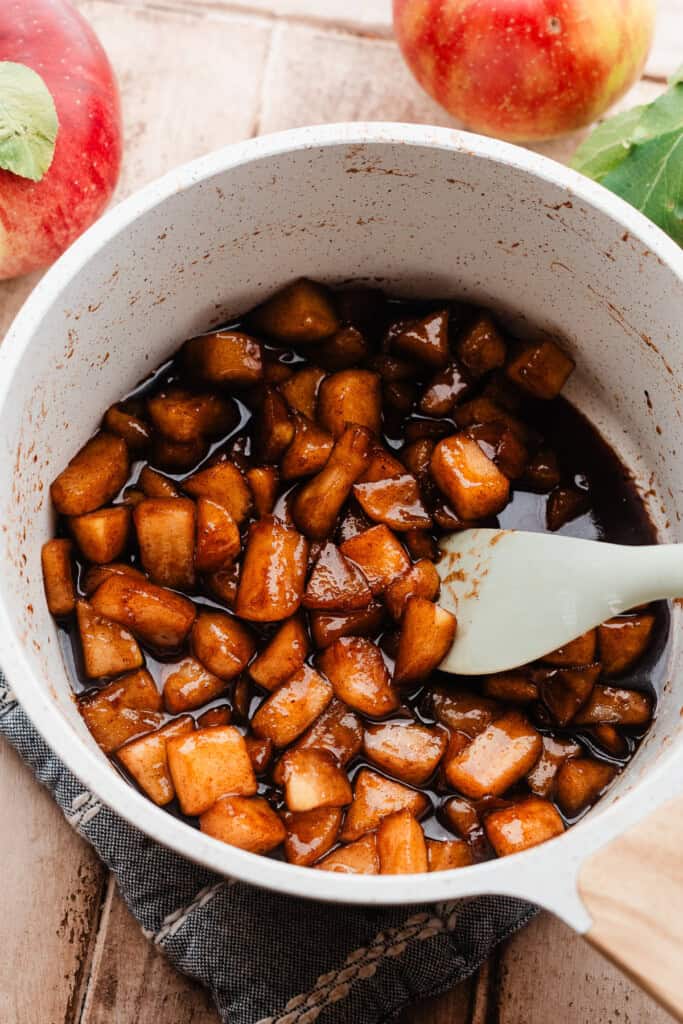
- Full of Apples – I’ve packed these fritters full of as many apples as they can handle. The apples are tender, spiced, and caramelized thanks to a short pre-cook before adding them to the dough!
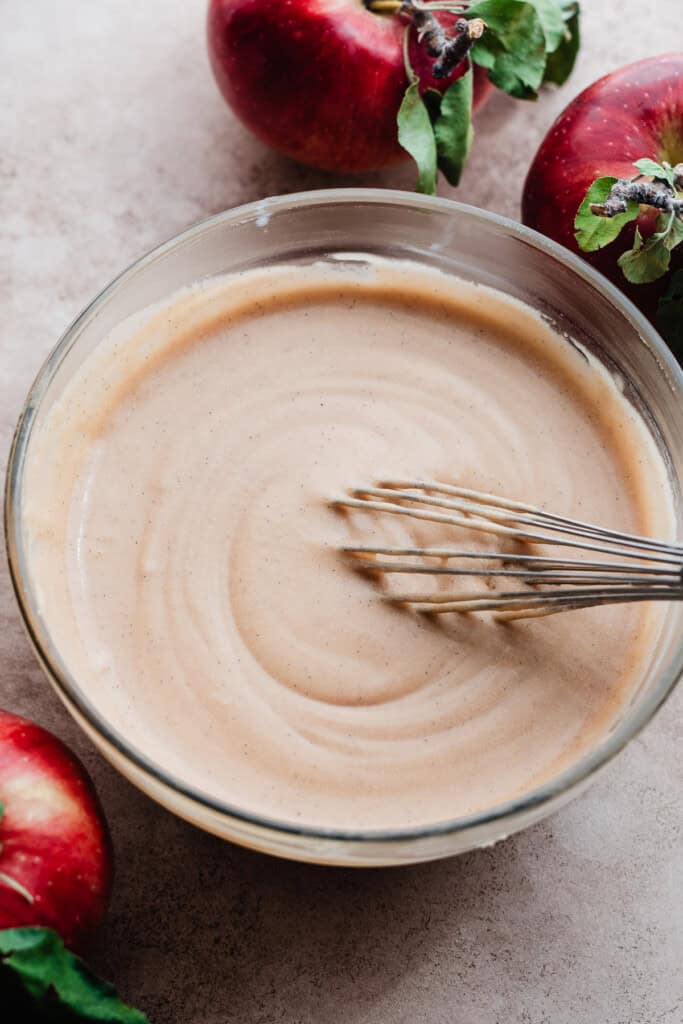
- Silky Apple Cider Glaze – A luscious glaze made of melted butter, powdered sugar, reduced apple cider (for concentrated flavor!), and vanilla drenches the hot fritters. It’s pure fall bliss!
Ingredient Overview:
As always, the full recipe with measurements & directions can be found in the recipe card at the bottom of this post. Use the table of contents (back at the top, below the first image, to navigate).
- Butter – I always use salted buter because in my experience, it lends the best flavor, but feel free to use unsalted butter if that’s what you prefer.
- All-purpose flour – Spoon your flour into the measuring cup, then level it with a flat utensil for best results, or use a scale. Scooping the measuring cup directly into your flour will lead to too much flour, and a potentially dry bake.
- Instant Yeast – We’re using instant yeast instead of active dry yeast here – it essentially just saves you a step of proofing your yeast before mixing up the dough.
- Eggs – Use large eggs, at room temperature.
- Apples – Use a firm apple here – any apple that’s good for baking will work! I personally like to mix about 2/3 honeycrisp and 1/3 granny smith. The granny smith apples are tart so they keep things from being too sweet, but I find that if you use all granny smith it’s too tart. Don’t use McIntosh – they’re too soft and aren’t a good baking apple – save them for homemade applesauce!
- Apple Cider – We’re using boiled apple cider for a concentrated apple flavor in the glaze. You can buy boiled cider online or possibly at your local apple orchard. Or, you can reduce your own apple cider (which doesn’t feel super worth it in this case, since it would take a bit of time even to get just 2 tablespoons). In a pinch, just use 2 tbsp of fresh apple cider, and you can even replace the milk in the glaze with more apple cider if you couldn’t get the boiled kind. You can also use apple cider concentrate in my Apple Cider Cookies and my Apple Cider Donuts.
Recipe Substitutions & Variations:
- Gluten-free – I have not tested a gluten-free version of this recipe.
- Dairy-free – I have not tested a dairy-free version of this recipe but I suspect using something like oat milk and a dairy-free butter would work fine. However, I want to be clear that I have not tried it myself.
How to Make Homemade Apple Fritters:
Step 1: Make the Dough. In a large bowl, stir together milk, yeast, egg, sugar, flour, cinnamon, and salt to form a shaggy dough. Knead this on a floured counter for a few minutes to smooth it out, then let it rise for about an hour, or until doubled in size.


Step 2: Make Apple Filling: While the dough rises, make your apple filling. Cook peeled and chopped apples with butter, brown sugar, and spices until they’re soft and caramely.
Step 3: Stuff the Dough with Apples. Once the dough is ready, gently work it into a rectangle with your hands – you don’t even need a rolling pin for this! Spread 2/3 of the apple mixture on the dough, leaving a border around the edge.
Fold the bottom half up and then fold the top half down, like you’re folding a letter. Add the remaining apples, and fold like a letter again, but this way work horizontally instead of vertically. Gently flatten the dough back out a bit. See photos below.


Step 3: Form the Fritters. Slice the dough into 24 (ish) squares, then press those squares together to form 8 fritters. Make sure you press the dough pieces together well, so they don’t fall apart when you begin frying them.

The image below left is the fritters, assembled. The photo below, right shows how the fritters will expand and be a bit larger if you refrigerate them, assembled, for 24 hours before frying.

How to Fry Apple Fritters:
Step 4: Keeping the frying oil at a consistent temperature is the most important factor in making apple fritters, or any fried donuts. Heat the oil to 365 degrees F, using an instant read thermometer![]() .
.
This is the one piece of equipment you do need for this recipe. If the oil isn’t hot enough, the dough won’t fry properly, and if it’s too hot, they’ll burn on the outside and be raw on the inside. Not a fun situation!

Use a digital instant read thermometer so you can easily see the temperature of the oil at any moment. Keeping the temperature relatively steady is key to ensuring your fritters are cooked!
Set the fritters on a cooling rack over a paper towel lined sheet pan as they are done frying, so the excess oil can drain. Once they’re cool enough to touch (but still warm) dunk them in the glaze.

Step 5: Make the Glaze. Melt the butter in a small bowl, then whisk in powdered sugar, apple cider concentrate, vanilla, milk, and a pinch of cinnamon and salt. Dunk the hot apple fritters in this luscious glaze!

Serving + Storing:
And now, we enjoy this fall bliss! I wish I could transmit the smell of these fresh Homemade Apple Fritters to you through the screen, but you’ll just have to make them and experience it for yourself.
These are, as with most fried treats, best while they’re still warm and freshly dunked in glaze. However, leftovers can be stored in the fridge for 1-2 days, reheating in the microwave until warm and melty. The recipe card and FAQs below also contain make-ahead tips!

Expert Baking Tips:
- Kitchen Scale – A food scale is the best way to make sure your flour is at the proper weight, since amounts will vary SO widely based on how you measure it, as well as the measuring cup you use, as they are not standardized.
- Read the Recipe – These are truly not difficult to make at home, but they do have more steps than your average recipe. To ensure success, I highly recommend reading through the recipe completely before beginning so you are prepared.
FAQs:
Yes, you can! The apple filling and maple glaze can both be made 1-2 days ahead and then warmed when ready to use. The complete apple fritters can also be made through the assembly step, then refrigerated on parchment paper and covered tightly in plastic wrap for up to 24 hours before frying. Let the fritters come to room temperature on your counter for 1 hour before frying them.
Yes! This recipe works beautifully whether you halve it, double it, or leave it as is. I recommend doubling it so you get 16 fritters – perfect for a party!
It’s totally normal for a few apple pieces to pop out during the frying process. Scoop them out and place them with the cooked fritters. They’ll still taste delish! If you have a lot of apples falling out, or if the fritters fall apart, they weren’t smushed together tightly enough.
This happens when the fritters haven’t been tightly formed. Really spend a good 5-10 minutes here, working the dough into a semi-tight disc that holds together. Press down any loose flaps of dough until it seems sealed up. See photos above for reference!

Special Tools:
- Dutch Oven – You’ll need a deep, heavy duty pot for frying. I recommend a dutch oven – I’ve had this one for years and love it! It’s perfect for baking bread in or making soup in, as well.
- Instant Read Thermometer – You absolutely must have an instant read thermometer for this recipe. It’s crucial for ensuring your frying oil is at the correct temperature.


More Apple Recipes to Love:
- Caramel Apple Cake
- Caramel Apple Cider Cookies
- Salted Caramel Apple Galette
- Cranberry Apple Crisp
- Salted Caramel Apple Pie Bars
- Caramel Apple Crumb Cake
- Apple Cider Old Fashioned Cocktails
- Apple Pie Cinnamon Rolls
Did you make this recipe? Leave a comment & star rating!
Click the little stars in the header of the recipe card below to leave a comment & star rating, letting me know how you liked the recipe. I take all feedback seriously, & leaving a rating helps my small business immensely!
Homemade Apple Fritters with Apple Cider Glaze
Ingredients
For the Fritter Dough
- 1/2 cup milk, 116 mL
- 1 tsp instant yeast
- 2 tbsp granulated sugar, 26 grams
- 2 tbsp salted butter, melted, 28 grams
- 2 tsp vanilla extract
- 1 large egg, at room temperature
- 1/4 tsp salt
- 1 and 3/4 cups + 1 tbsp all-purpose flour, 234 grams
- 1/2 tsp cinnamon
- 1/4 tsp nutmeg
- plenty of vegetable oil, for frying
For the Caramelized Apples
- 2 large apples, peeled, cored, & diced, Use something that's firm and good for baking like a mix of Honeycrisp & Granny Smith. 300 grams chopped, or 2 and 3/4 cups, or 10.4 ounces
- 1 tbsp salted butter
- 3 tbsp light brown sugar, packed, 36 grams
- 1/2 tsp lemon juice
- 3/4 tsp cinnamon
- 1/4 tsp nutmeg
- 1/8 tsp allspice
- 1/8 tsp ground cloves
- pinch of salt
- 1/2 tsp corn starch
- 1/2 tsp water
For the Apple Cider Glaze
- 4 tbsp salted butter, melted, 57 grams
- 1 and 1/2 cups powdered sugar, 173 grams
- 3 tbsp apple cider concentrate, also called boiled apple cider – see note below!
- 2 tsp vanilla extract
- 1-2 tbsp milk, as needed, to thin the glaze out
- pinch of cinnamon
- pinch of salt
Instructions
- Prep: Get out a large heavy-bottomed pot (like a dutch oven) for frying. Add vegetable oil until the pot is halfway full (you want at least 4-5 inches of oil, in my experience). Don't start heating it yet. This recipe is not as hard as you may think – but do read through the directions once before beginning so you are prepared. Line a baking sheet with paper towels, place a cooling rack on top, and set this next to the stove where you'll be frying your fritters later.plenty of vegetable oil, for frying
- Make the Fritter Dough: Measure out the milk and microwave it in 15 second intervals until it's about 110℉. You can test it with the same thermometer you'll be using to fry the dough. If it's within 5ish degrees either way, that's fine.Add all dough ingredients, except the flour & spices, to a large bowl and whisk together. Stir in the flour and spices last. You will have a wet, shaggy looking dough (see photos in the post above). Flour the counter and your hands well – dump the dough out and knead it gently for 1-2 minutes, to smooth it out. Form it into a ball. Spray the same mixing bowl (no need to clean it) with cooking spray, place the dough ball in it, cover with a kitchen towel, and let rise until doubled in size, about 1 hour. Note: Rise time may be a tad longer on cold days, and a tad shorter on warm days – but go by the appearance over the time.1/2 cup milk, 1 tsp instant yeast, 2 tbsp granulated sugar, 2 tbsp salted butter, melted, 2 tsp vanilla extract, 1 large egg, at room temperature , 1/4 tsp salt, 1 and 3/4 cups + 1 tbsp all-purpose flour, 1/2 tsp cinnamon, 1/4 tsp nutmeg
- Make the Caramelized Apples: While the dough rises, make the apples. Add the butter to a medium nonstick pot on the stove, and melt. Once melted, add the rest of the apple filling ingredients except the corn starch & water. Cook over medium high heat, stirring, for about 8-10 minutes – or until the apples are tender and the mixture has caramelized. If there's a lot of liquid, stir together cornstarch and water in a small bowl until dissolved, and stir into the apples over medium high heat. Cook for 1 minute or so until the juices thicken up. Remove from heat and set aside.2 large apples, peeled, cored, & diced, 1 tbsp salted butter, 3 tbsp light brown sugar, packed, 1/2 tsp lemon juice, 3/4 tsp cinnamon, 1/4 tsp nutmeg, 1/8 tsp allspice, 1/8 tsp ground cloves, pinch of salt, 1/2 tsp corn starch, 1/2 tsp water
- Assemble the Fritters: Photos for these steps are all included in the blog post above. BEGIN HEATING YOUR FRYING OIL OVER MEDIUM-HIGH HEAT AT THIS POINT. You want it to reach 365℉, and this will take a little bit. Once the dough has risen, flour your counter and gently pat the dough out into a rectangle that's a little less than 1/2 inch thick. Spread 2/3 of the apple mixture onto the dough, leaving a 1-inch border around the edge. Fold the bottom third of the dough up, and then fold the top third of the dough down onto the bottom third, like you're folding a letter. Gently pat the dough back out until it's about 3/4 inch thick. Add the remaining 1/3 of the apple mixture, and fold into thirds from side to side this time, instead of from top to bottom. Gently press the dough out one last time to about 3/4 inch thick. (See step-by-step photos above in the blog post.)Spray a large kitchen knife well with cooking spray. Slice the dough into 24 squares – wiping the knife and re-spraying between as necessary so the dough doesn't stick. Using well-floured hands, gather the pieces into 8 mounds, and gently work them into rough balls, tucking the apples in as best you can. These should NOT be perfect balls – they should be lumpy and bumpy and odd – that's part of the charm of apple fritters! We're mainly just trying to get the dough to hold together into 1 mound, with the apples tucked in so they don't all fall out when we fry them. Let these balls rest for 15 minutes.
- Fry the Fritters: Check that your oil is heating – you can turn up the heat if it's going too slowly. Be careful – the oil will be VERY hot. Once the oil is at 365℉, keep your burner at medium heat, and fry the first fritter as a test, for 90 seconds on each side, using a metal slotted spoon or spatula to transfer it in and out of the hot oil. It should turn a nice deep shade of golden brown. Place on your rack and use the instant read thermometer to check the temp in the center of the thickest part of the fritter – it should be around 212 to 220 degrees inside. If it's raw dough in the middle, you'll see some raw dough on the point of the thermometer. Check that your oil is between 345℉ and 365℉ and add the fritter back in for 10-30 more seconds, until it reaches temp. Remember to adjust the heat as needed. Adding the friters will lower the temp of the oil a bit, so continue to check it throughout.Continue with the remaining fritters, 2-3 in the pot at a time, frying for 90 seconds on each side, until deep golden brown, making sure to keep an eye on the oil temp, and adjusting the burner heat as necessary to keep it constant. That's the main thing to keep in mind with frying donuts or fritters – if the heat is too low, they won't fry properly, and if it's too high, they'll burn quickly on the outside while remaining raw on the inside.
- Make the Glaze: Melt butter in a medium bowl, then whisk in the remaining glaze ingredients. Taste and adjust as desired.4 tbsp salted butter, melted, 1 and 1/2 cups powdered sugar, 3 tbsp apple cider concentrate, 2 tsp vanilla extract, 1-2 tbsp milk, pinch of cinnamon, pinch of salt
- Glaze the Fritters: As soon as the fritters have cooled just enough to handle, dunk them in the glaze, and place on a cooling rack over a parchment-lined baking sheet. You can scrape the excess glaze that falls off back into the bowl and re-use it.
- Serve + Store: Enjoy immediately! Apple Fritters are best when fresh and warm! They won't be as good the next day, but you can store any leftovers (if you have any, hehe) in an airtight container in the fridge for 1-2 days. Reheat gently in the microwave until warm and melty again.
- Make-Ahead Tips: Glaze: The glaze can be made 1-2 days ahead and refrigerated in an airtight container. Gently microwave to bring it back to dunking consistency.Apples: The apples can be prepared 1-2 days ahead and refrigerated until ready to use. Gently reheat so they're lukewarm before adding to the dough.Fritters: The fritters can be assembled completely, but if you want to make them ahead, don't fry them yet. Place the assembled fritters in a parchment lined airtight container and refrigerate for up to 24 hours before frying. Let them come to room temperature on your counter for 1 hour before frying.
Notes
Nutrition
Nutrition information is automatically calculated, so should only be used as an approximation.

Looks perfect for an autumn day !
Thanks, Mark!
Oh my word, I’m so making these asap! They sound and look astounding!
Katie xoxo
I love the sound of this recipe, anything with apple, yes please but could I bake these instead of frying? I know they will probably not taste as good but I would like to give them a try in the oven.
Hi Ramona! I have no idea how these would turn out if you baked them since I’ve never tried it. If you do try it, know that the recipe may not turn out at all. If it does work out though, let me know! 🙂