This post contains affiliate links. Please see our disclosure policy.
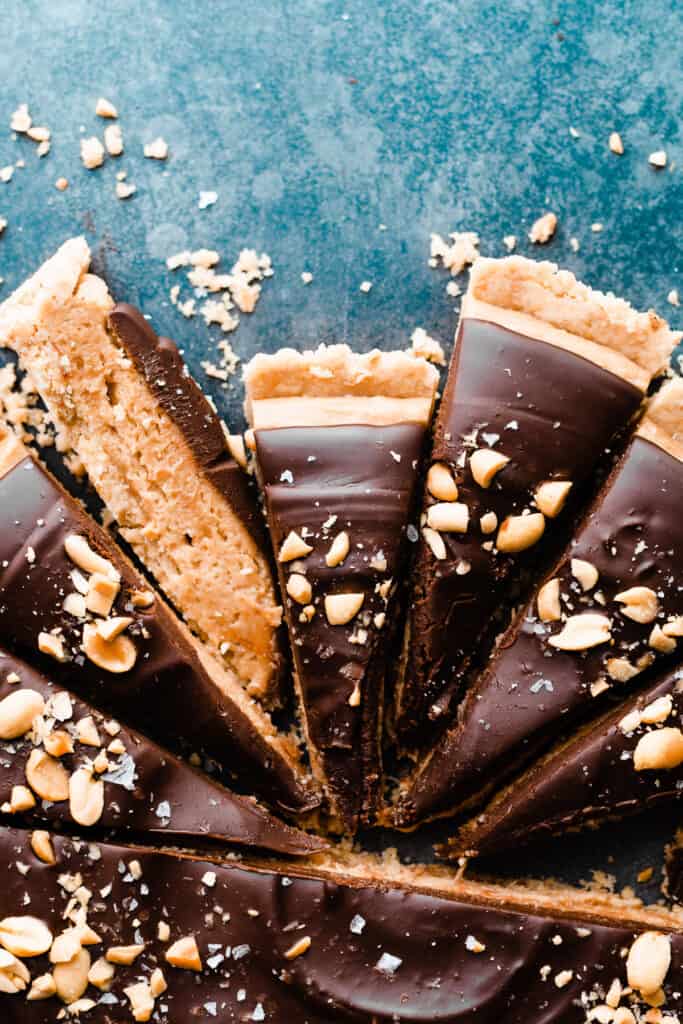
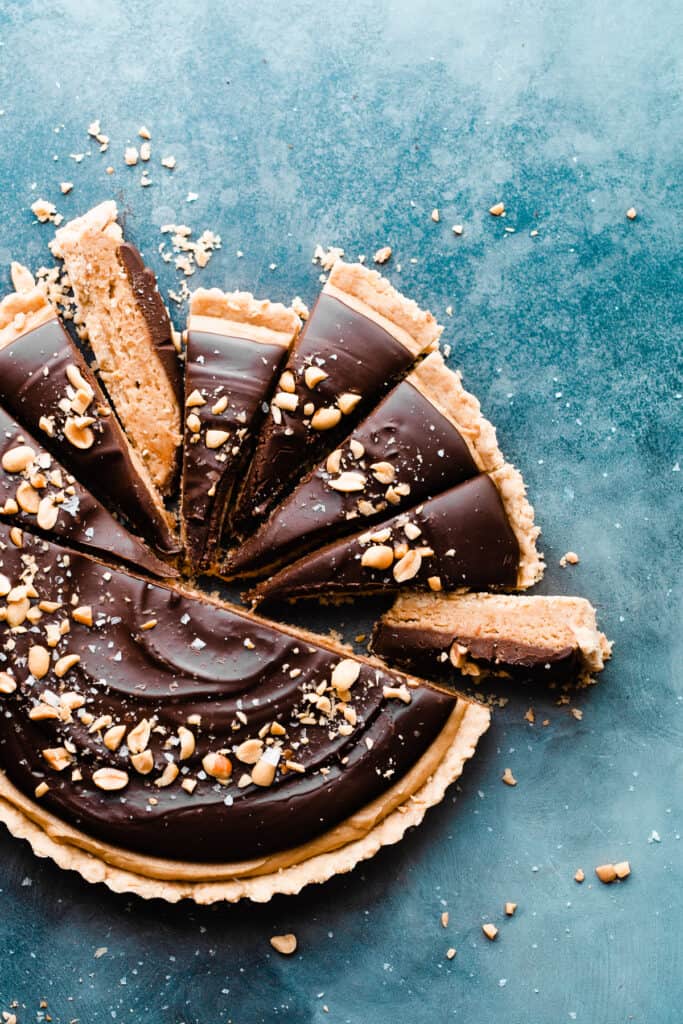
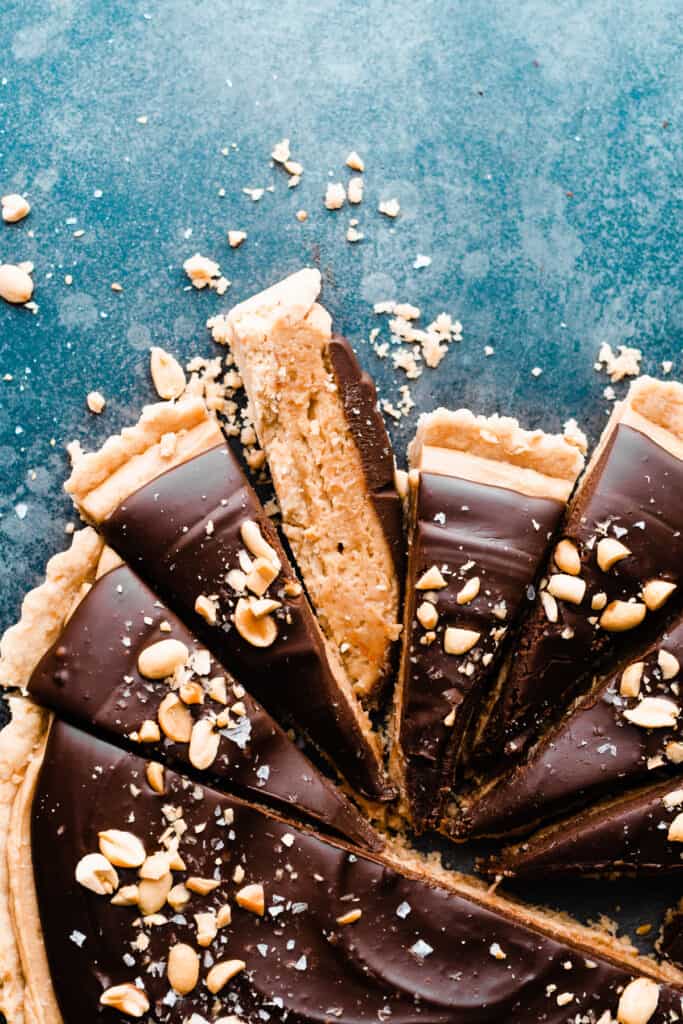
Peanut Butter Chocolate Tart is a restaurant-level dessert that will wow anyone you serve it to! Made with a salty peanut crust, luscious peanut butter mousse, and silky chocolate ganache. Top it with a shower of crushed peanuts & flaky sea salt. It’s a salty-sweet lover’s dream dessert and tastes like a giant, fancy peanut butter cup!

This recipe comes from my cookbook, “The One-Bowl Baker” out in February 2022. Pre-order info and more sneak-peaks of the book can be found here.
Table of Contents
Why you’ll love this Salted Chocolate Peanut Butter Tart:
- Chocolate & Peanut Butter – The classic combo of sweet chocolate with salty peanut butter is irresistible.
- Luscious Peanut Butter Filling – Peanut butter is blended with homemade whipped cream and cream cheese for a filling that’s creamy, and light.
- Chocolate Ganache – A thick and silky ganache covers this decadent dessert.
- Peanut Crust – The salty, crisp crust is the perfect contrast to the filling & topping.
Ingredient Overview:
As always, the full recipe with measurements & directions can be found in the recipe card at the bottom of this post. Use the table of contents (back at the top, below the first image, to navigate).
- Peanuts – I like to use lightly salted cocktail peanuts to make the crust and for sprinkling on top of the tart.
- Peanut Butter – Use creamy peanut butter (not natural peanut butter) for the smoothest filling.
- Butter – I always use salted butter because in my experience, it lends the best flavor, but feel free to use unsalted butter if that’s what you prefer.
- All-purpose Flour – Spoon your flour into the measuring cup, then level it with a flat utensil for best results, or use a scale. Scooping the measuring cup directly into your flour will lead to too much flour, and a potentially dry bake.
- Heavy Cream – We’re using heavy cream to make whipped cream for a light filling, and to make the ganache topping.
- Cream Cheese – Use the block-style full fat cream cheese, softened at room temperature.
- Vanilla Extract – Use real vanilla extract for best results.
- Semi-sweet Chocolate – I suggest using a high-quality baking chocolate bar like Baker’s, Ghirardelli, Lindt, etc. to make the ganache. Chocolate chips don’t work as well because they have stabilizers that prevent them from melting to the right smooth consistency.
- Flaky Sea Salt – Finish the tart with a generous sprinkling of flaky sea salt for a great bit of texture and to really compliment the sweet flavors of the filling and ganache. Plus, it looks so fancy!
Recipe Substitutions & Variations:
- Gluten-free – I haven’t made this as a gluten-free recipe, but in theory you should be able to swap all-purpose flour in the crust with a cup-for-cup gluten-free flour.
- Dairy-free – I have not tried a dairy-free version of this recipe, but you could swap your favorite trusted dairy-free alternatives if you want to give it a try.
- Oreo Crust – Need more chocolate? Replace the salted peanut tart crust with a quick and easy oreo cookie crumbs crust.
- Nut Allergy – Swap peanut butter with sunflower butter to make the creamy filling nut-free. Use this cookie crust from my s’mores tart recipe to make a tart crust without peanuts.
How to Make a Salted Chocolate Peanut Butter Tart:
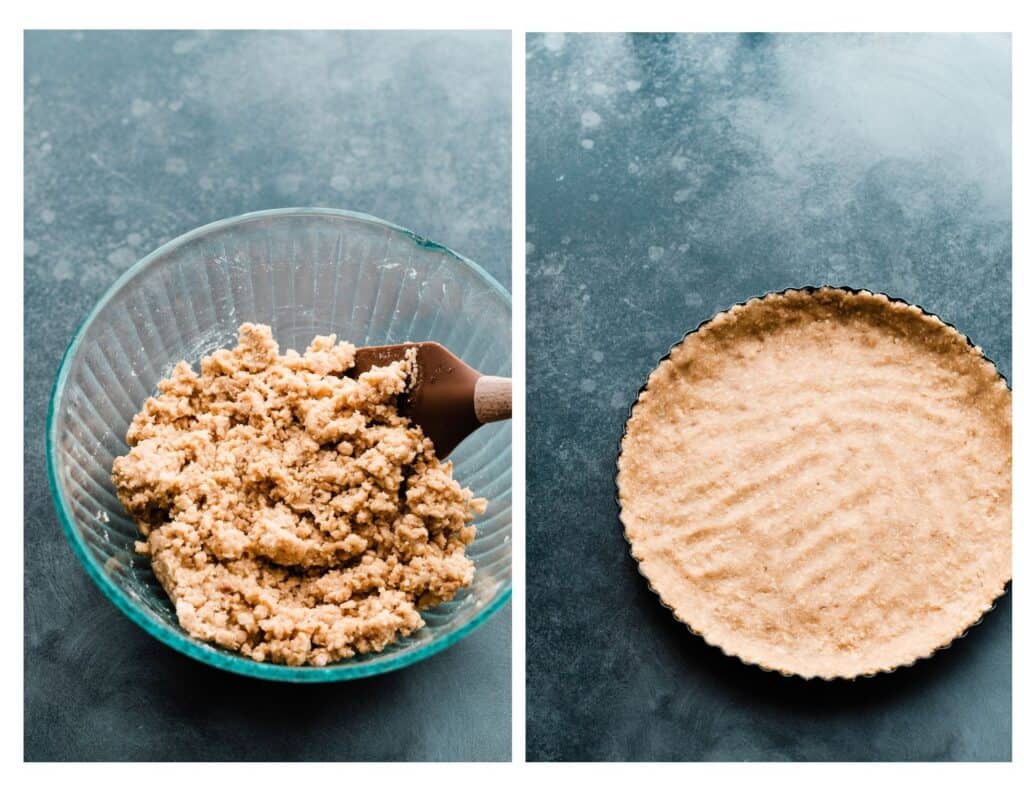
Step 1: Make & Bake the Crust. Stir together crushed peanuts, melted butter, sugar, flour, and a pinch of salt and baking powder in a medium bowl. Press into a well-greased tart pan.
(You can also use a 9-inch round cake pan, however, using a tart pan makes it much easier to serve + slice the tart later on.) Bake for 9 minutes, and set it aside to cool.
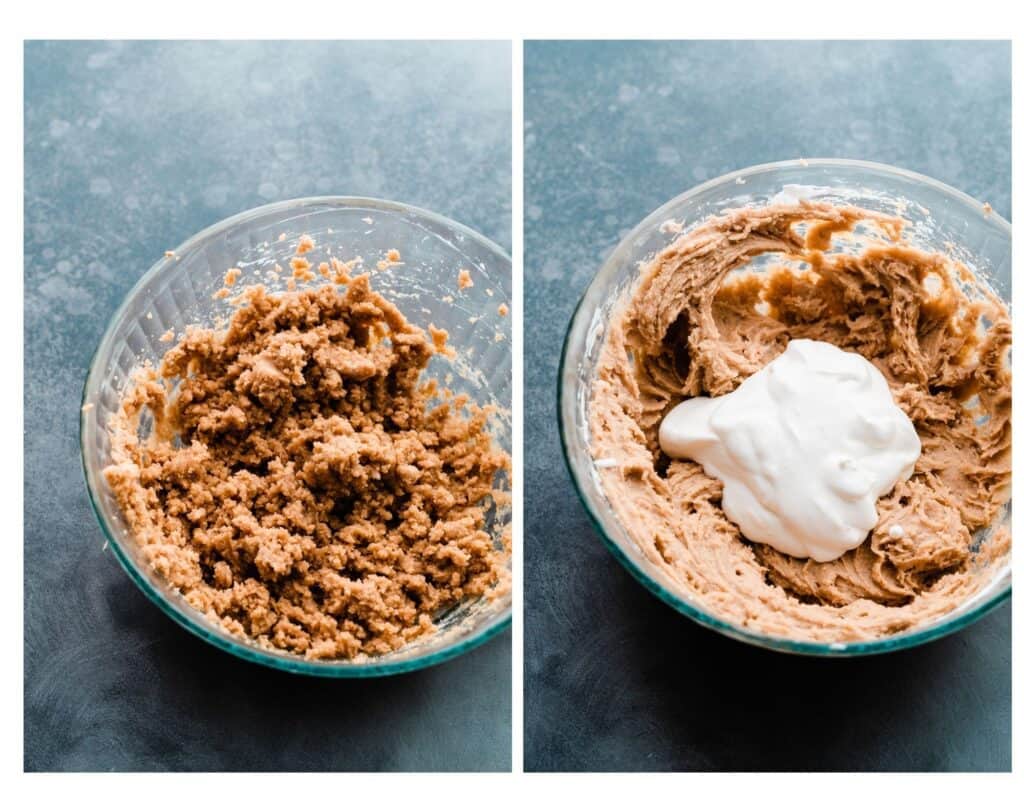
Step 2: Make the Filling. In a large bowl, beat heavy cream until soft peaks form, then scrape the whipped cream back into the 1 or 2 -cup glass measuring cup you used to measure it out in. This is one of my tricks to keep this recipe from using more dishes than you need to!
In the same bowl, cream together your filling ingredients until you have a mixture that looks a bit like a crumbly cookie dough – like the below left photo. Next we’ll beat a little bit of the whipped cream in.
And then, we’ll fold the rest in. Remember that the point of folding is to maintain all the air we whipped into the heavy cream – use a silicone spatula and scrape down to the bottom of the bowl, and then around over the top of the filling. Continue doing this until the whipped cream is all incorporated.
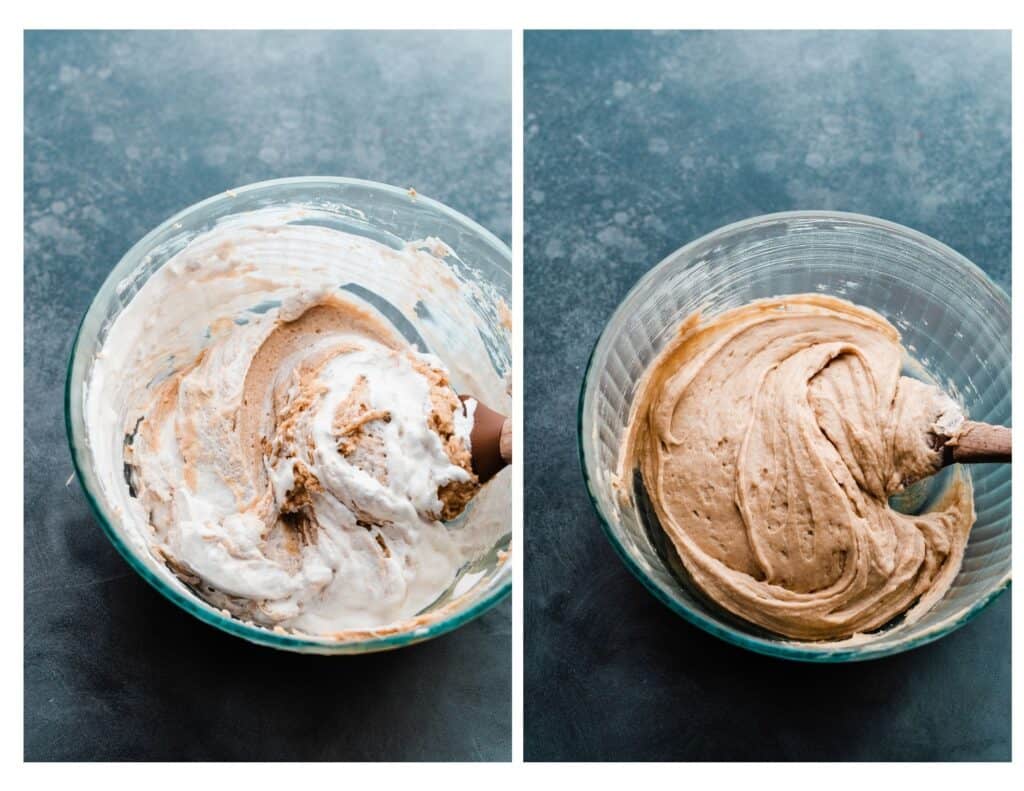
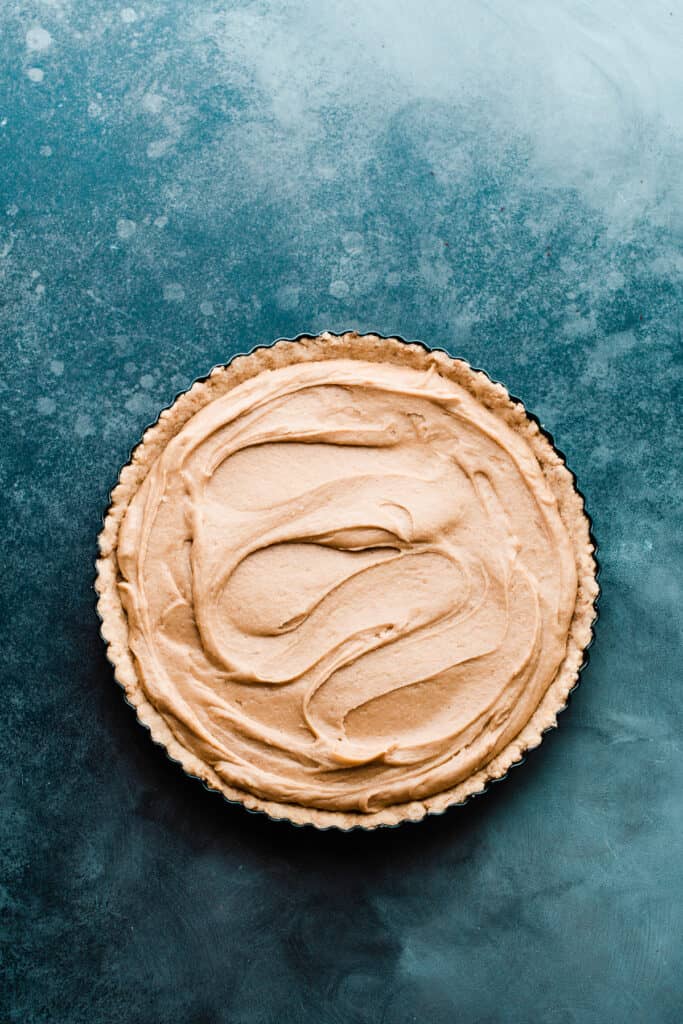
Spread this creamy dreamy filling into your baked and cooled crust, and pop it in the fridge to chill for a bit while you mix up the chocolate ganache topping.
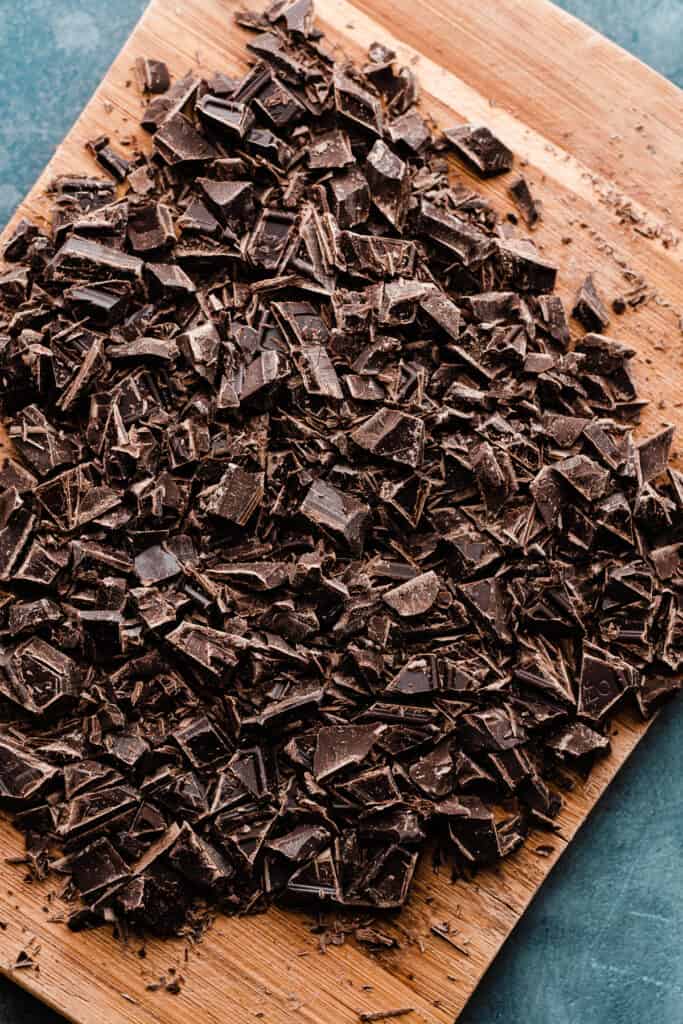
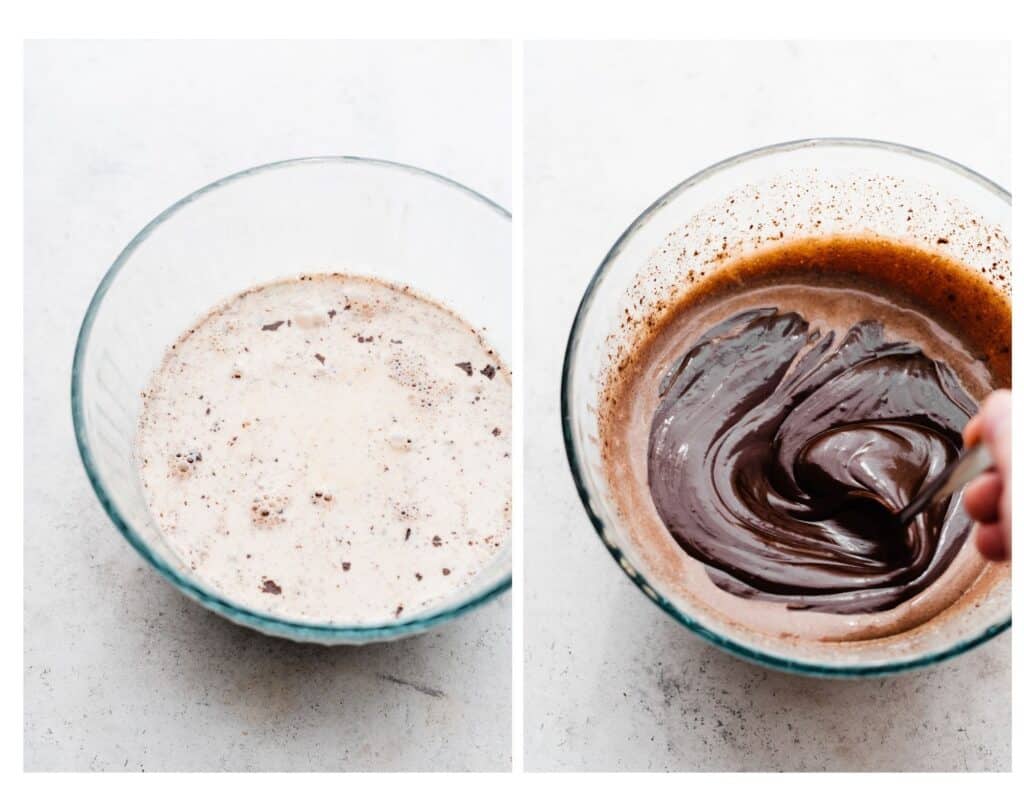
Step 4: Make the Chocolate Ganache. Chop your chocolate very finely (I could’ve gone even a bit smaller here) and pour simmering heavy cream over it.
Stir the chocolate until it’s completely smooth. If you have a few lumps left, microwave for 5-10 seconds at a time until smooth.
Serving + Storage
Let the tart chill in the fridge for at least 6 hours or overnight before serving. Now for the really fun part – decorating it! Add a flurry of crushed peanuts and flaky sea salt (the salt is best added after chilling) for a beautiful finish.
Store leftovers in an airtight container in the fridge for up to 5 or 6 days. Make my No-Chill Peanut Butter Cookies or my Peanut Butter Cheesecake next time a PB craving hits!
Expert Baking Tips:
- Oven Thermometer – An oven thermometer will tell you if your oven is actually running at the temperature you set it to. Your oven may not be accurate. Accurate oven temperature is crucial for most bakes, so I leave an oven thermometer in at all times to keep an eye on my oven’s calibration.
- Kitchen Scale – A food scale is the best way to make sure your flour is at the proper weight, since amounts will vary SO widely based on how you measure it, as well as the measuring cup you use, as they are not standardized.
- Cool the Crust – The tart crust needs to cool completely before adding the peanut butter mousse. Otherwise the filling will melt.
- Simmer, Don’t Boil – Heat the heavy cream to a light simmer without letting it boil or scald.
- Make Ahead – Since this dessert does need about 6 hours in the fridge to properly chill and set up, it’s a wonderful make-ahead option. You can make it 1 to 2 days ahead and keep it covered in the fridge.
FAQs:
They are almost opposites flavor-wise, but not so much that they clash… The nutty, savory and salty taste of peanut butter is great to pair with sweet chocolate! Together the peanuts aren’t too salty, and the chocolate isn’t too sweet. It’s the perfect match!
Pies have deep sidewalls of crust. This chocolate peanut butter tart has a full bottom crust, but the crust and filling are not as thick as a pie.
I haven’t personally tried scaling this recipe up or down, but my best guess is that a half batch would fit in a 6-inch cake pan, and a double batch would fill a 9×13 pan.
Special Tools:
- Tart Pan – I like to use a tart pan here because the removable bottom makes it easier to cut and serve neat slices, but you can, of course, use a 9-inch cake pan if that’s what you have!
- Food Processor – Use a food processor to quickly chop the peanuts into fine bits. You can also use a sharp knife and a cutting board if you don’t have a food processor.
More Peanut Butter Desserts:
- Peanut Butter Cup Stuffed Blondies with Peanut Butter Frosting & Chocolate Ganache
- Giant Peanut Butter Cup and Chocolate Chip Cookie Skillet
- Amazing No-Bake Peanut Butter Pie
- Bakery-Style Peanut Butter Chip Chocolate Cookies
Did you make this recipe? Leave a comment & star rating!
Click the little stars in the header of the recipe card below to leave a comment & star rating, letting me know how you liked the recipe. I take all feedback seriously, & leaving a rating helps my small business immensely!

Salted Chocolate Peanut Butter Tart
Ingredients
For the Salted Peanut Crust
- 1½ cups peanuts , I use the lightly salted cocktail type
- 1/2 cup salted butter , 113 grams
- 3/4 cup all-purpose flour, spooned & leveled or weighed out , 98 grams
- 1/8 tsp salt
- 2 tbsp granulated sugar, 26 grams
- 1/2 tsp baking powder
For the Peanut Butter Filling
- 3/4 cup cold heavy cream, 180 grams
- 4 ounces cream cheese, softened at room temperature, Use the full fat, block-style – 113 grams
- 1 cup creamy peanut butter, 250 grams
- 1/2 cup granulated sugar, 105 grams
- 2 tsp vanilla extract
- 1/2 tsp salt, plus an extra pinch
For the Chocolate Ganache
- 8 ounces semi-sweet chocolate, finely chopped, 226 grams
- 1 cup heavy cream, 240 grams
For Decorating
- handful of salted peanuts, as desired
- pinch of flaky sea salt, as desired
Instructions
- Prep: Preheat the oven to 350°F (180°C). Spray a round 9-inch tart pan or cake pan with nonstick spray. I like to use a tart pan here because the removable bottom makes it easier to cut and serve neat slices, but you can, of course, use a cake pan if that’s what you have!
- Make the Crust: Pulse the peanuts in a food processor just until they’re finely chopped. Don’t let it run too long or you’ll make peanut butter! Melt the butter in a medium mixing bowl. Stir in the crushed peanuts, flour, salt, sugar & baking powder. Scrape the bowl really well to get all the crust bits out, and press the crust mixture evenly into and up the sides of the tart pan. Bake for 9 minutes. Set aside to cool completely while you make the filling.1½ cups peanuts , 1/2 cup salted butter , 3/4 cup all-purpose flour, spooned & leveled or weighed out , 1/8 tsp salt, 2 tbsp granulated sugar, 1/2 tsp baking powder
- Make the Filling: Give the medium mixing bowl a quick wipe with a kitchen towel if there are still crust pieces in it. Measure the cold heavy cream into the bowl using a 1 or 2-cup glass measuring cup. Beat the heavy cream with an electric mixer on high speed just until softly whipped—we’re not going for stiff peaks here. Pour the softly whipped cream back into the measuring cup you used to measure it. Pop this in the fridge while you finish making the filling. Add the cream cheese to the same bowl, and beat on high speed until creamed. Add the peanut butter, sugar, vanilla and salt, and mix until well combined. Add about one-third (just eyeball it) of the whipped cream into the bowl with the filling, and beat in on low until just combined. Add the rest of the whipped cream, and gently fold it in with a silicone spatula until it’s completely combined. If the crust is still cooling, cover the bowl with a kitchen towel and pop in the fridge until the crust is completely cooled. Spread the peanut butter filling into the cooled crust and smooth it out. Pop in the fridge while you make the ganache.3/4 cup cold heavy cream, 4 ounces cream cheese, softened at room temperature, 1 cup creamy peanut butter, 1/2 cup granulated sugar, 2 tsp vanilla extract, 1/2 tsp salt, plus an extra pinch
- Make the Chocolate Ganache: Add the chopped chocolate to a small bowl. Add the heavy cream to a small pot and bring to a simmer. Pour over the chocolate, and let sit for 5 minutes. Then, stir until everything is combined and smooth. If a few lumps of chocolate remain, microwave in 15 second intervals, stirring between each, until smooth. Let this cool for a few minutes more (you can speed this up in the fridge) so it's a bit thicker and easier to spread, and then spoon it over the tart.8 ounces semi-sweet chocolate, finely chopped, 1 cup heavy cream
- Serve and Store: Let the tart chill in the fridge for at least 6 hours or overnight before serving. Serve with a sprinkle of peanuts and flaky sea salt. Store leftovers in an airtight container in the fridge for up to 5 or 6 days.handful of salted peanuts, as desired, pinch of flaky sea salt, as desired
Notes
Nutrition
Nutrition information is automatically calculated, so should only be used as an approximation.


This looks delicious!! Just one question- is the Peanut butter a name brand type that has sugar in it, or natural style with no added sugar? Thank you!
Great question! I used a name brand with sugar in it, not a natural style peanut butter. I’ll add a note about that to the recipe. Be sure to let me know how you like this dessert! ☺️
So delicious and great peanut butter flavor! I was a bit skeptical of the amount of ganache on this at first but the peanut butter is such a strong flavor that the thick ganache layer is a perfect balance. Plus the crust is delicious in its own right!
Thanks so much, Natalie! I’m so glad you enjoyed this dessert.
This was relatively easy to make and so delicious! Definitely impressed my guests!
Thanks, Mary Ann! 🙂
A very simple, show stopper recipe! I’ve made this twice now, and it definitely won’t be the last!
Thanks so much, Vicky!