This post contains affiliate links. Please see our disclosure policy.
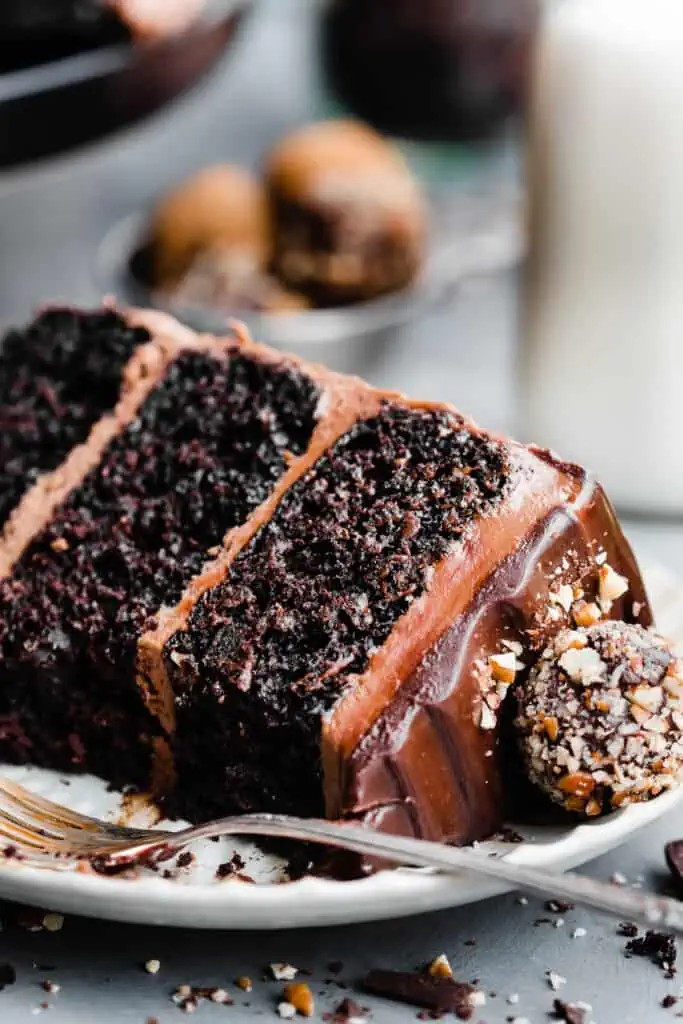
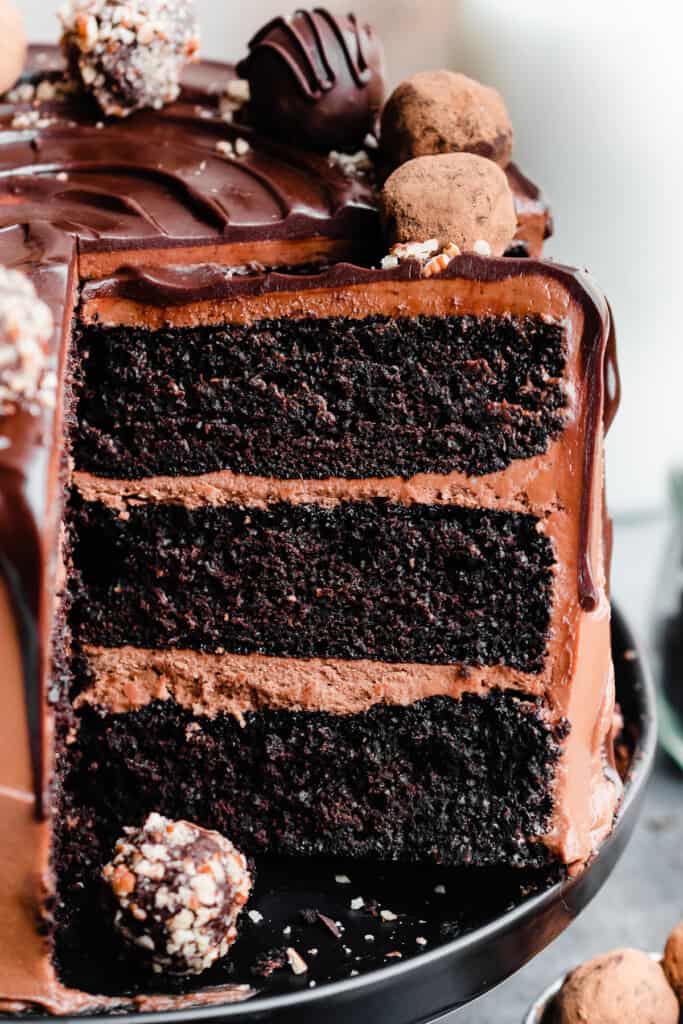
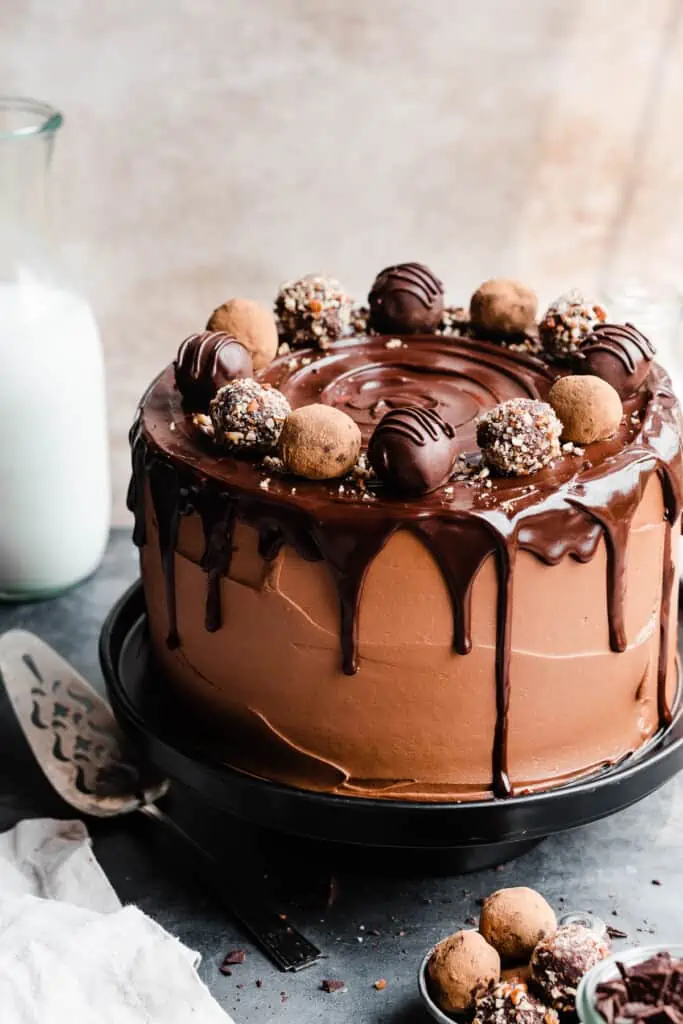
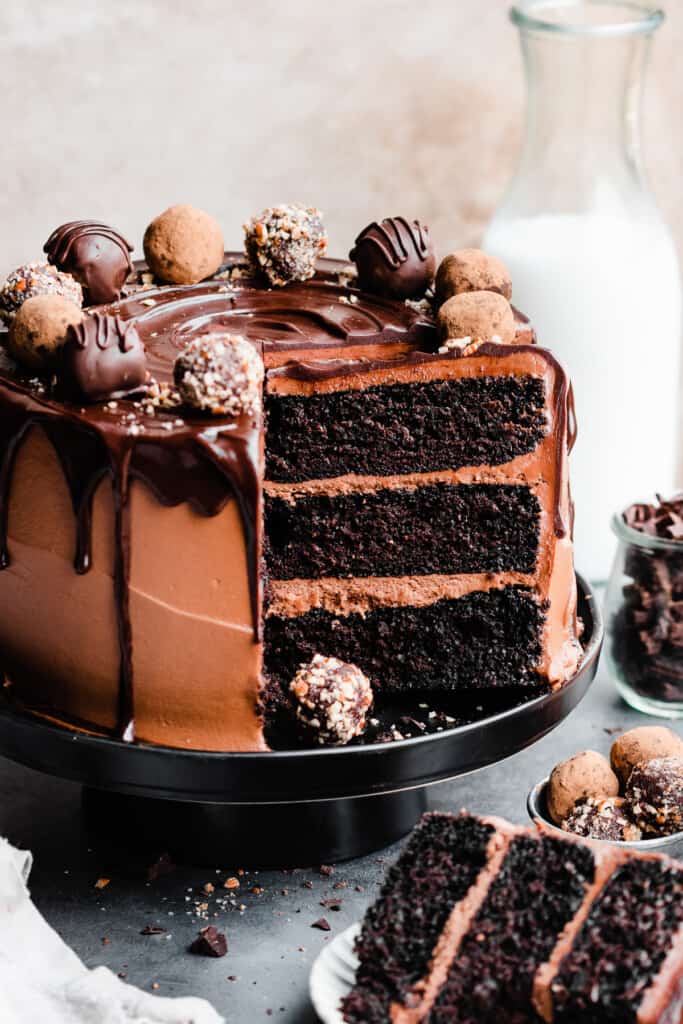
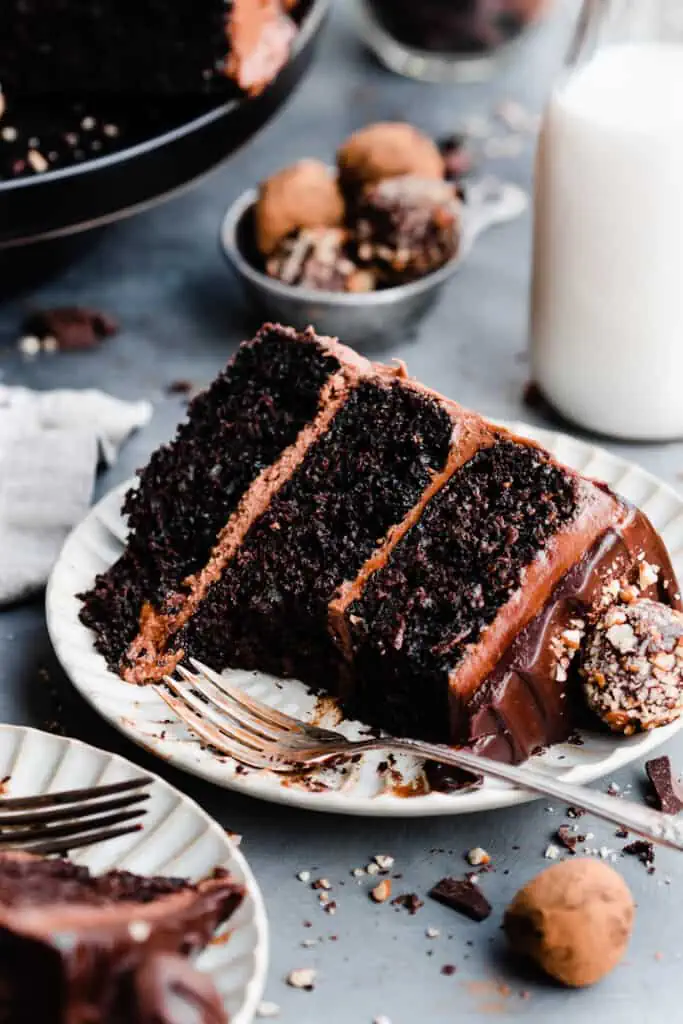
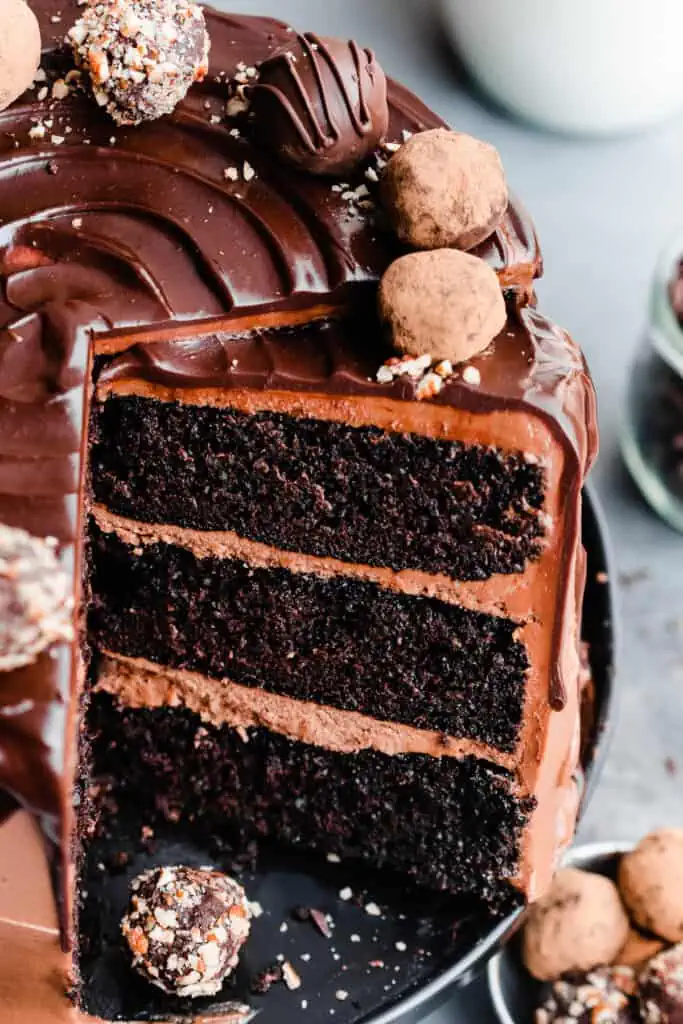
Chocolate Truffle Cake is a decadent chocolate dream! Layers of ultra moist, rich chocolate cake are slathered in milk chocolate buttercream and topped with a luscious chocolate ganache drip. Homemade chocolate truffles on top take the whole cake right over the top! There’s no better cake for a celebration than this beauty.

This cake is truly a decadent dessert, perfect for a special occasion, like Christmas, Thanksgiving, Valentine’s Day, or a birthday party. There are a few components at play here, but don’t be intimidated. I’ll walk you through each and every step in the blog post, with lots of tips & step-by-step photos. If you’re pinched for time, see my recipe variations at the bottom of the blog post for some time savers. But, this beauty is truly worth the time and effort! Let’s dive in.
Why you’ll love this decadent Chocolate Truffle Cake:
- Rich Chocolate Cake – This rich, one-bowl chocolate cake is the easiest and best chocolate cake you’ll ever make! No matter your baking skills, you can make this cake.
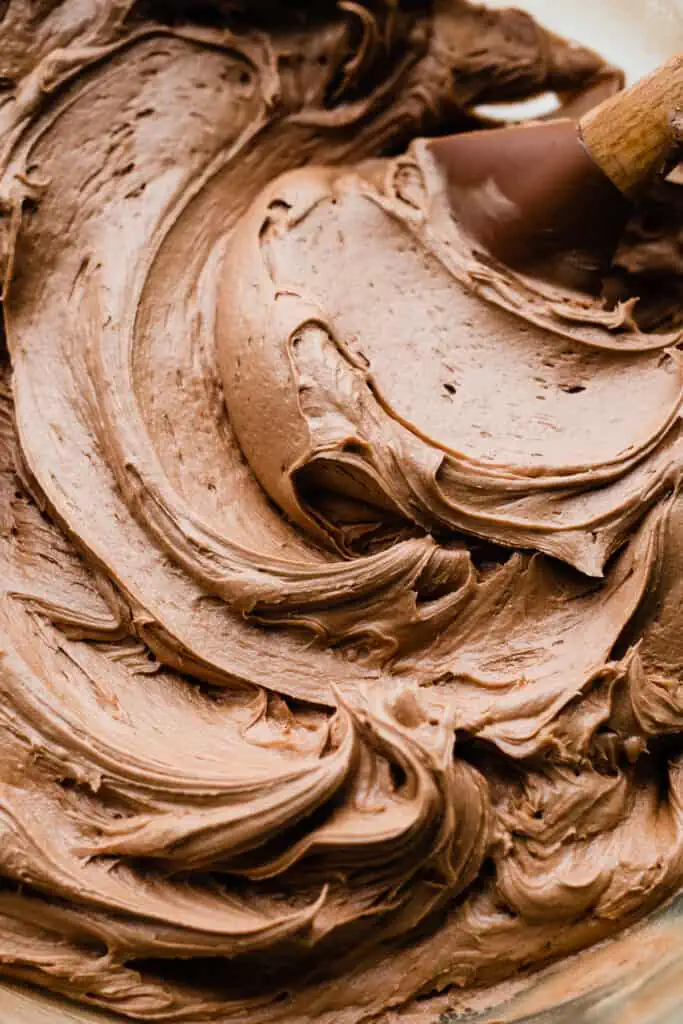
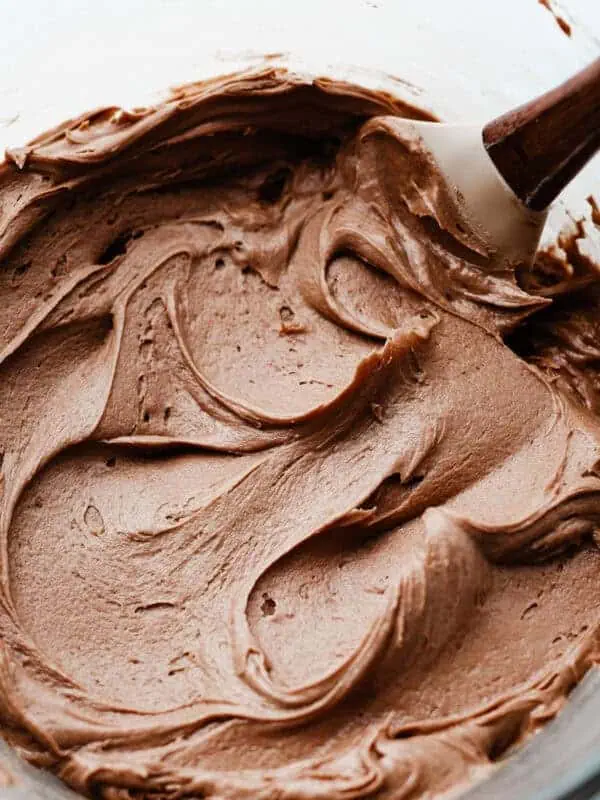
- Silky Milk Chocolate Frosting – I’ve never had a better chocolate frosting, and I’m sure you’ll feel the same. Melted milk chocolate is beaten into softened butter, with powdered sugar, a little cocoa, and cream cheese for the silkiest, most chocolatey frosting. It tastes like chocolate truffle filling!
- Chocolate Ganache Drip – Chocolate truffles are made with chocolate ganache, so adding a ganache drip to this cake gives it the full effect!
- Chocolate Truffles – Naturally, I had to top off this chocolate truffle cake with actual chocolate truffles! They’re easier to make than you might think, and take just two ingredients plus cocoa, chocolate, or nuts for dipping. They pack a big wow factor!
Ingredient Overview:
As always, the full recipe with measurements & directions can be found at the bottom of this post.
- Butter – I always use salted buter for the best flavor, but feel free to use unsalted butter if you prefer. We’re using this instead of vegetable oil in this cake to add extra richness!
- Sour Cream – Use full fat sour cream at room temperature for best results.
- Cake Flour– Cake flour produces a more tender crumb in a cake and I highly recommend using it! Spoon & level your flour for best results, or use a scale. Scooping the measuring cup directly in will lead to too much flour, giving you a dry cake. 1 cup of cake flour is 110 grams, whereas 1 cup of all-purpose flour is 130 grams.
- Cocoa Powder – Use natural cocoa powder, not dutch process.
- Milk – I always use 2% milk for baking because it’s what we already buy.
- Cream Cheese – Use full fat, block-style cream cheese.
- Heavy Whipping Cream – Also called heavy cream, this must be used for the chocolate truffles – there’s not something you can substitute for it.
Ingredient Substitutions:
- Dairy-free – Use your favorite, trusted dairy-free products to make this recipe dairy-free.
- Gluten-free – I have not tested a gluten-free version of this cake. Let me know if you do!
- Sour Cream – You can use full fat greek yogurt, at room temperature, in place of the sour cream.
- Cake Flour Substitute – Make your own cake flour by spooning & leveling 1 cup of flour into a measuring cup, using a flat edge to level it off. Add to a mixing bowl, then remove two tablespoons (scoop & level them off). Add two tablespoons of corn starch, then sift this mixture twice. This is important to evenly mix the ingredients and to give the same light texture as cake flour.
How to Make this Chocolate Truffle Cake Recipe Step-by-Step:
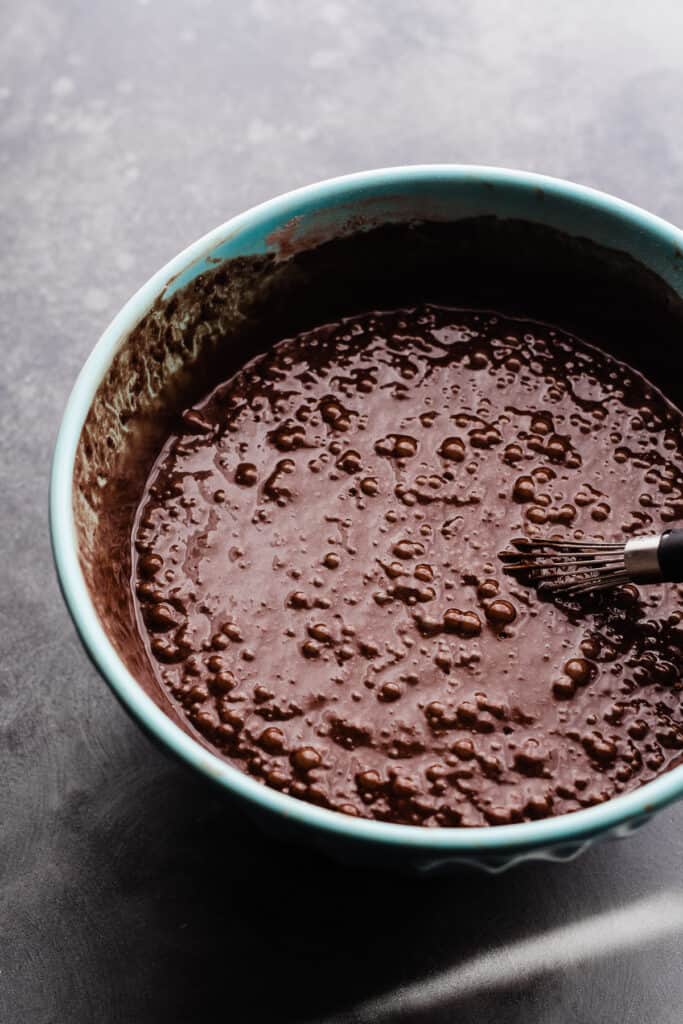
Step 1: Make the Cake Batter. Whisk together the dry ingredients, then mix in the wet ingredients until just combined. It’s the easiest chocolate cake recipe you’ll ever make!
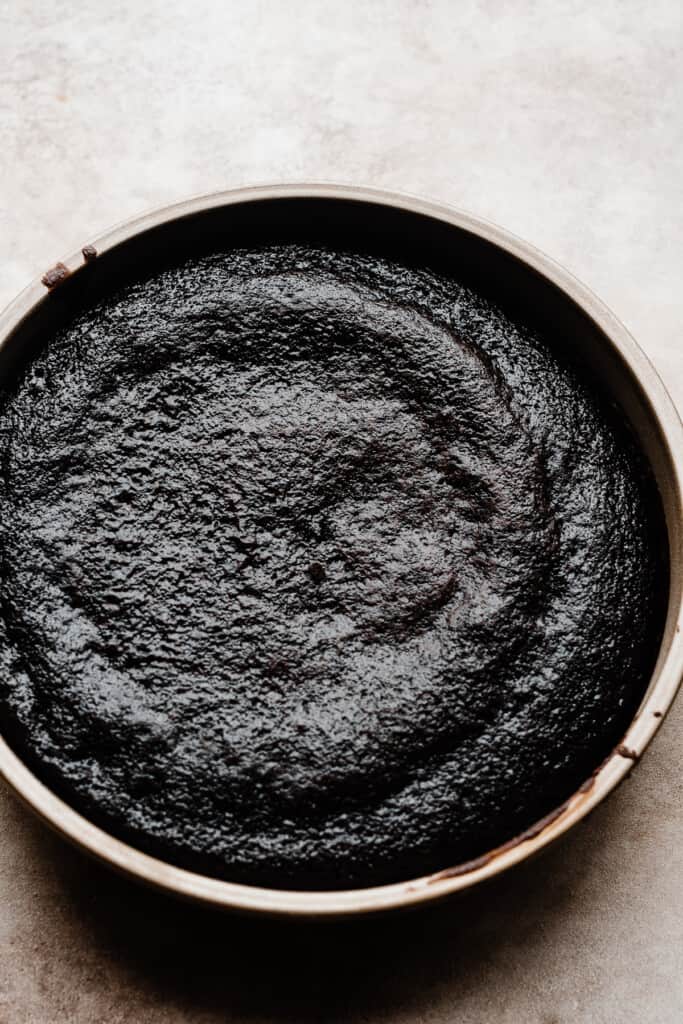
Step 2: Bake the Cake Layers. Divide the batter between greased and parchment paper-lined cake pans. Bake as directed in the recipe card below. Cool in the pans on wire racks for 10 minutes before inverting layers to cool completely.
Step 3: Make the Frosting. In a large mixing bowl, melt the milk chocolate. Beat that with softened butter, then beat in powdered sugar, a splash of milk, vanilla, a pinch of salt, and finally some cream cheese. This is the most luscious frosting!
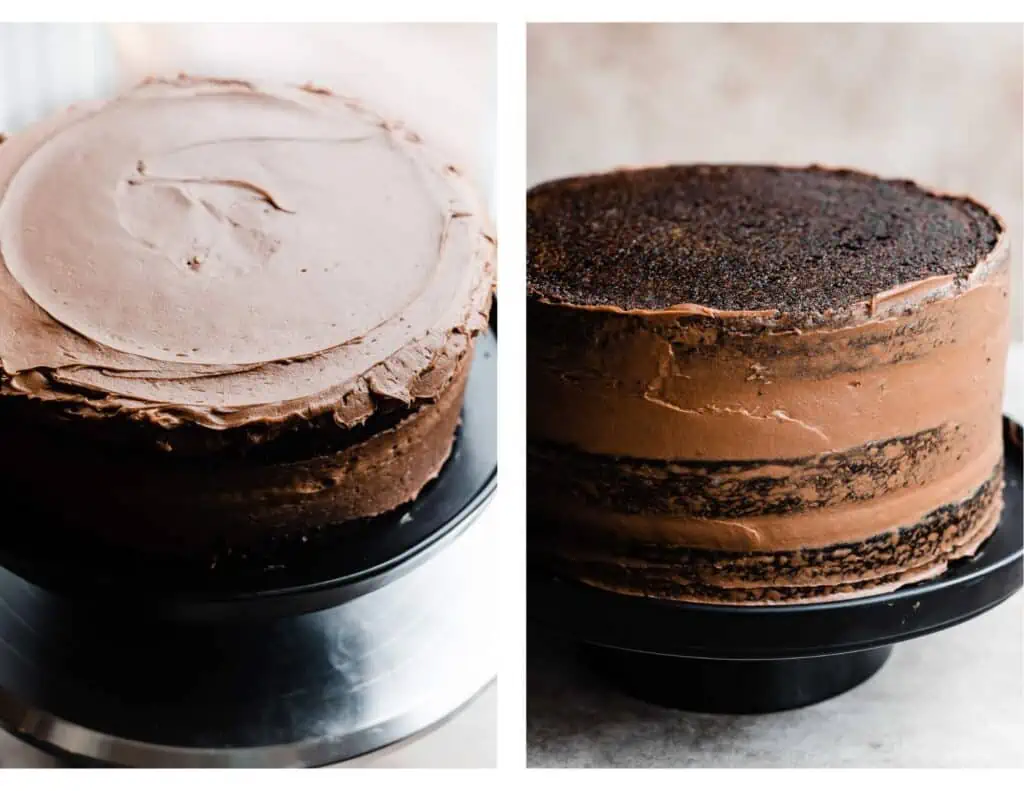
Step 4: Frost the Cake. Spread a layer of frosting over the first cake layer, then add the second layer of cake. Pop in the fridge to chill for 10 minutes or so, to ensure nothing slides around while you’re working with the cake. Repeat with the second cake layer, then add the third layer upside down for a perfectly flat top. Frost the outside of the cake with the remaining frosting. Let chill in the fridge for at least 30 minutes, or up to overnight.
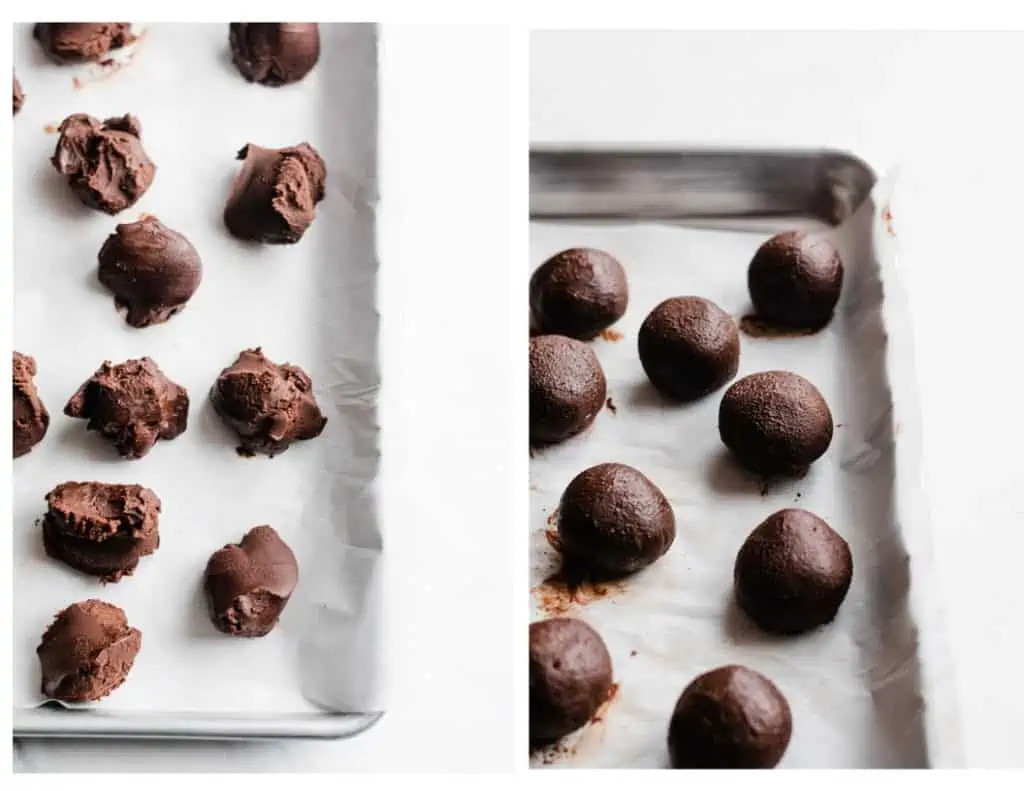
Step 5: Make Chocolate Truffles. The base of this recipe is simple – pour simmering heavy cream over chopped semi-sweet chocolate in a heatproof bowl, then stir until completely smooth. Chill this in the fridge until it’s solid, then scoop into balls. Chill them again and then roll the truffles in cocoa powder, chopped nuts, or dip them in chocolate. These can be made 2-3 days ahead!
Step 6: Finish Decorating the Cake. Once the frosting has set, add your chocolate drip. This is made in the same way we made the truffles – simmering heavy cream is poured over chopped chocolate. See more tips on a chocolate drip in “Expert Tips” below. Place the chocolate truffles on your cake and you are ready to eat!
Serving + Storing this Recipe:
Slice the cake once it’s decorated! You can let it stand at room temp for 15-20 mins before slicing so the frosting isn’t so solid from being in the fridge. Store leftovers (doubtful, hehe!) in an airtight container in the fridge for 3-4 days.
Expert Success Tips:
- Oven Thermometer – An oven thermometer will tell you if your oven is actually running at the temperature you set it to. Your oven may not be accurate. Accurate oven temperature is crucial for most bakes, so I leave an oven thermometer in at all times to keep an eye on my oven’s calibration.
- Kitchen Scale – A food scale is the best way to make sure your flour is at the proper weight, since amounts will vary SO widely based on how you measure it, as well as the measuring cup you use, as they are not standardized.
- Chocolate Truffles – For more info on making chocolate truffles, be sure to check out my Black Forest Truffles post – it has a little extra info on truffles!
- Powdered Sugar in Frosting – Beat powdered sugar in on medium speed so it doesn’t fly everywhere.
FAQs:
Yes, you can scale this recipe down in a few ways. Cut the recipe in half and make two 8-inch round cake layers, or one 9×9 square layer. Or, scale the recipe down to 1/3 of a batch to make one 8 or 9-inch cake layer.
Absolutely! The full quantity of cake batter in this recipe will yield 48 cupcakes, and half a batch will yield 24 cupcakes. You could also make 1/4 of a batch if you only want 12 cupcakes.
Yes. Cake layers can be baked, cooled, and stored on dinner plates tightly wrapped in plastic wrap for 24 hours before assembling & frosting. Chocolate truffles can be made 2-3 days ahead and stored in an airtight container in the fridge. I recommend making the frosting fresh, when ready to use.
Recipe Variations:
- Regular Chocolate Buttercream – Don’t love milk chocolate? Use semi-sweet chocolate instead, or try the classic chocolate frosting recipe from my Tuxedo Cake.
- Time Saving Tip – Need to shave a bit of time off the recipe? Top the cake with your favorite store-bought chocolate truffles!
Special Tools:
- Cake Pans – These are my absolute favorite 9-inch cake pans! I’ve had them for 6+ years and use them for every cake recipe, and they are still in great shape.
- Offset Spatula – Offset spatulas make cake assembly so easy! They can also be used for spreading cake and brownie batters evenly.
- Cake Turntable – If you make at least a few cakes a year, a cake turntable makes the process a breeze!
More Cake Recipes to Love:
- White Forest Cake
- Berries & Cream Cake
- Ultimate Cookie Dough Cake
- German Chocolate Cake
- Tuxedo Cake with Whipped White Chocolate Ganache
Did you make this recipe? Snap a photo and leave a comment!
Be sure to follow bluebowlrecipes on instagram and tag #bluebowlrecipes with your photo! You can also post a photo of your recipe to the bluebowlrecipes Facebook page. I’d love to see what you make!

Chocolate Truffle Cake
Ingredients
Chocolate Cake
- 2 cups hot water, 472 mL
- 1 and 1/2 cups + 2 tbsp cocoa powder, 157 grams
- 3 cups cake flour, 330 grams
- 2 and 1/4 cups light brown sugar, packed, 488 grams
- 1 cup granulated sugar , 206 grams
- 3 tsp baking soda
- 1 and 1/2 tsp baking powder
- 3/4 tsp salt
- 2 tsp espresso powder
- 1 and 1/2 cups full fat sour cream, at room temperature, 360 grams
- 1/4 cup milk, 60 mL
- 4 large eggs, at room temperature
- 1/2 cup vegetable oil, 106 mL
- 1 and 1/2 tsp vanilla extract
For the Milk Chocolate Buttercream
- 12 ounces milk chocolate, use good-quality baking bars, not chocolate chips
- 1 and 1/2 cups salted butter, 3 sticks, 24 tbsp, or 339 grams
- 4 cups to 5 cups powdered sugar, 460 to 575 grams
- 3/4 cup + 1 tbsp cocoa powder
- 1 tbsp vanilla extract
- pinch of salt, to taste
- 12 ounces cream cheese, softened at room temperature, 340 grams
For the Chocolate Drip:
- 4 ounces semi-sweet chocolate, finely chopped, 113 grams
- 1/2 cup heavy cream, 4 ounces, 118 mL
- 1-2 tsp vegetable oil
For the Chocolate Truffles
- 12 ounces semi-sweet chocolate, finely chopped
- 8 ounces heavy cream
- chopped nuts, cocoa powder, or more melted chocolate, for dipping/rolling
Instructions
- Prep: Preheat your oven to 350 ℉. Grease three 9-inch cake pans with shortening. Place a parchment circle in the bottom of each, then grease over that. Dust the inside of each pan well with flour, knocking out any excess.
- Make the Chocolate Cake: Measure the hot water into a 4-cup glass measuring cup or large bowl, then whisk in the cocoa until completely dissolved. Set aside to let come down to room temp. In a large mixing bowl, whisk together all the dry ingredients (including the sugars). Next, add the wet ingredients, including the room temp (not steaming hot!) cocoa and water mixture, and whisk until combined. There may be a few small lumps – that's fine.
- Bake Cake Layers: Divide the cake batter evenly between the three pans (use a kitchen scale to weigh the full amount of batter, then divide by 3 to get it perfect!). Bake for 23 to 27 minutes, or until a toothpick inserted into the center pulls out moist crumbs. Let cakes cool in the pans on wire racks for 10 minutes before running a butter knife around the edge and inverting onto a cooling rack. Let cool completely. Tip: I recommend rotating cake pans halfway through since every oven will have hot spots and this ensures an even bake.
- Make the Milk Chocolate Frosting. Melt the milk chocolate in a large mixing bowl. Beat in the softened butter until well combined. Add the powdered sugar in two additions, mixing well between each. Start with 4 cups – taste and add more, up to 5 cups as desired. Add all remaining ingredients except the cream cheese. Beat until combined, then mix in the cream cheese very last.
- Assemble Cake: Place the first cake layer on a cake stand on top of a turntable. Spread 1 and 1/2 cups of frosting over the layer, going past the edge a smidge. Place the second cake layer on top and chill for 5-10 minutes to set things so the layers don't slide around. Repeat with the second layer. Add the final layer upside down for a flat top, and give the cake a thin layer of frosting on top and on the sides. Use a cake scraper to smooth out and remove excess. This is your crumb coat, so don't fret if it isn't perfect. Pop the cake in the fridge for 30 minutes or until the frosting is set. Then, frost the top and sides of the cake, smoothing things with the cake scraper or offset spatula. Chill the entire cake in the fridge for 30 minutes, or until set, before adding the chocolate drip. Tip: If your frosting is getting too soft at any point from sitting out, pop it back in the fridge for a bit to firm back up.
- Chocolate Drip: Add finely chopped chocolate to a small bowl. Heat heavy cream in a small saucepan over medium heat until simmering. Pour over the chocolate, let sit for 4 minutes, then stir until completely smooth. Add 1-2 tsp vegetable oil to get a pourable consistency. Set cake on a turntable. Pour ganache into the center of the top of the cake, then spin the cake slowly while pushing ganache to the edges with an offset spatula to create drips. Let chill 20-30 minutes, until ganache is set.
- Make Chocolate Truffles: Chop the chocolate finely and place it into a microwave-safe bowl. Heat heavy cream in a small pot over medium heat until simmering. Pour over the chocolate and let sit 5 minutes. Then, stir the mixture until completely smooth. If you have any lumps of chocolate left, microwave the mixture for 15 seconds at a time, stirring between each interval, until no lumps remain. Pour the ganache into a shallow dish (like a glass pie plate) to cool quickly. Cover with plastic wrap, pressing the plastic wrap onto the surface of the chocolate so it doesn't dry out, and chill in the fridge for 1 and ½ to 2 hours, or up to 24 hours.Once the mixture is chilled, line 2 baking sheets with parchment paper. Scoop the cooled chocolate into scant tablespoon sized mounds. Place on prepared pans. Once you've scooped all the chocolate, go back and roll them each into smooth balls. If they're too soft, pop the pan (covered with a kitchen towel) back in the fridge for 10-20 minutes to firm up. Let the rolled chocolate truffles chill again for 20-30 minutes before decorating. Roll chilled truffles in finely chopped walnuts or pecans, cocoa powder, or dip in melted chocolate. Store in an airtight container in the fridge for up to a week.
- Serve & Store: Top the chilled cake with chocolate truffles and chopped nuts (optional). Slice & serve! Store leftovers in an airtight container in the fridge for 4-5 days.
Nutrition
Nutrition information is automatically calculated, so should only be used as an approximation.

Hi Stephanie, I will be making your beautiful cake for my husband and my brother’s birthdays. Please I have a question, For the Chocolate drip, which 4 ounces semi-sweet chocolate brand was used. Thank you.
Hi Diana! I used baker’s brand but any semi-sweet baking bar (ghirardelli, lindt, etc.) would work! Let me know how you like the recipe!
Hi ..my name is Amu baloyi from South Africa 🇿🇦..l.m also a baker..but l.m steal learning…my chocolate cake is not nice..soo l want to improve my self..to bake better…can you plz assist me with a chocolate cake recipe..
Hi Amu! I’d recommend trying this recipe as written. Happy baking!
This is hands down the best chocolate cake recipe I’ve ever followed! I used gluten-free flour blend and you honestly can’t even tell- it turned out so rich and moist. I also made a small tweak to the chocolate drip by using ruby chocolate instead of semi-sweet, and added a touch of red coloring for ana extra pop of color. The whole recipe is just incredible – definitely a keeper!
Thanks so much for your kind comment, Rizza!
Just THE BEST! I love all your recipes and amazing directions and tips! Another incredible recipe! I trust all of your recipes and advice and am enjoying your cookbook! Thank YOU!You’ve made a baker out of this runnerGIRL!
Thank so much for your kind words, Stephanie!
I didn’t pay attention to how much chocolate is needed for the buttercream so I ended up making a different frosting, but it was still amazing! Made it for my dad’s birthday and even the none chocolate eaters were getting two pieces!
So glad to hear you enjoyed this recipe, Brianna!
This is by far the best chocolate cake I’ve ever made! I bring a lot of treats into my office for my coworkers and this got rave reviews from everyone!
Aw, so glad to hear that! Thank you for the review!
Hi! Just wondering how much cream cheese did you mean?
It says “12 ounces cream cheese, softened at room temperature, 170 grams”
But 12 ounces is 340 grams, not 170?
Hi Teresa – you are correct, it should be 340 grams for 12 ounces of cream cheese. Thanks for catching that! I’ll update the recipe now. Let me know how you like the recipe!
Hi
On this recipe I’m a bit baffled with the recipe it says 1 & 1/2 cups then 2 tablespoons of cocoa powder but doesn’t say what needs to be in the 1 & 1/2 cups.?
Thanks
Katrina
Hi Katrina! It’s 1 and 1/2 cups of cocoa powder, plus an additional 2 tablespoons of cocoa powder. Since that whole quantity is given under one bullet point line, you can assume that it’s all the same ingredient! I wouldn’t blend two different ingredient measurements together like that. Happy baking!
I really want to make this for my daughters second birthday. It looks divine! Could you tell me what baking chocolate you use for the buttercream icing?
I used ghirardelli milk chocolate (in the bar form). Please let me know how you like this cake! ☺️
I made this cake for my husband’s birthday and OH. MY. GOODNESS was it AMAZING!!! I was a little nervous about taking on this task. I’d never made truffles before. The directions are well written and so easy to follow. Everything about this cake was absolutely delicious! I will definitely be making it again and am excited to try more recipes from Blue Bowl Recipes.
Thanks so much for the rave review, Cindee! I’m so glad that you found the directions easy to follow. Please be sure to let me know what other recipes you try! 🙂
Hello I’ve made this cake just today. Why my butter cream doesn’t have that beautiful orangy colour? It’s really tasty but have a brown colour instead
Hi Andres! It probably has to do with the brand of chocolate you used, as they will differ in color from one brand to another. Please let me know how you liked the cake!