This post contains affiliate links. Please see our disclosure policy.
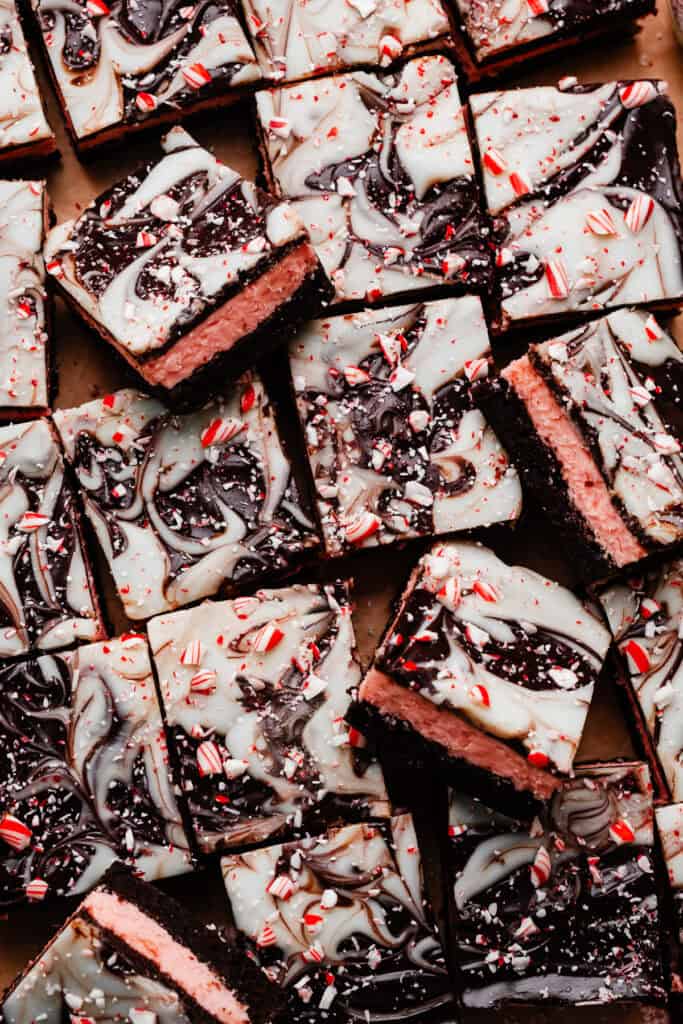
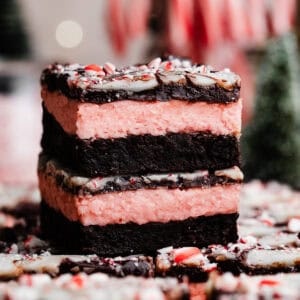
Layered Peppermint Brownies are made with a layer of rich, fudgy brownies, a creamy peppermint buttercream frosting, and a swirled peppermint bark chocolate ganache layer! This festive treat yields a large serving size, and is guaranteed to impress!

Why you’ll love Peppermint Brownies:
- Better than Box Mix Brownies – These homemade brownies are richer and fudgier than your favorite box mix! This is the base recipe from my popular Brown Butter Fudgy Brownies.
- Three Layers – We’re layering fudgy brownies, peppermint buttercream, and a swirled chocolate ganache topping that mimics peppermint bark!
- Adjustable Peppermint – Don’t love peppermint? You can tone down the peppermint extract in the brownies and frosting. Love it? You can add more!
Ingredient Overview:
As always, the full recipe with measurements & directions can be found in the recipe card at the bottom of this post. Use the table of contents (back at the top, below the first image, to navigate).
- Butter – I always use salted butter because in my experience, it lends the best flavor, but feel free to use unsalted butter if that’s what you prefer.
- Vegetable Oil – Since vegetable oil remains a liquid at room temperature (unlike butter) it’s instrumental in keeping baked goods of all kinds tender & moist. I used to make brownies with all butter but trust me – swapping out some of the butter for oil gives huge payoff in the moisture department, without sacrificing on flavor!
- Semi-Sweet Chocolate – We’re using semi-sweet chocolate so the brownies won’t be too sweet.
- Eggs – Use large eggs, at room temperature.
- Sugars – Using a combination of granulated sugar and powdered sugar makes it easier for all the sugar to dissolve, which is key to achieving the paper thin, shiny crust!
- Vanilla – Use real vanilla extract for best results.
- Peppermint Extract – You’ll need this to flavor the brownies and frosting.
- All-Purpose Flour – Spoon your flour into the measuring cup, then level it with a flat utensil for best results, or use a scale. Scooping the measuring cup directly into your flour will lead to too much flour, and a potentially dry bake.
Recipe Substitutions & Variations:
- Dairy-free – Use your favorite, trusted dairy-free butter, cream cheese, and chocolate.
How to Make Peppermint Brownies:
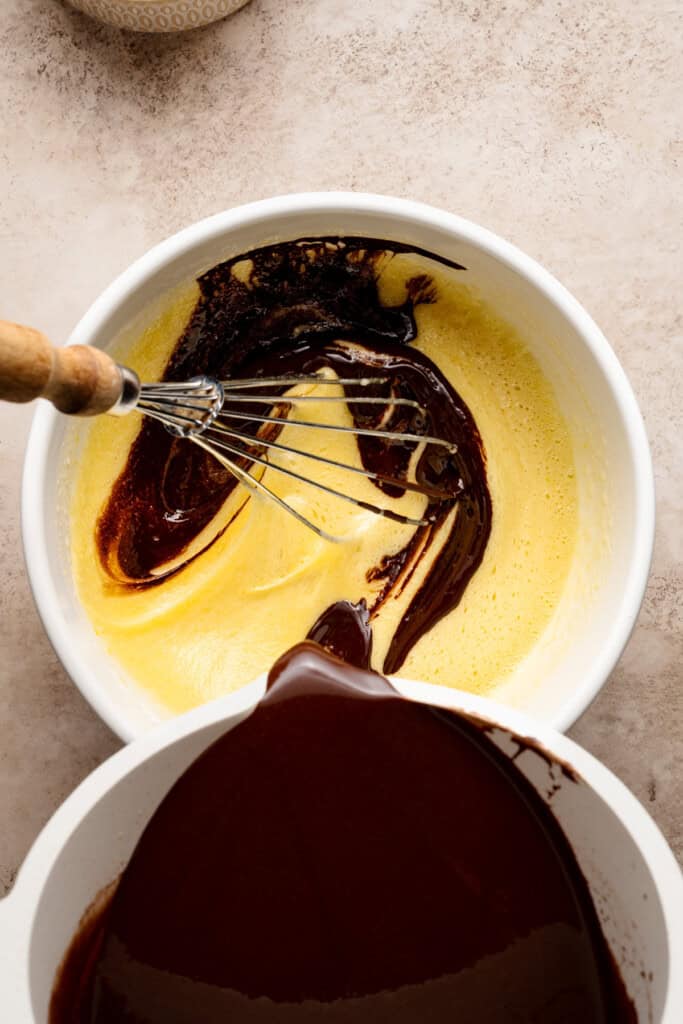
Step 1: Make the Brownies. Melt together butter and semi-sweet chocolate. Whisk in cocoa and oil. Set aside to cool. In a large bowl, whisk together the eggs, sugars, vanilla, peppermint extract, and salt.
Then, whisk the warm chocolate mixture into the eggs and sugar. Fold in the flour and espresso powder.

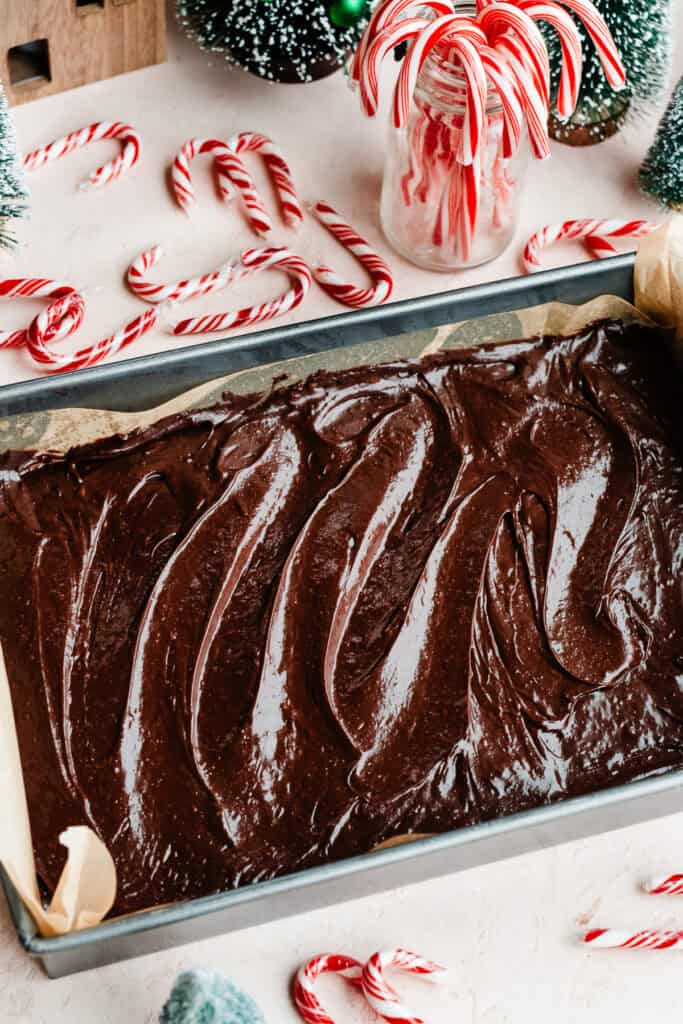
Step 2: Bake the Brownies. Pour the batter into your prepared 9×13 pan and bake as directed in the recipe card below. Do not over bake!
Step 3: Make the Frosting. Beat together the butter and cream cheese in a medium bowl. Mix in the powdered sugar, heavy cream, vanilla, peppermint extract, salt, and a tiny drop of red gel food coloring. Spread on cooled brownies and chill until firm.


Step 4: Make Ganaches. Finely chop your white and semi-sweet chocolates. Heat heavy cream to a simmer, then pour over each type of chocolate. Stir until smooth.


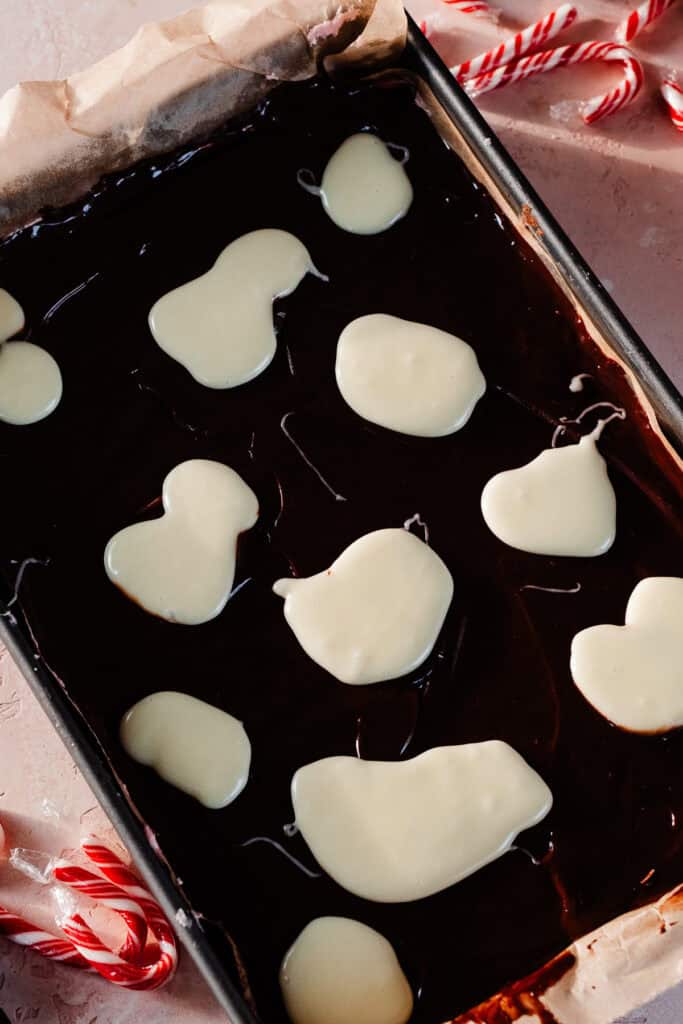
Step 5: Top the Brownies. Pour the semi-sweet chocolate ganache over the frosting layer, then immediately dollop on spoonfuls of the white chocolate ganache. Use a toothpick to swirl the two, then add a flurry of crushed candy canes.
Serving + Storing:
Place brownies in the fridge and allow the chocolate to set before slicing. Wipe your knife between cuts for neat slices. Enjoy! Store brownies in an airtight container in the fridge. Leftovers keep for 4-5 days.
Expert Baking Tips:
- Oven Thermometer – An oven thermometer will tell you if your oven is actually running at the temperature you set it to. Your oven may not be accurate. Accurate oven temperature is crucial for most bakes, so I leave an oven thermometer in at all times to keep an eye on my oven’s calibration.
- Kitchen Scale – A food scale is the best way to make sure your flour is at the proper weight, since amounts will vary SO widely based on how you measure it, as well as the measuring cup you use, as they are not standardized.
- Glass vs. Metal Pan – Glass is a poor conductor of heat, making it a poor option for baking. It will bake the edges of your brownies faster than the center. Metal conducts heat faster and more evenly, making it the universal choice for bakers. A metal pan will produce perfectly fudgy, evenly-baked brownies every time.
- Don’t Over Bake – Do not over bake these brownies, or I will take away your baking license! I kid. But really – use the doneness indicators that I give in the recipe card, and don’t over bake.
- Neat Slices – Wipe your knife clean between each cut – yes, it’s a pain. But, it does ensure those perfect, neat edges.

FAQs:
Yes! You can halve the entire recipe and bake the brownies in a 9×9 pan.

Special Tools:
- Metal 9×13 Pan
- Offset Spatula
- Electric Mixer

More Peppermint Recipes to Love:
- Peppermint Mocha Cookies
- Peppermint Hot Fudge Bars
- Chocolate Covered Peppermint Pretzels
- Double Chocolate Swirled Peppermint Bark
- Peppermint Hot Chocolate Marshmallow Cookies
- White Chocolate Peppermint Puppy Chow
Did you make this recipe? Leave a comment & star rating!
Click the little stars in the header of the recipe card below to leave a comment & star rating, letting me know how you liked the recipe. I take all feedback seriously, & leaving a rating helps my small business immensely!
Layered Peppermint Brownies
Ingredients
For the Brownies
- 10 tbsp salted butter, 140 grams
- 4 ounces semi-sweet chocolate, chopped, 113 grams
- 1/4 cup vegetable oil, 56 mL
- 3/4 cup cocoa powder, 63 grams
- 3 large eggs, at room temperature
- 1 large egg yolk, at room temperature
- 3/4 cup granulated sugar , 158 grams
- 1 and 1/2 cups powdered sugar , 174 grams
- 2 tsp vanilla extract
- 1/4 tsp peppermint extract
- 1/4 tsp salt
- 1/2 cup all-purpose flour, spooned & leveled or weighed , 65 grams
- pinch of espresso powder, optional
For the Peppermint Buttercream
- 10 tbsp salted butter, softened at room temperature , 140 grams
- 4 ounces cream cheese , 113 grams
- 4 and 1/2 cups to 5 and 1/2 cups powdered sugar, adjusting to taste, 518 to 633 grams
- 2-4 tbsp heavy cream, 30 to 60 grams
- 1/4 tsp vanilla extract
- 1/2 tsp peppermint extract, or a tiny bit more, to taste
- pinch of salt
- 1 drop red gel food coloring, Optional! See notes below
For the Chocolate Ganache
- 8 ounces semi-sweet chocolate, finely chopped, 226 grams
- 8 ounces heavy cream, 240 grams
For the White Chocolate Ganache
- 4 ounces white chocolate, 113 grams
- 1 and 1/3 ounces heavy cream, 40 grams
- 5-7 mini candy canes, crushed
- toothpicks
Instructions
- Prep: Preheat your oven to 350℉. Spray a metal 9×13 pan with nonstick spray and line with parchment paper (this makes for easy removal & slicing later).
- Make the Brownies: Add butter and chopped chocolate to a medium heat-safe bowl and microwave in 30 second intervals, stirring between each, until melted and smooth. Whisk in the vegetable oil and cocoa powder. Set aside to cool slightly.In a large mixing bowl, add the eggs, egg yolk, and granulated sugar. Whisk for about 1-2 minutes, until the sugar is fully dissolved. (Feel the mixture between your fingers – if it's completely smooth, you're good! If you feel sugar granules, keep whisking.) Next, whisk in the powdered sugar, vanilla, peppermint extract, and salt. Then, check that the chocolate mixture is no longer piping hot (it will be quite warm, though), and whisk it into the bowl of eggs/sugar/. Fold in the flour and espresso powder.10 tbsp salted butter, 4 ounces semi-sweet chocolate, chopped, 1/4 cup vegetable oil, 3/4 cup cocoa powder, 3 large eggs, at room temperature , 1 large egg yolk, at room temperature , 3/4 cup granulated sugar , 1 and 1/2 cups powdered sugar , 2 tsp vanilla extract , 1/4 tsp peppermint extract, 1/4 tsp salt, 1/2 cup all-purpose flour, spooned & leveled or weighed , pinch of espresso powder
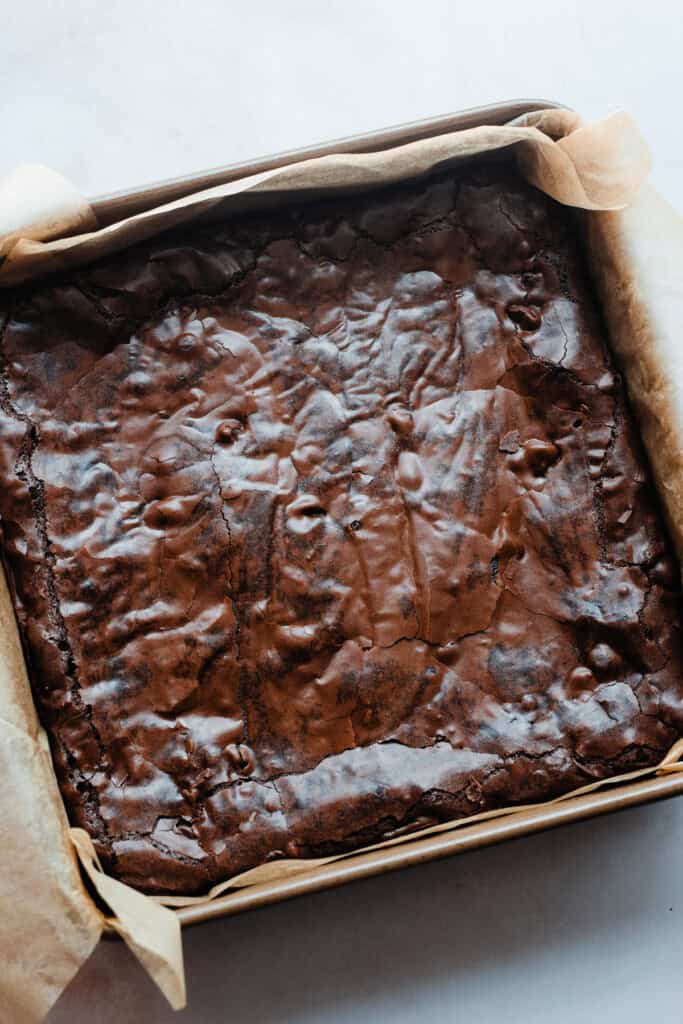
- Bake: Pour the batter into your prepared pan, and bake for 18 to 22 minutes. The center will seem *just* set. The top will be shiny, and a toothpick inserted into the center will have some thick batter, with a smattering of moist crumbs. An instant read thermometer should reach about 215℉ in the center of the brownies, without touching the bottom of the pan. Don't over bake! I promise these will set up to the perfect fudgy (but not raw) texture as they cool.Let brownies cool on a wire rack at room temperature for about 30 minutes, then transfer to the fridge (place on pot holders or a wire rack so the still hot pan isn't on a glass shelf) to cool until the brownies are at room temperature or colder.
- Make the Frosting: Once the brownies are at room temperature or cold, make the frosting. Beat butter and cream cheese in a large bowl until smooth. Add the powdered sugar in 2-3 additions, adding heavy cream as needed to bring things together. Mix in the vanilla, peppermint extract, and a tiny pinch of salt. Add one tiny drop of red gel food coloring to make a beautiful pink peppermint color (this is optional). Taste and adjust powdered sugar to your liking. Spread the frosting evenly on the cooled brownies, then return the pan to the fridge while you make the ganache.10 tbsp salted butter, softened at room temperature , 4 ounces cream cheese , 4 and 1/2 cups to 5 and 1/2 cups powdered sugar, adjusting to taste, 2-4 tbsp heavy cream, 1/2 tsp peppermint extract, pinch of salt, 1 drop red gel food coloring
- Make the Ganaches: For each ganache, the method is the same. Finely chop each type of chocolate and add to two separate small bowls. Heat the heavy cream (do one quantity at a time – first the 8 ounces, then the 1 and 1/3 ounces) in a small pot over medium heat until simmering around the edges. Pour heavy cream over the chopped chocolate, and let sit for 5 minutes before stirring until smooth. If any small lumps of chocolate remain, microwave in 5-8 second intervals, stirring between each, until completely smooth. Repeat process with the second batch of ganache.8 ounces semi-sweet chocolate, finely chopped, 8 ounces heavy cream, 4 ounces white chocolate, 1 and 1/3 ounces heavy cream
- Decorate Brownies: Check that your frosting layer is chilled and solid before pouring on the ganache. Don't let your ganache sit around or it will thicken up and you won't get nice swirls on top (you can pop it in the microwave for 5-15 seconds at a time if you let it sit too long, to loosen it up). Pour the semi-sweet chocolate ganache over the brownies, and smooth it evenly. Then, drop spoonfuls of the white ganache on top of the chocolate. Drag a toothpick up and down and then side to side through the chocolate create beautiful swirls. Sprinkle with crushed peppermint. Let ganache set up in the fridge for at least 2 hours before slicing and serving.5-7 mini candy canes, crushed, toothpicks
- Serve & Store: Once the ganache is firm, slice the brownies. Clean your knife between each cut for neat slices. Enjoy! Store brownies in an airtight container in the fridge for 4-5 days. Brownies freeze beautifully as well, in an airtight container, for 1-2 months. Thaw in the fridge overnight.
Notes
Nutrition
Nutrition information is automatically calculated, so should only be used as an approximation.


I made these to share with my friends on Christmas (using 1:1 gluten free flour) and we all loved them! Very rich and fudgy!
So glad to hear you enjoyed this recipe, Kira!
These are rich, indulgent, yet refreshing and everything I was hoping for!!!! The only thing I would say is I would use more cream for the white ganache and then in general I would make a little more white ganache but that’s just preference. Also the recipe makes so much frosting so I didn’t use it all but now I realize, use all the frosting! It helps balance the chocolate layers. So good! Will make again next year.
So glad to hear you enjoyed these, Cara!
Made these today and they’re amazing. One tiny little thing – in Step 4 (frosting) you mention adding the vanilla, but there isn’t any vanilla listed in the frosting ingredients. I left it out figuring the peppermint should stand alone in the frosting.
So glad to hear this, Brian! Oops – sorry about that. Thanks for alerting me! I just add a small splash of vanilla by eye to the frosting (about 1/2 tsp). I’ll add that to the recipe card now. Happy baking!
Wowwww these are so decadent! Definitely a splurge for the holidays to treat your family, friends, and coworker. There’s kind of a lot of steps/ingredients and it takes time to make given the layers, but as long as you are prepared, its not too difficult. The end result is more than worth it!
So glad to hear you enjoyed this recipe, Leslie!
These are to die for!
So glad to hear you enjoyed this recipe, Mary!
So yummy and everything I wanted in a dessert!
So glad to hear this, Aby!
Made this and tastes delicious! So festive.
Vicky
So glad to hear you enjoyed this recipe, Vicky!
Can these be made ahead and frozen?
Yes, these freeze well! I actually did that this year. 🙂
Very nice
Thanks so much for taking the time to leave a review, Rajinesh!