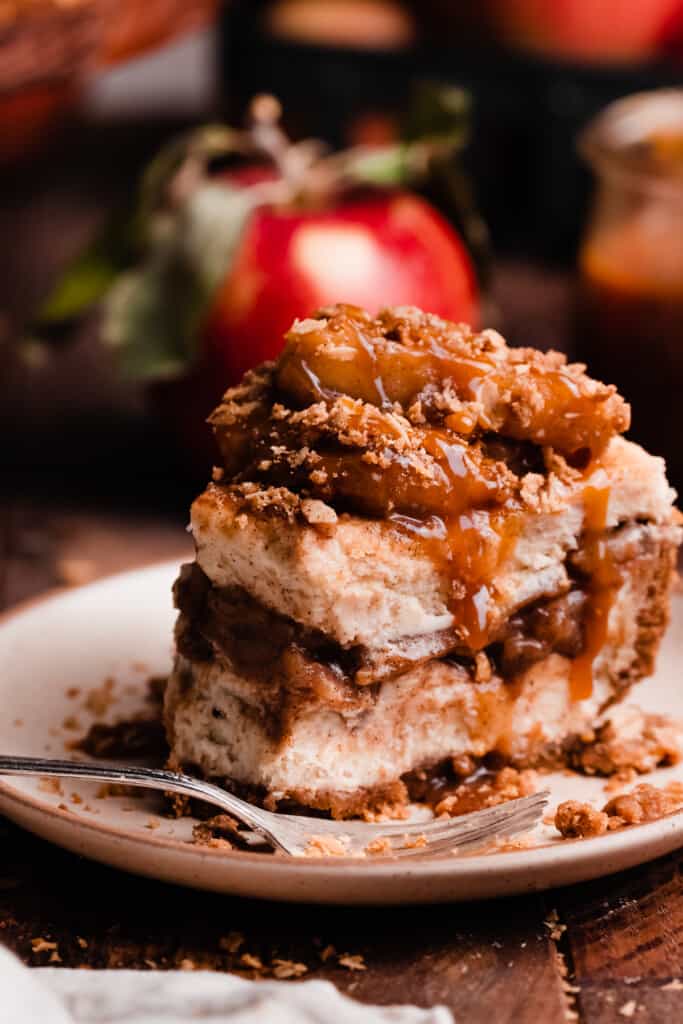
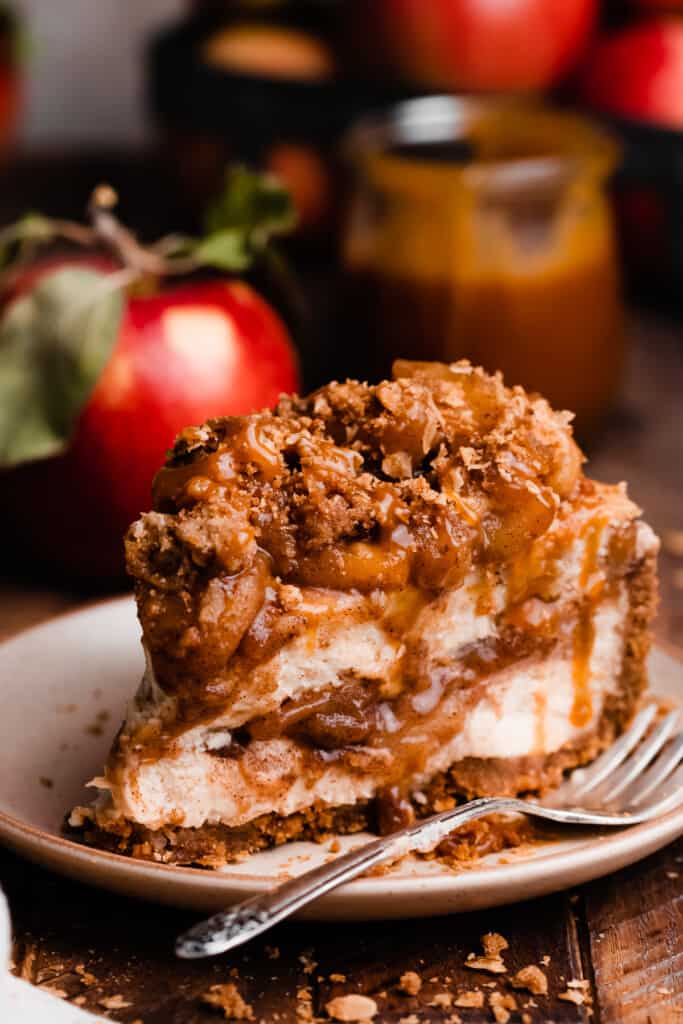
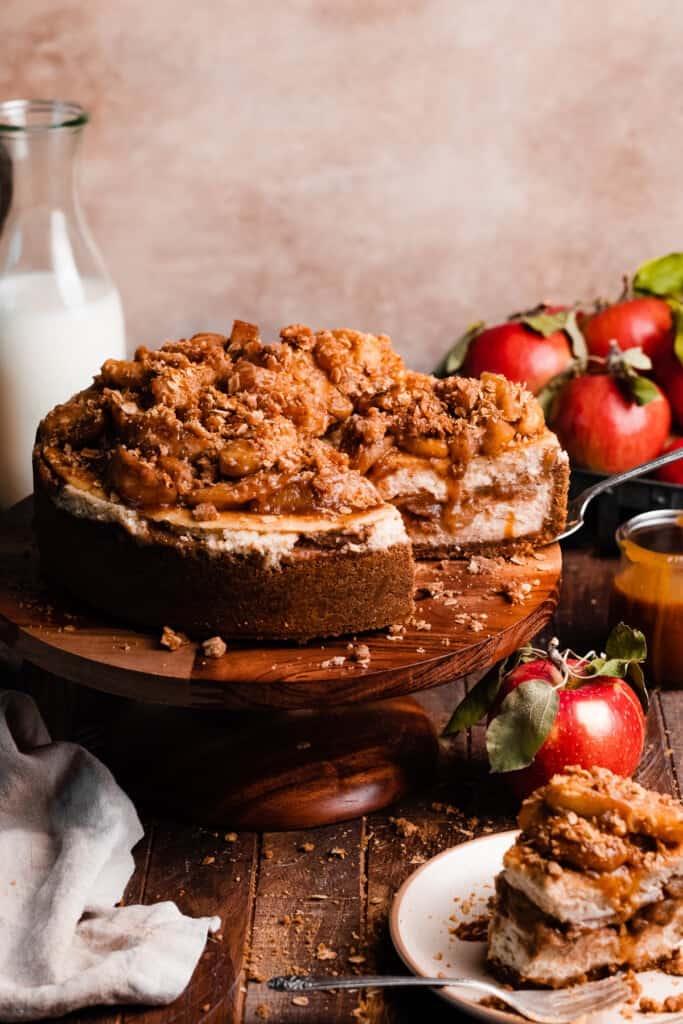
Apple Pie Cheesecake is the ultimate fall dessert! A perfectly baked, creamy vanilla cinnamon cheesecake filling surrounds layers of caramelized apples, atop a crisp graham cracker crust. Top off this beauty with a layer of spiced apples, a buttery oat crumble, and a drizzle of salted caramel sauce. It’s a delicious apple pie in cheesecake form – without any of the hassle of pie crust!
Why you’ll love this Apple Crumble Cheesecake recipe:
- Caramelized Apple Pie Filling & Topping – Sliced apples are quickly cooked on the stovetop with a little butter, brown sugar, and cozy spices until tender and caramelized. It’s the most delicious homemade apple pie filling you’ll ever taste!
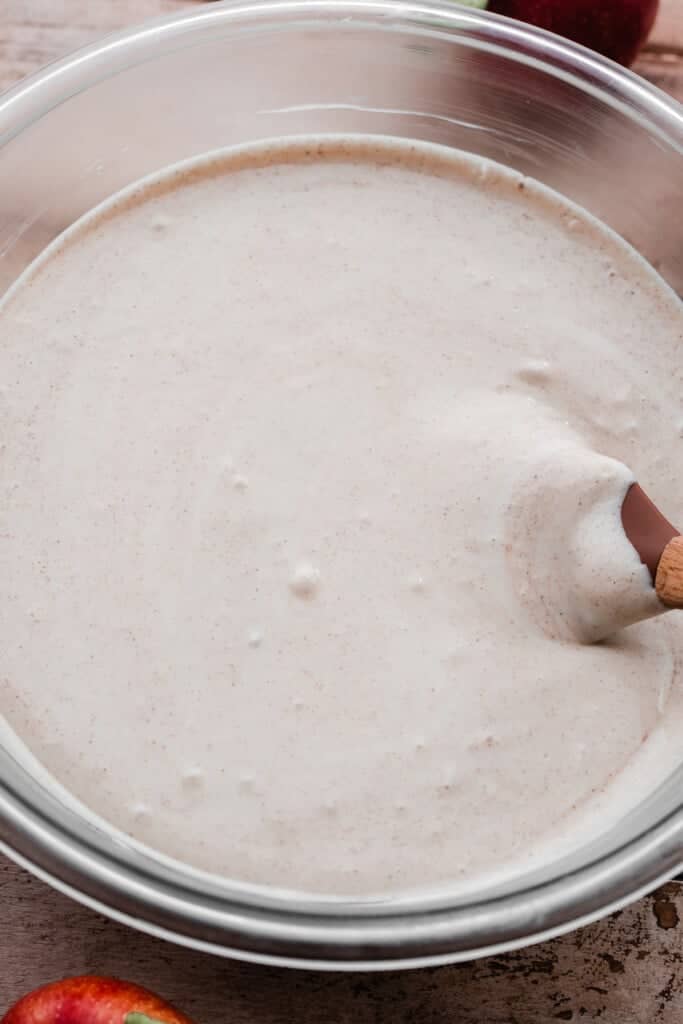
- Creamy Cheesecake Filling- A creamy, baked vanilla cinnamon cheesecake is the perfect base for this fall treat.
- Crisp Graham Cracker Crust – Cinnamon graham crackers add just a bit of extra flavor to the perfectly crisp crust.
- Crumble Topping – A buttery oat crumble topping is sprinkled over the top of the cheesecake.
- Salted Caramel Sauce – A drizzle of salted caramel sauce finishes things off beautifully!
Ingredient Overview:
As always, the full recipe with measurements & directions can be found at the bottom of this post.
- Apples – Use any good baking apple for the apple filling and topping. Don’t use soft apples like McIntosh as they will become mushy. Use something like Jonathan, Golden Delicious, Honeycrisp, Gala, or Fuji. Some people recommend granny smith but I personally don’t like the taste of those.
- Graham Crackers – Graham crackers are the base for our crust. You can use biscoff cookies or gingersnap cookies instead, for a fun twist.
- Butter – I always use salted buter for the best flavor, but feel free to use unsalted butter if you prefer.
- Cream Cheese – Use full fat cream cheese, in the block style. This needs to come to room temperature before using.
- Eggs – Use large eggs at room temperature.
- Sour Cream – Use full fat sour cream, at room temperature.
- Vanilla extract – Use real vanilla extract for best results.
Ingredient Substitutions:
- Dairy-free – Use your favorite trusted dairy-free products to make this recipe dairy-free.
- Gluten-free – Use gluten-free graham crackers for the crust to easily make this entire dessert gluten-free!
How to Make this Apple Pie Cheesecake Recipe Step-by-Step:
Step 1: Make the Apple Filling. Peel and slice fresh apples one quarter inch to one half inch thick, and cook them in a medium saucepan over medium heat for about 10-16 minutes, with butter, brown sugar, and spices. Set aside.
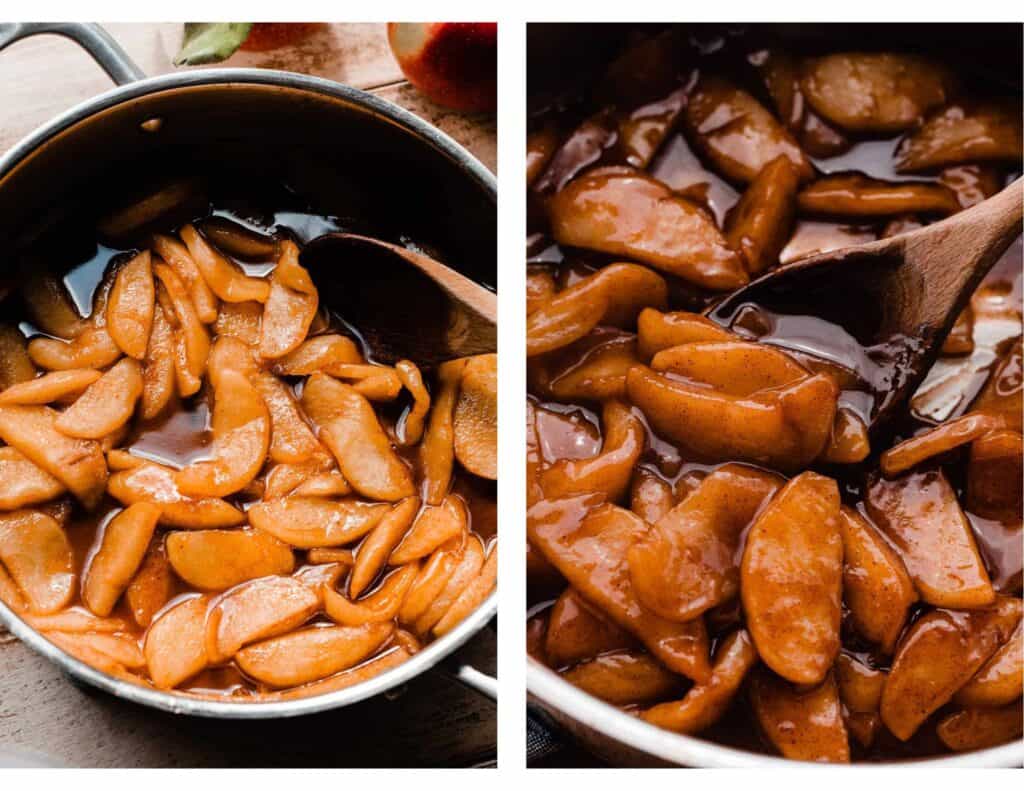
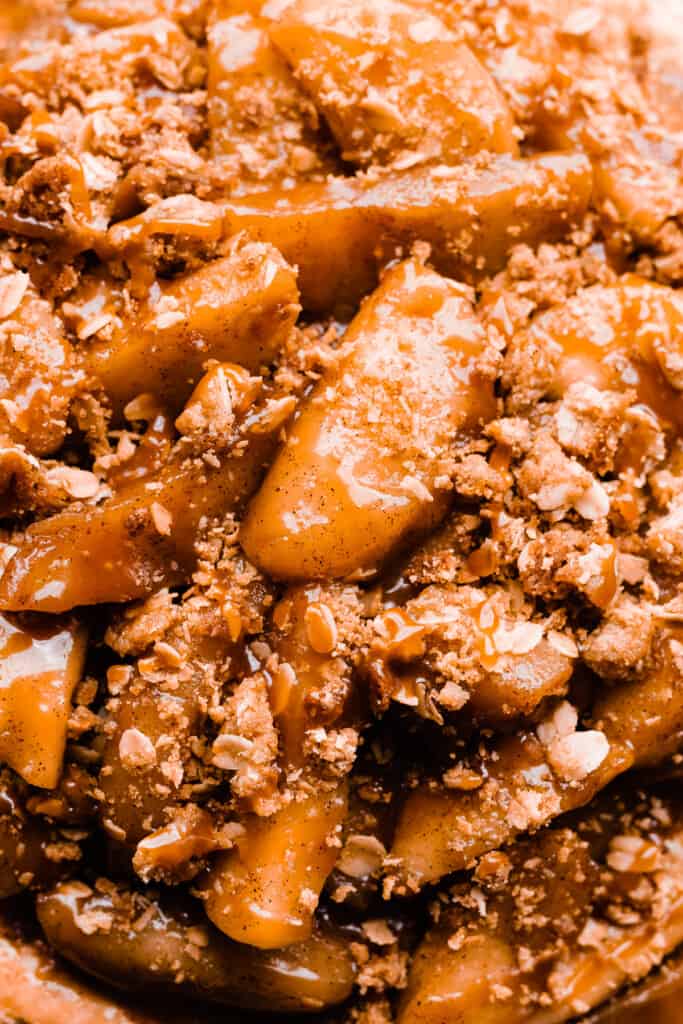
You’ll repeat this step again when ready to serve the cheesecake – I like to make the apple slices thicker for topping the cheesecake, but you can make a double batch of thinner slices at once if you don’t mind that for your topping. Pictured below is the topping made with thicker apple slices (1/2 to 3/4 inch thick).
Step 2: Make the Crust. Stir together crushed cinnamon graham cracker crumbs, melted butter, and a pinch of sugar. Press this firmly into the bottom and up the sides of the pan and bake for 10 minutes.
Step 3: Make the Cheesecake. In a large mixing bowl, beat the cream cheese on high speed with an electric mixer, until creamy. (You can also do this in the bowl of a stand mixer, fitted with the paddle attachment.) Then, mix in the sugar, eggs, vanilla, sour cream, and cinnamon. You’ll have a silky batter. If there are a few tiny lumps, that’s ok.
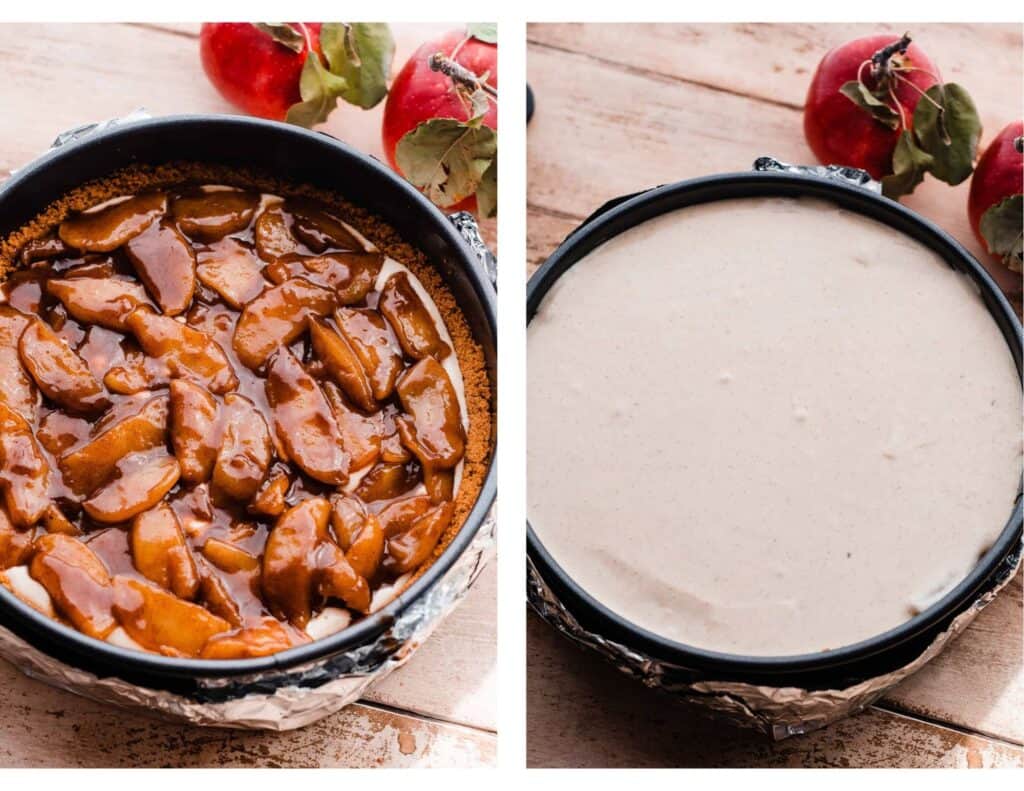
Step 4: Assemble & Bake Cheesecake. Pour half of the cheesecake batter over the pre-baked crust. Spoon on the apple filling in an even layer, then pour on the remaining batter and smooth it out with an offset spatula. Bake as directed in the recipe card below. Let cool completely at room temperature, then transfer to the refrigerator to chill for at least 6 hours or preferably overnight before topping & serving.
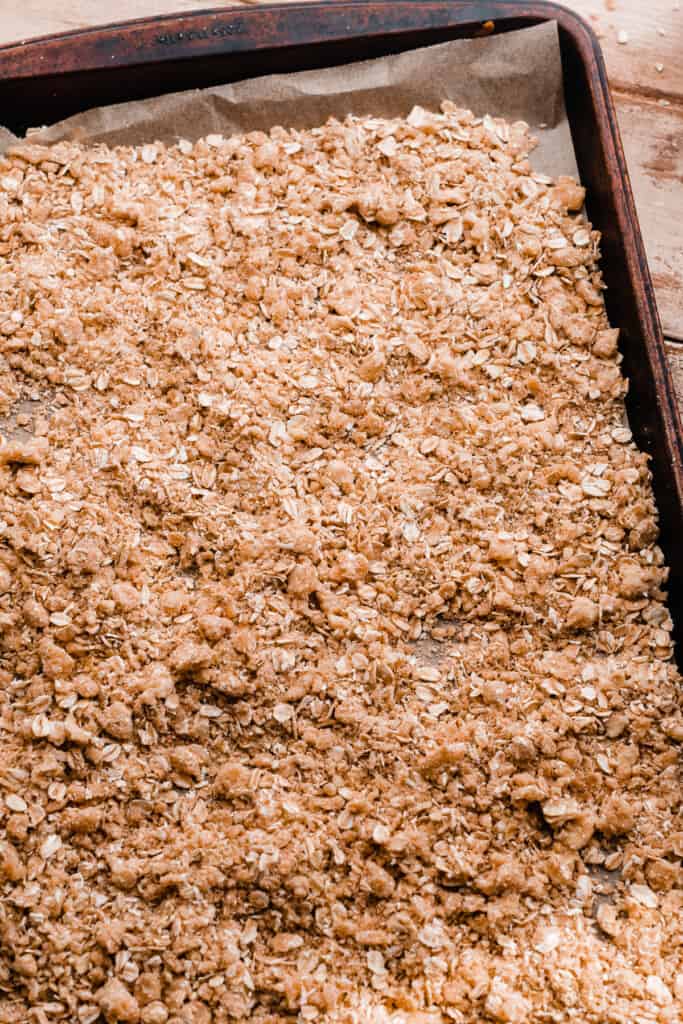
Step 5: Make the Crumble Topping. Cut cold butter into a mixture of oats, flour, brown sugar, cinnamon, and salt. Bake and let cool.
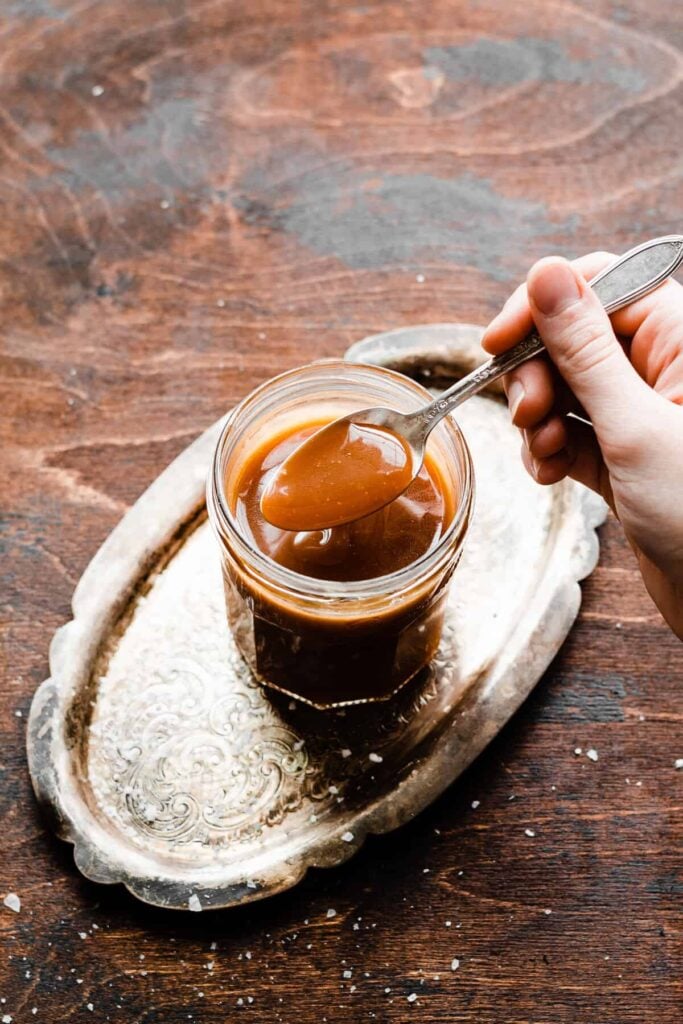
Step 6: Make Salted Caramel Sauce. Melt sugar in a medium saucepan, then mix in butter and heavy cream. Finish with a pinch of flaky sea salt. For full directions and troubleshooting, visit my easy salted caramel sauce recipe post.
Serving + Storing this Recipe:
Top the cooled & chilled Apple Pie Cheesecake with the second half of the apple mixture, and add a generous sprinkle of the crumble. (Place a small bowl with the extra crumble on the table so people can add more to their slices.) Drizzle with caramel sauce, slice, and enjoy! Store leftover cheesecake in an airtight container (or cake stand with a lid) in the fridge for 3-4 days.
Expert Success Tips:
- Oven Thermometer – An oven thermometer will tell you if your oven is actually running at the temperature you set it to. Your oven may not be accurate. Accurate oven temperature is crucial for most bakes, so I leave an oven thermometer in at all times to keep an eye on my oven’s calibration.
- Kitchen Scale – A food scale is the best way to make sure your flour is at the proper weight, since amounts will vary SO widely based on how you measure it, as well as the measuring cup you use, as they are not standardized.
- Room Temperature Ingredients – It is imperative that you let your cold ingredients come to room temperature. Cold ingredients will create a lumpy batter.
- Don’t Over Mix – Over mixing the cheesecake batter when you’re adding the eggs can cause the cheesecake to buckle a little bit in the oven. It will still taste great, but won’t look as pretty.
- Don’t Over Bake – Follow the doneness cues given in the recipe card below to avoid over baking the cheesecake. Don’t panic if it browns the slightest bit on top – that can happen without it being overbaked.
FAQs:
Yes! Cut the recipe in half and bake in a 9×9 pan. I think a half quantity will be a bit too much for a 6-inch springform pan. Start with 32-40 minutes, and add time as needed, checking for doneness in the same way as the recipe card states.
Yes. That’s the nature of cheesecake. Allow the cheesecake to come to room temp after it’s baked, and then transfer to the fridge to chill at least 6 hours or up to 1 day before serving. This slight annoyance actually makes cheesecake the perfect dessert to make ahead!
The hot water produces steam that fills the oven, which helps the cheesecake cook evenly and remain nice and creamy, without cracking. It also helps prevent the edges from cooking at a faster rate than the center.
You have two options – place the roasting pan filled with water on the rack below your cheesecake, or place your cheesecake pan (still wrapped in aluminum foil) into a 10-inch cake pan inside of the roasting pan. Pour water into the roasting pan only. If you place the foil-wrapped cheesecake pan into the roasting pan and pour in water, it will almost always leak to some degree.
Recipe Variations:
- Peach – I have a peach version of this apple pie cheesecake! My popular Peach Cobbler Cheesecake recipe has over 110, 5-star reviews.
- Whipped Cream – Feel free to serve with freshly whipped cream. If you made thinner apple slices for the topping, you can spread them out in an even layer on your cheesecake, add the crumble and a drizzle of caramel, then pipe a whipped cream border or dollops around the edges. Use my easy whipped cream recipe!
Special Tools:
- Springform Pan – This recipe uses a 9-inch springform pan.
- Offset Spatula – I use an offset spatula for so many things, including smoothing the batter evenly into the pan for this recipe.
More Cheesecake Recipes to Love:
- Key Lime Pie Cheesecake
- Classic Strawberry Cheesecake
- Pecan Pie Cheesecake
- Bailey’s Chocolate Cheesecake
- Biscoff Cheesecake
- Triple Nutella Cheesecake
- Lemon Blueberry Cheesecake
Did you make this recipe? Snap a photo and leave a comment!
Be sure to follow bluebowlrecipes on instagram and tag #bluebowlrecipes with your photo! You can also post a photo of your recipe to the bluebowlrecipes Facebook page. I’d love to see what you make!
Salted Caramel Apple Pie Cheesecake
Ingredients
For the Apple Filling:
- 4 medium apples 588 grams
- 3 tbsp salted butter
- 1-2 tbsp apple cider or water if you don't have cider – apple cider vinegar is not the same thing, don't use it!
- 1/3 cup light brown sugar, packed
- 1 and 1/4 tsp cinnamon
- 1/2 tsp nutmeg
- 1/4 tsp ground cloves
- 1/8 tsp allspice
- 1-2 tsp lemon juice to taste
- 2 tsp cornstarch
- 2 tsp water
For the Crust:
- 3 cups cinnamon graham cracker crumbs 300 grams. See note
- 1/2 cup + 3 tbsp salted butter, melted 155 grams
For the Cheesecake:
- 32 ounces cream cheese, at room temperature use the full-fat, block style
- 1 and 1/2 cups granulated sugar 308 grams
- 4 large eggs, at room temperature
- 1 cup full-fat sour cream, at room temperature 240 grams
- 2 tsp vanilla extract
- 1 tsp cinnamon
- 1/4 tsp nutmeg
- 1/8 tsp ground cloves
For the Apple Topping:
- 4 medium apples 588 to 625 grams
- 3 tbsp salted butter
- 1-2 tbsp apple cider or water if you don't have cider – apple cider vinegar is not the same thing, don't use it!
- 1/3 cup brown sugar, packed
- 1 and 1/4 tsp cinnamon
- 1/2 tsp nutmeg
- 1/4 tsp ground cloves
- 1/8 tsp allspice
- 1-2 tsp lemon juice
- 2 tsp water
- 2 tsp cornstarch
Crumble Topping
- 1/4 cup all-purpose flour 33 grams
- 1/2 cup old-fashioned whole rolled oats
- 1/4 cup brown sugar, packed 55 grams
- 1/2 tsp cinnamon
- 1/8 tsp salt
- 1/4 cup cold salted butter, cubed 4 tbsp, or 57 grams
For the Salted Caramel Sauce
- 1 cup granulated sugar 210 grams
- 6 tbsp salted butter, cubed 85 grams
- 1/2 cup + 1 tbsp heavy cream
- pinch of flaky sea salt
Instructions
- Prep: Read through the recipe before you begin to ensure you have everything you need, as there are a few elements at play here. They can be broken down over multiple days to break things up! See make-ahead tips at the bottom of this recipe.
- Make the Apple Filling: See note below if you want to make this all in one batch! Peel & slice your apples between 1/4 and 1/2 inch thick. Add all apple filling ingredients to a medium pan over medium high heat. Cook for 8-14 minutes, stirring lazily the whole time, until desired tenderness is reached. If the liquid all dries up at any point, add a splash more cider or water to keep things saucy. Once apples reach desired tenderness, if the filling isn't thickened like in my photos, thicken by stirring together 2 tsp cornstarch and 2 tsp water until dissolved. add to the apple filling over medium heat, and cook, stirring, for 30-60 seconds. This will thicken the juices.Transfer apple mixture & thickened juices to a medium bowl to cool (at room temp or in the fridge if making ahead).
- Make the Crust: Preheat oven to 350° F. Spray a 9-inch springform pan with nonstick spray and make sure the bottom is securely fastened. Stir together crust ingredients and press into prepared pan and up the sides a bit (see photos above). Bake this for 10 minutes. Set aside. Keep the oven on at 350. Fill a large pot with water and set it on your stove, and get out a large roasting pan – you'll need this for your water bath later.
- Make the Cheesecake: Remember that your cold ingredients need to come to room temp before you start or the filling won't turn out. In a large mixing bowl, beat the softened cream cheese with electric mixer until creamy, about 1-2 minutes. Add the sugar & mix until well incorporated, about 1 minute. Scrape the sides of the bowl with a rubber spatula as you go. Add the eggs one at a time, mixing on medium speed after each until just incorporated. Add the vanilla, sour cream, and spices, and mix until just incorporated. Start your pot of water boiling on the stovetop before you start assembling the cheesecake into the crust. Pour half the batter into the baked crust, then spoon the apple filling over the top of the batter in an even layer. Pour on the remaining batter and smooth with an offset spatula.
- Prep Water Bath: Set your pan of cheesecake on a rack positioned in the center of the oven, and place the roasting pan on the rack below, or wrap the base of the cheesecake pan in foil and place it inside a 10-inch cake pan inside of the roasting pan (this one is ideal – having the cheesecake surrounded by water helps protect it from the oven's heat and keeps things extra creamy). Pour the boiling water into the roasting pan in both scenarios. Both of these methods ensure no leaks. Note: I do not recommend placing your cheesecake pan (even if wrapped in foil) directly into the water bath as it will always leak to some degree and you'll have a soggy crust.
- Bake: Bake the cheesecake for 1 hour and 35 to 1 hour and 50 minutes. When done, the edges of the cheesecake will be slightly raised, the top will appear matte, and it will have only a slight wobble in the center. A knife inserted into the edge will come out with a small amount of thick batter, and an instant read thermometer inserted halfway down into the center should read 150 to 155℉. If the top of the cheesecake appears a bit puffy and browns during the bake, that's normal. It is not over baked – the top browns more with this recipe because of how full this pan is. Turn off the oven and crack the door open. Let the cheesecake cool in the oven for 1 hour before removing it.
- Cool & Chill: Once the hour is up, remove the pan from the oven. It should be cool enough to handle, but be careful. Remove the foil and set the springform pan on a wire rack. Let cool completely at room temp, then cover with foil and refrigerate at least 6 hours or ideally up to 12 hours to 1 day before removing from the pan & serving.Time Saving Tip: Make the elements below – the crumble, caramel, and apple topping – while the cheesecake bakes or while it cools and chills.
- Make Crumble Topping: Preheat oven to 350℉. Line a sheet pan with parchment paper. Whisk together the flour, oats, brown sugar, salt, and cinnamon. Cut the cold butter into chunks, then add to the bowl with the dry ingredients. Cut the butter into the dry ingredients using a pastry blender or two forks until you have a crumbly mixture. Spread into an even layer on your prepared cookie sheet and bake for 12 to 20 minutes, stirring halfway through. Add more time as needed – mine took 25 minutes, but other folks have said theirs was done faster. Let cool completely.
- Make Salted Caramel Sauce: Make the caramel sauce according to my 10-minute Salted Caramel Sauce Recipe. This blog post includes step-by-step photos & troubleshooting tips along with the recipe. Let cool before using on the cheesecake.
- Make Apple Pie Topping: Peel & slice your apples between 1/2 and 3/4 inch thick. Add all apple filling ingredients to a medium pan over medium high heat. Cook for 8-14 minutes, and repeat all the steps from the apple filling section above, just like you did for the filling. Transfer apple mixture & thickened juices to a medium bowl to cool (at room temp or in the fridge if making ahead).
- Serve + Store: Top the cooled cheesecake with your apple pie topping, a generous layer of the crumble topping, and a drizzle of caramel sauce. Slice the cheesecake and enjoy!
- Make-Ahead Tips: –Apple Filling/Topping: This can be made up to a day ahead. Store in the fridge in an airtight container. –Caramel Sauce: Make up to 5 days in advance. Cool and store in a mason jar in the fridge. -Crumble: This can be made 2-3 days ahead. Let cool and store in an airtight container at room temp.
Notes
Nutrition
Sonia F says
This is truly the best cheese type. All the flavors blend perfectly together! This was the second cheesecake I’ve made and I could not believe how easy it came together. The directions were easy to follow and spot on!
Everyone I shared this cheesecake with said it was hands down the BEST they’ve ever had. I’ll make this again and again. I’m craving it right now!
Stephanie Simmons says
Thanks so much for your kind review, Sonia!
alexa renzella says
THIS WAS SO FREAKING GOOD. Make sure you read this recipe in advance as there are some things you can prep the day before. Also ensure you are not needing this cake day of, as it needs to sit in the fridge to set for a while. I have grown to love the method of the oven cracked to cool down the cheesecake. I made this for my boyfriend for an early Valentine’s Day and he rated this a 10/10. I absolutely loved it.
Thank you for the recipe ❤️
Stephanie Simmons says
Thanks so much, Alex!
ROBERT WHITTINGTON says
Must try it Looks very mouth watering yum yum yummy .
Stephanie Simmons says
Thanks, Robert!
Binta b says
I loved making this, first time making cheesecake and I nailed it! I’m so happy with how it turned out and the recipe was so reassuring because for a second I thought I burned it 😭- this was so good I will definitely be making more recipes off your website thanks!🖤
Stephanie Simmons says
So glad to hear you enjoyed the cheesecake, Binta! Thanks so much! Please be sure to leave comments on any other recipes you try 🙂
Megan says
This recipe is delicious!! I took it to a gathering and everyone was asking for thr recipe! Will definitely be making again!
Stephanie Simmons says
Thanks so much, Megan! Glad to hear it 🙂
Ammey says
I made this apple pie cheese cake for Thanksgiving and when I say they loved it they loved it lol ate and lefted no crumbs if you haven’t already tried it please do.
Stephanie Simmons says
Thanks so much for the rave review, Anmey!
Maria ojeda says
I am not a baker..not a real one lol I make cupcakes from the box kind of baker. I saw this recipe and I decided okay I’ll make it. I had only skimmed the ingredients and hadn’t read much of the directions. This cheesecake was a complete challenge for me and because of this recipe and the step by step instructions I nailed it! And it was absolutely amazing! I can’t wait to try more of your recipes!
Stephanie Simmons says
I’m so glad to hear this, Maria! Thanks so much for taking the time to leave a review. Please be sure to leave comments on any other recipes you try as well. 🙂
Sue Luft says
Another outstanding, crowd pleasing recipe! It sounds like a lot, and it is, but not in a way that is overly sweet or too much. Each part works together to make it unique and delicious! Absolutely making this again!
Stephanie Simmons says
Glad you enjoyed this, Sue!
Lindsey Moore says
Hey! Would it work to use a 10in spring form pan instead of a 9 in?
Stephanie Simmons says
HI Lindsey! Yes that should be fine. Reduce the bake time by 20-30 minutes to start as the amount of batter won’t be as deep since it’s a wider pan, and will likely bake faster.
Sarah Schuler says
I made this for Thanksgiving and my family was thoroughly impressed! It looked stunning and was so delicious. This is a crowd-pleaser! Definitely a must!!
Stephanie Simmons says
Thanks so much, Sarah!
Daria says
Hii 🙂 I’m wondering if I could use Philadelphia cheese or Mascarpone? Is it similar? Here in Poland, we usually use cottage cheese in blocks for cheesecakes, and there’s no single store here selling the type of cheese from the recipe 🙁
Stephanie Simmons says
Hi! I’m not familiar with Philadelphia cheese other than that is a brand name of cream cheese that we have here in the United States. Is that what you mean?
Daria says
Yes! The soft one for spreading in a sandwich.
Stephanie Simmons says
Hi Daria! I think that would work. Let me know how you like the recipe!
Edwin Rivera says
Stephanie. Thank you for the great recipe! I have never tried something so complex as this. Your detailed notes made it “easy”. I’ve been keen to make it since I first saw it on TikTok. Finally did! It came out beautifully, and delicious! Not as beautiful as yours of course.
Stephanie Simmons says
Thanks so much for your kind review, Edwin! I’m so glad your cheesecake was a success.
Judith Giannetto says
This looks delicious wondering, what size pan you used
Stephanie Simmons says
Hi Judith! I used a 9-inch springform pan. A 9×13 baking dish with deep sides would work as well. (Not a 9×13 cookie sheet.) Let me know how you like the recipe!
Nono says
This recipe was so fun to make! I even learned how to make the salad caramel from scratch and I love it.
The dessert itself is divine 😩💕👌🏾
Definitely a must-try if you like salted caramel, apple pie and cheesecake 🫶🏾
I look forward to making it again soon.
Stephanie Simmons says
So glad you enjoyed this cheesecake, Nono!
Nicole Szeto says
I was noticing that you put 240g of sour cream which is equivalent to a cup- I was wondering if it was supposed to be 130g instead?
Stephanie Simmons says
Hi Nicole. One cup of sour cream is 240 grams. This is what you’ll find if you google it, and I’ve weighed it out plenty of times and have always gotten 240 grams. I hope you enjoy this recipe!
Adri says
Hi– Can I still do this recipe if I don’t have a roasting pan?
Stephanie Simmons says
Hi Adri! Yes, just be sure to use some sort of oven safe baking dish that’s deep enough to hold a few inches of water. Ideally you’d want the cheesecake inside of a 10-inch cake pan inside the roasting pan, but if you have no pan large enough, the cheesecake can go on the center rack in your oven, and the pan of water on the rack below. Let me know how you like this recipe!
Chef TS says
Stunning! If it is possible for it to taste better than it looks, than I guess it does but it’s so tasty and so beautiful! The recipe is laid out wonderfully – very long but written excellently. Will frequent this website as part of my regular meal planning for sure! Thank you for your hard work and attention to detail!
Chef T.S.
Stephanie Simmons says
Thanks so much for your kind words, Chef T.S.! I greatly appreciate them. I’m glad you enjoyed this recipe and can’t wait to hear what else you make!
Fabiana says
Hi Stephanie, I’m so excited to try this recipe this weekend, but I was wondering if I could make the crust with biscoff cookies or if you think it might be too much since they are spiced cookies. Thank you in advance.
Stephanie Simmons says
Hi Fabiana! I think that would be delicious and not too much. Please let me know how you like this recipe!
Arlett says
Made this for thanksgiving and everyone loved it, best cheesecake I’ve made so far!
Stephanie Simmons says
Thanks so much for the kind review, Arlett!
Meeks says
This was the absolute BEST cheesecake ever. I appreciated all the steps and tips for the recipe. I was initially nervous to make this but I am so happy I did! The caramel sauce is also a must.
Stephanie Simmons says
Thanks so much, Meeks! Glad you enjoyed this.
Brittney Hoyle says
Hello,
Can you use duck eggs in the recipe? If so, how many duck eggs would I use?
Any suggestions?
Stephanie Simmons says
Hi Brittney! I have no experience using duck eggs, but some quick online research tells me that a duck egg is about 30% larger than a medium chicken egg, so two duck eggs would equal three chicken eggs, and 2 and 2/3 duck eggs (2.666 duck eggs) would equal 4 chicken eggs. The most accurate way to tell would be to separately weigh the white and yolk of one chicken egg, then multiply each weight times four, as this recipe uses four eggs. That will tell you the weight of egg whites and egg yolks used. Then, do the same with your duck eggs to match this total weight in both the egg whites and yolks. Hope that helps! Please let me know how you enjoy the recipe.
Courtney Graham Hipp says
I made this for our family Thanksgiving dinner this weekend and it was AMAZING. I followed the recipe to the letter as much as I could. There are a lot of parts but no one part is particularly difficult and you don’t have to know any special techniques. It was maybe not the brightest idea to cook this for the first time for a big family meal; I risked having to run to the store on the way to dinner if it didn’t work out, but it DID!
I did have some difficulty not burning the caramel – had to make it twice – but I was working with a brand-new induction burner for the very first time (no exaggeration) and that thing is HOT, lol. For the crumble I had to turn my oven down about 10 degrees and cooked it for 17 minutes.
Another issue I had was with my very small oven. I had a 9″ springform and a 10″ pan to put it in but I didn’t have a roasting pan wide enough to put those into for the water bath. (I’m going to look for one for next time but it’ll have to be pretty much square for me to be able to close the oven door.) So I put a roasting pan on the bottom shelf and the nested cake pan above it, but at that point the cake was REALLY close to the top burner. I actually had to fold down the aluminum foil so it wouldn’t touch the element. When the cake was done it had risen well above the rim of the pan (but didn’t get wider or go over the side). It was really brown though, so I was worried that it was overdone and I was felling pretty disheartened. At that point it was after midnight so I turned off the oven, opened the door a bit and went to bed. When I looked at it again in the early morning it had shrunk back down below the top of the pan. There were no cracks in the middle, just around the edges. It didn’t smell burned or anything and I was all in at that point so I continued to the finish. To make a long story very slightly less long, it turned out amazing, didn’t taste overdone at all, the texture was great, everyone who had it, loved it and I am definitely making it again soon!
Stephanie Simmons says
Glad to hear that everything turned out well, Courtney! Thanks so much for leaving such a detailed review, it’s very helpful for me and other readers to see!
Monique says
Made this for Thanksgiving and oh my this is soooo delicious!!!! Easy to follow and soo decadent and yummy 🤤 This is a keeper!!! I followed the recipe to the T ! Soo good !
Stephanie Simmons says
Thanks so much for the rave review, Monique!
Sarah G. says
I saw this recipe on IG reels and thought there was NO WAY I could make it given that I’ve NEVER made a cheesecake ever in my life. I decided to tackle it for Thanksgiving and OMG! BEST cheesecake ever. I followed the recipe step by step as it is written and it was incredible. I got so many compliments from my family. The entire cheesecake was gone in less than 24 hours. If you follow this word for word, you’ll end up with a crowd favorite masterpiece. I’ll be making this again for Christmas!
Stephanie Simmons says
I’m so glad to hear you were able to make this having never made a cheesecake before – that’s my goal when I write recipes! Thanks so much for taking the time to leave such a *sweet* review – pun intended. 🙂
Lysette says
My family loved this cheesecake. Definitely making it again!!
Stephanie Simmons says
So glad to hear that, Lysette!
Eve says
Hi! I was wondering if tHis should be served hot or cold
Stephanie Simmons says
Hi Eve! It should be served cold as cheesecake needs to chill for at least 6 hours (or up to overnight) after it’s baked and then cooled down to room temperature. I do not recommend trying to warm it up. Let me know how you like the recipe!
Kayla says
Hi!
I was very excited to make this dessert. My final result resulted in an odd crumbly texture. Not quite like cottage cheese, but very small curds and wasn’t a smooth looking texture. I followed all of the directions, but I didn’t have a hand mixer so I used a whisk. I didn’t think there would be an issue because I’ve done it to make a pumpkin pie cheesecake and the texture was normal. Was this my downfall for the texture? Does this mean I over whisked ? Or I took it out 15 minutes early because the top was turning black? Is it still edible ? Any advice would help
Stephanie Simmons says
Hi Kayla! I’m guessing that not using a hand mixer could have contributed to this. The top does brown quickly on this cheesecake because of how full the pan is. That doesn’t mean it’s bad on the inside at all! The other things that could’ve caused that odd texture is leaving your cream cheese out too long (spoiling) or not long enough, which would cause it to lump up in the batter. Hope that helps! I’m happy to keep troubleshooting if you can give me any more details. 🙂
Sarah says
My 14 year old happened upon this recipe and wanted it for Thanksgiving. It was by far the most complex recipe I have ever made, bit it was very easy. I was so proud! I have never made homemade caramel. My kids loved it and I felt so accomplished. I will make this the next time I need to bring something to an event. It’s aesthetically pleasing and tastes so amazing! Thanks so much for the thorough recipe and all the helpful tips!
Stephanie Simmons says
I’m so glad to hear this recipe was a hit for you and your family! Thanks so much for your kind review, Sarah.
Ria Walsh says
The BEST! Made this for thanksgiving dinner and it was the biggest hit! Thank you so much for this recipe – it’s a keeper. It definitely takes some time, but all the “elements” (cheesecake, apple, oat crumble, caramel) made it extra special. I really loved your 10 minutes caramel recipe too. So easy with great instructions!
Stephanie Simmons says
Thanks so much for your kind words, Ria!
Vanguard says
10/10 I loved this recipe it was so easy to follow and the cheesecake came out amazing !!! Everyone loved it on thanksgiving thank you so much !!!
Stephanie Simmons says
Glad to hear that, Vanguard!
Emma says
This was very fun to make, and absolutely delicious! Easily modified to be gluten free, too, which is lovely! This was a hit at my Thanksgiving table, and I’ll absolutely be making it again.
Stephanie Simmons says
So glad to hear this, Emma! Thank you!
Danielle says
Omg…I found your page on Instagram and this cheesecake was a must-have for my family! I’m a home baker so I’m familiar with most of the instructions already but if you’re a beginner…the way she breaks this recipe down, step by step is extremely helpful! If you read it, you can’t mess this up! Now this cheesecake was so good that my family requested another one so I made it twice lol! Luckily I had caramel and oatmeal topping left over lol! I didn’t use a springform pan, I baked mine in an 8 inch round 3 inch deep pan and it came out beautiful
Stephanie Simmons says
Thanks so much for your incredibly sweet comment, Danielle! I’m so glad to hear my directions were helpful & easy to follow. Glad this recipe was a hit with your family!
Connor says
Made it and turned out lovely, I double the recipe for the apples since I love apples it’s better to have a lot than too little (for both the filling and on top). Totally recommend!! This was my first cheesecake ever and it was a success, everyone loved it!!! Had no issues, make sure to read her recipe a few times to not forget any tips she wrote down!
Stephanie Simmons says
Glad to hear it was a success, Connor! I’m so surprised to hear you were able to fit double the apples in the center, since this cheesecake pan is very full already. What size pan did you use?
Imani says
Hey I’m the commenter from TikTok. Amazing recipe. My first time making cheesecake and it came out perfect. I love the detailed instruction!
Stephanie Simmons says
Glad to hear that! Thanks so much for taking the time to leave a review, Imani.
Jen S says
Huge hit at Thanksgiving! Definitely making this again!
Stephanie Simmons says
Thanks so much, Jes! Happy baking!
Rachel B says
I made this and broke it up into two days. It was amazing. It was by far the best cheesecake I have ever made. It didn’t cave or crack. My caramel didn’t look so great but it tasted divine.
What an awesome recipe- thanks for sharing.
Stephanie Simmons says
Thanks so much for taking the time to review, Rachel!
Amber says
This turned out wonderful and everyone enjoyed it for thanksgiving! Mine did cook faster but I didn’t know if that was due to me putting my spring foam on a cookie sheet in the oven (to take it out easier). Will make again !!
Stephanie Simmons says
Glad to hear it was a success, Amber!
Rachel says
Omg overflow!
Anyone else’s cheesecake turn out HUGE? Mine is over flowing the 9” spring form pan by quite a bit!! I used ingredients per the instruction so not sure where I went astray
Stephanie Simmons says
Hi Rachel! Is it overflowing like spilling or just raised up over the top?
Ria says
I didn’t use all my cream cheese filling – I think mostly because the apples I used were very big – so took up more space. Mine didn’t overflow, but only because I knew it would grow in the oven. But OMG it was fantastic!
Stephanie Simmons says
Thanks for that note, Ria!
Whitney says
I made this for my family thanksgiving stayed up the night before thanksgiving till 3 am baking the cheesecake because I wasn’t expecting it to have to cool that long I am finishing the topping and the Carmel sauce tomorrow so far it tastes amazing and I’m excited for the final product it did crack and overflow a bit but it still taste good I’ve never baked anything more complicated than a simple brownie before so this was a first for me!
Stephanie Simmons says
Hi Whitney! Oh goodness, sorry to hear you were up so late! Glad everything is tasting good so far. I’m surprised to hear it overflowed a bit – did you use a standard 9-inch springform pan with the tall sides? Happy Thanksgiving!
Lauren says
Hi! Late post before thanksgiving but I loved your recipe and only had a 9×13 pan to cook in! After about an hour my cheesecake is brown on the edges, raised and matted, the knife is clean on the edges and thick when pull it out of the middle, do you think it is cooked sufficiently? We are letting it cool now but don’t know if we should allow it to cook longer! Tastes amazing though!
Stephanie Simmons says
Hi Lauren! I’m thinking the cheesecake would probably be done faster in a 9×1:3 pan because the batter isn’t as deep as in the 9inch springform. But, if you have an instant read thermometer (or meat thermometer, clean of course haha) insert it halfway down in the center of the cheesecake. It should be 150-155 degrees F. It may be a bit off now since it’s been out of the oven a bit.
Caitlyn Kelly says
HI! I love this recipe but am a little confused… when I put the cheesecake into the oven to bake for 1 hour 35 minutes, is the oven on to 350 degrees? Or is the steam of the water just supposed to bake the cheesecake?
Stephanie Simmons says
Hi Caitlyn! Bake the cheesecake at 350 degrees F. Sorry if that wasn’t clear! Let me know how you like the recipe. Happy Thanksgiving!
Maria sears says
If I happened to only put in 24oz of cream cheese but kept everything the same, what will happen to the cheese cake. I already put it in the oven before I realized the other 8oz were on the counter 🙁
Stephanie Simmons says
Hi Maria! Oops – we’ve all been there at some point! I think it could still turn out good. You will likely need to lower the bake time – start with 1 hour and go from there, checking for doneness as indicated in the recipe card. Let me know how it goes! ☺️
Alex says
I have a puppy and toddler so I can NOT let my cheesecake cool in the over cracked open. Would it be fine if I just let it cool for an hr on the counter?
Stephanie Simmons says
I think that would be ok, since it sounds like it’s your only option haha. ☺️ let me know how you like the cheesecake! Happy Thanksgiving!
Stephanie Simmons says
Oh, be sure to let it cool to room temperature before putting it in the fridge, like the recipe says.
Nikki says
I’m making this right now and my cake has been in the oven for 50 min so far. It has definitely raised a bit over the pan but the top also is golden already. I worry about another 45 minutes in the oven.
Stephanie Simmons says
Hi Nikki! This is totally normal. The cheesecake will be very underbaked if you don’t let it go an additional 30-45 minutes. When in doubt, use an instant read thermometer to check the temp halfway down in the center – it should be at about 150-155 degrees F. Let me know if you have any other questions!
Nikki says
Well I waited the full 1 hour and 35 minutes and it is brown on top and has expanded so much that it cracked.
Stephanie Simmons says
It sounds like the batter may have been overmixed. I’m sure it will still taste good even if it doesn’t look the prettiest. It should settle down as it cools and chills in the fridge, and the crack will be hidden by toppings.
Nikki says
Writing to add that I was able to salvage the cake and the toppings all covered everything beautifully. The cake came out great and the taste was amazing!!!! Was a huge hit!
Stephanie Simmons says
Glad to hear that, Nikki! Thanks so much!
Brittany Bryant says
I’m in the same boat as you, except I turned the oven off with 20 minutes still on the clock. I poked the cake as it says and it came out clean, yet it jiggled slightly. The brown top can be peeled off from my quick Google research, so I’m hoping I can salvage this!
Stephanie Simmons says
Hi Brittany! I would not recommend peeling the top of your cheesecake off, it will be very messy and is unnecessary. It’s perfectly fine for the top to be browned – it’s because these filled cheesecakes make the pan so full, so the top will brown a bit more. It should still be nice and creamy inside! Please let me know how it tastes. Happy Thanksgiving!
Chelsea Markowski says
Hello! I’m so excited to make this. If I bought a premade crust does that change the whole recipe? Thanks!
Stephanie Simmons says
Hi Chelsea! Unfortunately that won’t work for this recipe – my experience with pre made grahams cracker crusts is that they are usually made in the size of a 9-inch pie plate and this batter will only fit in a 9 inch springform pan, it’s far too much for a 9 inch pie plate. You could fill two or three 9-inch pie plate sized graham cracker crusts with a single batch of this recipe. A 9×13 pan would be another option as it would hold all the batter, if you don’t have a 9-inch springform pan.
Chelsea Markowski says
Okay! Thank you for such a quick response, Stephanie! Happy thanksgiving!
Stephanie Simmons says
Thanks, Chelsea! Happy Thanksgiving! Let me know how you like the cheesecake.
Jade P. says
THANK YOU Stephanie! Just tried your Dutch Caramel Apple Pie recipe and let me tell you 🤌🏽🥧 everyone LOVES. This is only my second apple pie that i’ve made from scratch and it is so good! I knew that I would love your recipes when I started following you on Instagram last week 😍 thank you!
Stephanie Simmons says
Thanks so much Jade! It looks like you left this review on the apple pie cheesecake instead of the apple pie, though. 🙂
Keila says
I made this cheesecake recently and I have to say, it is by far the best cheesecake I’ve ever had! I make cheesecakes all the time and I know they can be time consuming but I love that I can make the apple filling, crumble topping and caramel ahead of time which makes it so much easier! You out did yourself on this one!!! I highly recommend this recipe to anyone looking to impress your guests/family! They will LOVE it!!!
Stephanie Simmons says
Thanks so much for your kind review, Keila! I’m so glad you enjoyed this recipe adn that the make ahead tips were helpful. Happy Thanksgiving!
Hamptons Holistic Health says
I made this cheesecake for my Friendsgiving last Saturday and everyone’s raving about it. They all love it so much that they are paying me to make some for their thanksgiving dinner on Thursday. Haha
I enjoy making cheesecakes but never have I thought about incorporating apples into a cheesecake. This recipe is incredible and I will always make this whenever I have any gathering again. Wish I had made more than one of them.
Thanks so so much for this recipe. Can I give it 10 ⭐️⭐️⭐️⭐️⭐️⭐️⭐️⭐️⭐️⭐️
Stephanie Simmons says
I’m so glad to hear that this cheesecake was a hit! Thanks so much for your kind words. Happy Thanksgiving!
Jennifer says
So, my 9 inch pan is at my daughter’s. I only have my 8 inch and 10 inch. Would it be horrible to make in the 10 inch?
Stephanie Simmons says
As long as it’s a 10-inch springform with the tall sides (not a 10-inch cake pan) that would work just fine! Please let me know how you like the recipe!
Jennifer says
It is springform!! I’m so excited to make this. I will comment back with my results.
Stephanie Simmons says
Thanks so much, Jennifer! Happy Thanksgiving!
Dee says
I only have a convection oven – I read on other cheesecake recipes they recommend lowering the temperature by 25 degrees and needing 10-15 mins less bake time. Do you agree?
Stephanie Simmons says
Hi Dee! I do not have experience with convection ovens, but if that’s what other reputable websites say I would say that’s a safe bet. There’s likely no harm in starting with a lower temp and less bake time – you can always add more if needed. Please let me know how you enjoy this recipe!
Amira says
Hi Stephanie! I’m going to make this for thanksgiving and was wondering if the cornstarch in both the filling and topping recipe is only used if it’s not as thick?
Also, to make in one batch, would I just double the ingredients for filling and topping?
Thank you in advance!
Stephanie Simmons says
Hi Amira! I don’t recommend skipping the cornstarch – it thickens the juices in the filling so it doesn’t add too much moisture to the cheesecake. And yes, you can double that to make the filling and topping all at once! You’ll want to make sure you slice all of your apples between 1/4 and 1/2 inch thick. Please let me know how you enjoy the recipe!
Amira says
Thank you for such a quick response! Okay perfect will do. I’ve just finished making the caramel—super easy! Will update once it’s all put together!
Stephanie Simmons says
Sounds good! 🙂
Amira says
Hi again! So I made it and it turned out AMAZING!!! Everyone loved it—even my SIL who never eats sweets lol.
I made some substitutions based on my family’s tastes. I didn’t add the spices to the actual cheesecake and only put half of the apples in the center. I also made it a couple days in advance so the cheesecake had time to fully settle. It was super creamy and still very flavorful even without the additional spices.
Thank you for this great recipe!!
Stephanie Simmons says
Glad to hear everyone enjoyed this, Amira!
Chloe says
The most amazing cheesecake ive EVER had!! The fact you write so much useful tips and tricks annoys some people but i find it so helpful <3
Stephanie Simmons says
Thanks so much Chloe! I appreciate your kind words more than you know 🙂 Happy Thanksgiving!
Donna says
What is the best kind of apple to use?
Stephanie Simmons says
Hi Donna! This is mentioned in the ingredient overview. Use any good baking apple for the apple filling and topping. Don’t use soft apples like McIntosh as they will become mushy. Use something like Jonathan, Golden Delicious, Honeycrisp, Gala, or Fuji or a mix of these. Some people recommend granny smith but I personally don’t like the taste of those. Please let me know how you like this recipe! Happy thanksgiving!
Greg says
Is there a secret to removal from the springform bottom ? Thanks
Stephanie Simmons says
Hi Greg! Did you line it with parchment paper? That will allow you to carefully slide the whole thing off the bottom and onto a serving plate. Otherwise, you will need to carefully run a large flipper/spatula under the bottom crust to loosen it from the bottom. Or you can just serve it with the bottom still on – no harm in that! ☺️ please let me know how you like this recipe and happy thanksgiving!
Greg says
Haven’t made it yet. Today’s the day. Do you line just the bottom or up the sides as well. I didn’t see any in your video. I’m assuming place the cheesecake on your serving platter after cold and it will slide off the parchment ?
Stephanie Simmons says
I just line the bottom. So, place a piece of parchment over the top of the bottom of the pan, then attach the sides. So, it will just cover the bottom and stick out through the wall of the springform pan. Yes that is correct – it should come off easily. So, I would set the cheesecake with the parchment paper and springform pan bottom on your serving platter or cake stand, then gently lift the cheesecake using the parchment paper so that you can grab the base and slide it out. Then gently lower that end of the cheesecake back onto the platter, and then pull out the parchment paper from under it. Hopefully that makes sense! Let me know how it all goes. Happy Thanksgiving!
Claire says
Made this for a Friendsgiving the other weekend and everyone LOVED this! I was nervous to make it as I have never made a cheesecake before but the instructions were so clear and helpful. This is the best, most decadent dessert I have ever made!!!
Stephanie Simmons says
I’m so glad to hear the directions were helpful for a first-time cheesecake baker! 🙂 Glad you enjoyed the recipe!
Abby Sachdeva says
Stephanie this cheesecake was AMAZING!! A couple of questions about how to improve the texture: mine turned out really good but on the drier side and the top browned a lot. Was it because I used a shallow pan for the water bath (a sheet pan)? I also set the cake on the rack above because I was worried about leaking. I made sure the sheet pan had water the full time but maybe the amount of water in the bath matters?
Stephanie Simmons says
Hi Abby! If it was dry, I would say using the water bath below could have contributed. Putting it in the water is ideal but I understand not everyone can make that work. It’s normal for a cheesecake like this to brown more on top because there’s so much in the pan that the batter is up at the very top edge, meaning the heat from the oven is going to hit it more easily and brown it more. Was your water boiling?
John Dyer says
“”I would really like to make this cake for my wife for Thanksgiving. I tried yesterday but failed miserably. I have made plenty of cheescakes and I use the the same old 9″ springform pan I have always used but this recipe seems to be for a much larger pan. I read in one of the above sections that you said a half recipe should be baked in a 9″ pan. Can you please advise as to exactly what size pan to use for this recipe? 9” springform pan is too small
Stephanie Simmons says
Hi John! Apologies that I didn’t see your comment sooner. This recipe should fit in a 9″ springform pan. My note about a half recipe was that a half recipe can be baked in a 9×9 square pan (a 9×9 pan having shorter sides and less capacity than a 9″ springform). If you have extra batter for some reason, it can be baked in cupcake liners in a cupcake or muffin pan. Did you end up baking any of it on your first go-round?
Steph Aviles says
Delectable! This recipe is tedious and time consuming but as she says, you can do it over a span of a couple days. This was my first try at a water bath and I think it went well! I just placed a pan on the rack below filled w boiling water. I only had an 8” springform pan but this allowed me to also get a mini 3” cheesecake out of it too and boy was I soooo happy I didn’t have to share that 😆 Mine browned on the top way more than I wanted so next time I’d probably cover it halfway through with foil. I followed the recipe and directions as written. The flavor was very well balanced and not overwhelmingly rich! The cinnamon grahams were the right choice for the crust imo as well!!
Stephanie Simmons says
Glad you enjoyed this cheesecake, Steph! That’s a great tip about the extra batter going in a mini pan. I would not recommend covering with foil – it will stick and rip off the top of the cheesecake. Been there, done that haha.
Erica C says
This was the best desert I have ever made hands down. The only change I made was not putting any seasoning in the cheesecake to add more contrast and it was perfection I’ll be making this every holiday
Stephanie Simmons says
Aw, thanks so much Erica! I’m honored that my recipe has a standing place on your holiday table. Happy Thanksgiving!
Teresa says
Could this be made like 3-4 days ahead before serving? I’d like to bake it today for thanksgiving.
Stephanie Simmons says
Hi Teresa! I think 3-4 days ahead might be pushing it a bit, as in some places online I’ve found that the FDA recommends cheesecake be eaten within 3-4 days, and in some places it says 5-7. If you make it 3-4 days ahead, this greatly eats into (hah, no pun intended) your time to enjoy the leftovers. I would recommend making it no more than 2 days ahead. However, if you must make it today, I would bake the cheesecake, then let it cool in the oven and at room temperature as directed. Once it’s chilled overnight, remove the outer rim from the springform pan. Wrap the cheesecake well – still on the bottom of the pan – in a few layers of plastic wrap, then give it a final layer of aluminum foil. If you have a tupperware container large enough, I would add it into that as well. (Make sure you don’t have anything nearby in your freezer like, chopped onions, as that smell/taste can seep into other food.) Freeze, then transfer back to the fridge on wednesday to thaw for serving on Thursday. I do NOT recommend freezing it with the extra apple pie filling, crumble, and caramel on top. However, the extra apple filling can be made 1-2 days ahead and refrigerated. Gently reheat with a splash of water or apple juice/apple cider to get it juicy again before adding to the cheesecake. The crumble can be made now, cooled at room temperature, and frozen in a ziplog bag. Thaw on the counter for 1-2 hours before using. Caramel sauce can be made now, refrigerated, then warmed up when ready to drizzle on the cheesecake. Hope that helps! Please let me know how you like this recipe and I hope you have a wonderful Thanksgiving!
Neyda R says
Made this today for an early Thanksgiving dinner. It was UH-MAY-ZING!!! My family absolutely loved it. I followed the recipe exactly as written & all the components came out perfectly. My one piece of advice for anyone attempting to make this is to read the recipe & tips thoroughly. Trust me, it will help you achieve a perfect dessert.
Stephanie Simmons says
That is absolutely the best tip for a long recipe like this, Neyda! I’m so glad you enjoyed this recipe. Happy Thanksgiving!
Sara Strother says
This cheesecake is DELICIOUS!!!! Not to mention incredibly easy. It has many steps but they are well laid out and easy to follow. I can’t wait to make it again!!!!!
Stephanie Simmons says
Thanks so much, Sara! I’m so glad to hear that you enjoyed it and that the recipe was easy to follow.
Kyla says
This was SO worth the effort. Splitting things up into a couple of days also made this recipe feel easier than it was. Thank you for making this recipe man, it’ll definitely be a cozy season staple in my house 🙂
Stephanie Simmons says
Thanks so much, Kyla!
Hannah says
Everyone loved this cheesecake! I found the directions easy to follow. My crumble needed a lot less time in the oven, so keep an eye on it!
Stephanie Simmons says
Thanks so much Hannah! I will add a note to the crumble – thanks for bringing that to my attention! 🙂
emily says
this looks incredible and has all of my favorite things! i’d love to try it this week but have one question- my partner cannot stand sour cream and he will (somehow) notice if i use this much, do you have a recommendation for a good substitute? 🙏 thank you in advance!
Stephanie Simmons says
Hi Emily! I have not tried it in this recipe but heavy cream is a very common substitute for sour cream in cheesecake recipes. I would recommend just using 3/4 cup in place of the 1 cup of sour cream. Or, you could do 1/4 cup heavy cream and 1/2 cup sour cream. I promise the sour cream taste is not noticeable at all, so you could just go ahead with the recipe as written! Another option would be Crème fraîche if you can find it. Use it in the same quantity as the sour cream. Please let me know how you like this recipe!
Sara Strother says
I really dislike sour cream … like REALLY dislike it! I couldn’t taste it at all in this recipe.
Stephanie Simmons says
That’s super helpful to know for anyone else who dislike sour cream!! 🙂
Ashley says
Havent been able to taste, but in process of baking. I was very precise in measuring, every was good until baking. I have made cheesecakes before in a bath, but your instructions were very confusing. I gathered that you could do a bath without submersion (cake above water) and my cheesecake isnt coming out well at all. With this method its raised about an inch above the springform and has taken significantly longer to bake. I do my fair share of baking, but thought i would try the adverse way of the bath. I highly suggest to stick to the regular submersion bath.
Stephanie Simmons says
Hi Ashley! I’m sorry the directions seemed confusing – I tried to be clear that you can place the 9-inch springform pan containing the cheesecake batter inside of a 10-inch cake pan, inside of the roasting pan, which is then filled with a few inches of the water. This ensures no leaks into your cheesecake. The other option is to simply place the roasting pan with the water on the rack below the rack your cheesecake is baking on. I’ve never found any other foolproof way to keep the water from leaking into your cheesecake, and have had beautiful creamy cheesecakes as a result of both of these methods. The cheesecake raises above the top of the springform a bit in this recipe due to the volume of batter & apples inside the cheesecake. This is fine and completely normal, and has nothing to do with the water bath method. I do hope you will leave a follow up to complete your review once you’ve had a chance to taste the cheesecake. Thanks so much!
Cristina Golgotiu says
I saw the recipe on Instagram and absolutely had to try it, I love salted caramel. This is definitely the most “difficult” cheesecake I’ve ever done and it’s incredibly mouthwatering and pretty easy to make. Thank you so much!
Stephanie Simmons says
Thanks so much, Christina!
Diane Granger says
This was the best cheesecake I have ever made. I brought it to a dinner party, and everyone raved about it.
This recipe is very time consuming but well worth the effort! I thought it was going to be way too sweet, but it was the perfect sweetness. I did have trouble with making the caramel, but I always do…ugh.
Thank you so much for sharing your delicious and amazing recipe, Stephanie!
Stephanie Simmons says
Thanks so much for the rave review, Diane! If you can tell me what trouble you had with the caramel, I’m happy to try and help troubleshoot. Happy Thanksgiving!
Colt says
Delicious recipe! Took it to a work thanksgiving potluck and it was devoured in 15 minutes. 4.5 stars. One thing I noticed though for me, there was way too much cheesecake leftover. I probably could’ve made two with all of the extra mix I had. The directions for making the crumb toppings was a little confusing, so I just melted the butter first and then mixed it all together before baking it. If I didn’t have trouble viewing everything online with how the website looks and the extra cheesecake mix, it’d be 5 stars!
Stephanie Simmons says
Wow, it sure was devoured quickly haha! Glad to hear this recipe was a hit. What size pan did you use? I use a standard 9-inch springform pan and am always able to fit all of my batter in. It does make the pan very full, but it doesn’t rise and expand like a cake, so it’s not a problem. I do apologize for any trouble you had with my website – I’m in the midst of some changes and am happy to hear any further feedback you have as a user! Happy Thanksgiving.
Katie says
If I freeze the cheesecake how long does it need to thaw before I put the toppings on?
Stephanie Simmons says
Hi Katie! It will need to thaw in the refrigerator overnight before topping and serving. I hope you enjoy this recipe – please be sure to let me know how you liked it! Happy Thanksgiving!
Jane says
Why not give instruction to make the apple topping only once, just double the ingredients and instruct half for the middle, half for the top? :-/
Stephanie Simmons says
Hi Jane! I actually have a note about that at the beginning of the apple pie filling directions in the recipe card. I hope you enjoyed this cheesecake!
Saida says
One of the best cheesecake recipes that I ever made! The tartiness of the apples with the spiced cheesecake the crunchiness of the crumble and the sweetness of the caramel makes the flavor out of this world! I definitely recommend this recipe for your next dinner party!
Stephanie Simmons says
Thanks so much, Saida! I’m so glad to hear you enjoyed this recipe.
Quincee Healy says
I did a trial run of this recipe before Thanksgiving and it was a hit! I took it to work, and my coworkers LOVED this cheesecake. It will definitely be a staple in my holiday desserts. Thank you so much for sharing this wonderful recipe!
Stephanie Simmons says
So glad to hear that, Quincee! Happy Thanksgiving!
Ashley Hamric says
I had this over the past weekend and it was AMAZING. Everyone in my house loved it and we had plenty to share with friends also. This was such a success it will be made for Thanksgiving also 😊
Stephanie Simmons says
Thanks so much, Ashley! I’m glad to hear it was a hit and I’m so honored that my recipe will be part of your Thanksgiving celebration. 🙂
Ann Marie says
This cheesecake was delicious! My daughter saw this recipe on IG and asked me to make it for her birthday. We served it at our family gathering and it was declared delicious by all. Not a crumb was left on any of the plates! As suggested by Stephanie, I thoroughly read and took notes on the recipe before starting. I highly suggest this also due to the number of steps required to complete this recipe. Everything turned out exactly as written in the recipe except for the crumble which burned completely by the 12 min. mark of the 22-27 minutes. After some quick internet searches of other crumble recipes, I downgraded the temperature to 325 for 9-10 minutes. Also note, there is an extensive amount of cooling time not included in the recipe cook time. It cools for 1 hour after baking in the oven and then needs about another 3-4 hours to cool completely (it’s very dense – the 9-inch springform pan was filled to the brim!) on a rack before refrigeration of 6+ hours. Using Stephanie’s make ahead tips, I made the apple filling/topping, caramel sauce, and crumble 2 days before serving, I baked the cheesecake mid-day the next day which allowed it to cool for hours afterwards, and then refrigerated it over night. Assembly came together quickly the next day. A reviewer asked below if this was too sweet and while it does seem like it would be with all the components together, it was not too sweet for any of the 12 guests of all ages at our event. I would suggest watching the caramel drizzle on top to control that. Serve with remaining caramel sauce on the side for guests to add as desired. Thanks for the great recipe, Stephanie!
Stephanie Simmons says
Thanks for leaving such an in depth review, Ann! I truly appreciate it. I’m sorry to hear that the crumble was burnt – I’ve made it a few times in my oven with no issue though, so I wonder if your oven was running a bit hot. I will test it again and see if I can replicate the issue. I’m so glad to hear that you enjoyed this cheesecake! Happy baking.
Rebecca says
Hi! What type of apple works best with this recipe? Looking forward to trying it, but I know the type of apple can make a difference.
Stephanie Simmons says
Hi Rebecca! I answer this in the ingredient overview section towards the beginning of the blog post. 🙂 Don’t use soft apples like McIntosh as they will become mushy. Use something like Jonathan, Golden Delicious, Honeycrisp, Gala, or Fuji. Some people recommend granny smith but I personally don’t like the taste of those, unless I’m using 3 parts honeycrisp to 1 part granny smith, or something like that. Please let me know how you like this recipe! Happy baking.
Jackie says
I tried this recipe and it was very flavorful. Seems hard to make when you are reading through instructions but it is pretty easy. The only part I got a little confused on was the water bath. Overall very good dessert.
Stephanie Simmons says
Thanks so much, Jackie! Glad you enjoyed the recipe. I’m happy to help out with the water bath – which part was confusing there?
Ashley says
Do you have to use a water bath? I don’t have a roasting pan.
Stephanie Simmons says
Hi Ashley! I do recommend it for the best & most creamy texture. You can always fill a 9×13 pan with a few inches of boiling water instead! Please let me know how you like this recipe.
Katie says
Hi there! Have this in right now. I have 21 minutes left but the top is completely browned and cracked/raised. I thought i followed directions exactly, I’m unsure if I should leave it in for the remaining 21 minutes or take out now, don’t want it to be underbaked. Thank you so much!! Excited to taste this.
Stephanie Simmons says
Hi Katie! The cracking & raising may be due to over mixing the batter. It’s normal for it to brown on top. Does it look like the visual cues I give in the recipe for doneness? Did you test it with a knife or take the temp with an instant read kitchen thermometer?
Margge Eslick says
Holy. Yum. This was waaaay more involved than what I’m used to doing and almost gave up a couple times, but I am so glad I stuck with it! This was AMAZING!!
Stephanie Simmons says
I’m so glad you stuck with it and enjoyed the recipe, Margge!
Maegan Rambin says
Just checking, can I make this in a regular pie dish? I could get what you make it in, but if that’s just for plating and serving could I use something else?
Stephanie Simmons says
Hi Maegan! There is no pie dish that can hold this amount of batter. The springform pan is very deep/tall which is why we use them for cheesecakes. However, you could bake this in a deep 9×13 pan! ☺️ Please let me know how you enjoy this recipe.
Brittany says
First time I ever made a cheesecake and this turned out incredible! I even overbaked it cause my oven runs hot and it still turned out perfect. After the first cooling in the oven I put it in the freezer for 2 hours then transferred it to the fridge for 2.5-3 hours and it turned out perfectly set up!
Stephanie Simmons says
So glad to hear you enjoyed this recipe, Brittany!
Esme says
I love all your recipes. They’re all so delicious!
Stephanie Simmons says
Thanks so much, Esme!
Derek says
This looks delicious, but I’m worried about it being overly sweet. Do you think it’d still taste good and bake the same with half the apple filling/topping?
Stephanie Simmons says
Hi Derek! None of the people I shared this with found it overly sweet, but you can certainly use half the apples if you’re worried about that. The bake time may be a bit less – I always start 20-30 minutes under the given bake time anyways for a cheesecake, adding more time as needed. Please let me know how you enjoy this one!
Brittany says
Definitely not overly sweet in any capacity. I can’t do super sweet things but the cheesecake filling has a slight tang (I think from the sour cream) and pares very well with the apples and crust.
Stephanie Simmons says
Thanks so much, Brittany! 🙂
Fabiana says
Hi Stephanie,
Would I have to adjust the baking time if I don’t use a water bath?
Thank you in advance.
Stephanie Simmons says
Hi Fabiana! I recommend NOT skipping the water bath as it produces the creamiest and most evenly baked cheesecake. But, if you must skip it, I would reduce the baking time by 25-35 minutes to start with, then check it and add time as needed. Let me know how you enjoy this recipe!