This post contains affiliate links. Please see our disclosure policy.
My Perfect New York Style Cheesecake is an incredibly easy dessert to make at home, but feels like it came from a fancy restaurant! It’s rich and creamy, with a light yet decadent texture, and a crisp graham cracker crust. Don’t be intimidated – my recipe walks you through everything you need to know for cheesecake success every time!

Table of Contents
- Why you’ll love this Classic Cheesecake:
- Ingredient Overview:
- Recipe Substitutions & Variations:
- How to Make Classic New York Style Cheesecake:
- Serving + Storing Cheesecake:
- New York Cheesecake Topping Ideas:
- Expert Baking Tips for the Best Cheesecake:
- FAQs:
- Special Tools:
- Now that You’ve Mastered Cheesecake, Try These Recipes:
- Classic New York Cheesecake Recipe
Why you’ll love this Classic Cheesecake:
- Creamy Cheesecake – This cheesecake is ultra creamy and rich, while still having a beautifully light texture.
- Celebration Worthy – This is the perfect dessert to serve for any occasion since it must be made ahead, the flavors are customizable, and it serves a crowd.
- Approachable Recipe – Cheesecake may seem intimidating, but I promise this really is an easy cheesecake recipe! My blog post and recipe will walk you through every step to give you the confidence to produce a perfect cheesecake.

Ingredient Overview:
As always, the full recipe with measurements & directions can be found in the recipe card at the bottom of this post. Use the table of contents (back at the top, below the first image, to navigate).
- Cream Cheese – Use full fat cream cheese, in the block style. This needs to come to room temperature before you bake.
- Granulated Sugar – We’re using just enough sugar to sweeten the cheesecake, while still keeping the classic, slightly tangy, cream cheese flavor at the forefront.
- Eggs – Use large eggs, at room temperature.
- Sour Cream – Use full fat sour cream, at room temperature.
- Corn Starch – Just a hint of corn starch helps the cheesecake hold its shape, while staying super creamy.
- Vanilla Extract – Use real vanilla extract for best results.
- Salt – A tiny pinch of salt always balances the flavors in any baked good!
- Butter – I always use salted butter because in my experience, it lends the best flavor, but feel free to use unsalted butter if that’s what you prefer.

Recipe Substitutions & Variations:
- Gluten-free – Use gluten-free graham crackers to make this new york cheesecake gluten-free.
- Dairy-free – I have not experimented with dairy-free cheesecakes so I can’t confidently direct you here, except to check out a fabulous vegan baking blog, like The Banana Diaries or Little Blog of Vegan!
- Graham Crackers – I believe that digestive biscuits or something similar would be the comparable option to graham crackers if you don’t live in the U.S.
How to Make Classic New York Style Cheesecake:
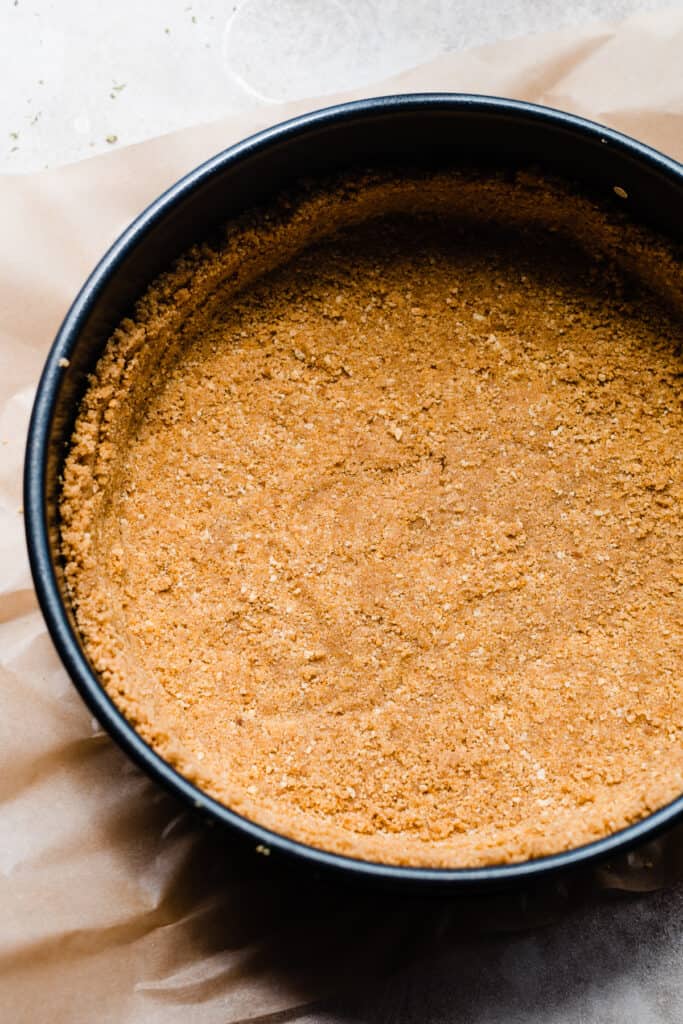
Step 1: Make the Crust. Stir together melted butter & graham cracker crumbs. Press into a 9-inch springform pan and bake at 350 for 10 minutes.
Step 2: Combine the Cream Cheese & Sugar. Beat the cream cheese alone for 30-60 seconds first, to get it creamy. Scrape the bowl. Add the granulated sugar and beat for 1-2 minutes, scraping the bowl to ensure no lumps.


You can see how lumps of cream cheese were hiding in the bottom of the bowl in the image below. This is why scraping down to the bottom of the bowl is so important! (The cheesecake batter below is a bit of a different color – it’s from my Pineapple Upside Down Cheesecake which uses brown sugar instead of white sugar!)

Step 3: Add the Eggs, Sour Cream, and Vanilla. Mix in the eggs one at a time, on medium speed, until just barely combined. Mix in the sour cream, corn starch, salt, and vanilla.


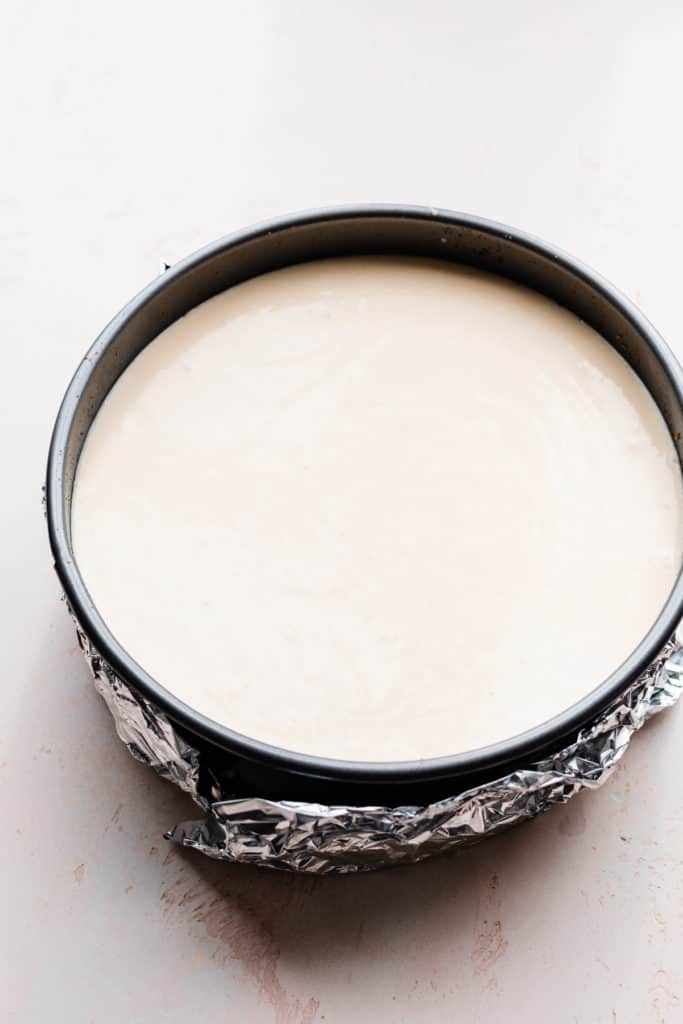
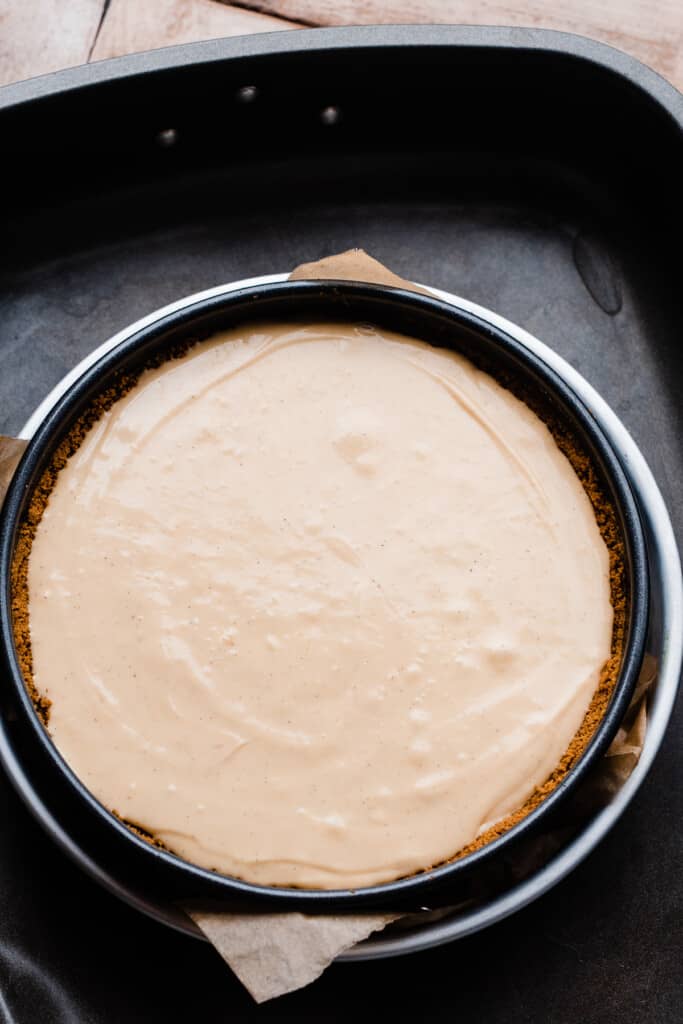
Step 4: Bake in a Water Bath. Pour the batter into your baked crust. Place the springform pan inside of a 10-inch cake pan, and set that in your roasting pan. Place your roasting pan on the oven rack, and then pour boiling water into the roasting pan only.
Step 5: Cool & Chill. Once done baking, turn the oven off, and crack the door open. Leave the cheesecake in for 1 hour to gradually begin cooling (this helps prevent cracks!).
Then, place the cheesecake on a wire rack to further come back to room temperature, about 1 hour. Then, place in the fridge to chill for at least 6 hours or preferably overnight before serving.
Serving + Storing Cheesecake:
Once the cheesecake has chilled overnight, you can add desired toppings, slice, and enjoy! For the most *perfect* restaurant-quality slices, run your large knife under hot water, then dry it and make a cut.
Repeat this (rinsing the knife off at the same time) for each slice. It’s fiddly but makes perfect slices. Store leftover cheesecake in an airtight container in the fridge for 3-4 days.

New York Cheesecake Topping Ideas:
Top your chilled cheesecake with fruity toppings, chocolate, caramel, or whipped cream before serving! Here are a few of my favorite topping recipes:

Expert Baking Tips for the Best Cheesecake:
- Oven Thermometer – An oven thermometer will tell you if your oven is actually running at the temperature you set it to. Your oven may not be accurate. Accurate oven temperature is crucial for most bakes, so I leave an oven thermometer in at all times to keep an eye on my oven’s calibration.
- Room Temperature Ingredients – It is imperative that your cold ingredients come to room temperature. Cold ingredients will create a lumpy batter.
- Don’t Over Mix – Over mixing the cheesecake batter when you’re adding the eggs can cause the cheesecake to buckle when cooled, or, it might puff up like a soufflé in the oven which we definitely don’t want!
- Don’t Over Bake – Follow the doneness cues given in the recipe card below to avoid over baking the cheesecake. Don’t panic if it browns the slightest bit on top – that can happen without it being overbaked.
- Stand Mixer – This recipe works well with a hand mixer or in a stand mixer fitted with the paddle attachment!

FAQs:
You can cheat this by gently (gently!!! Like, 4-6 seconds at a time) warming cream cheese and sour cream separately in the microwave if you forgot to set them out. Do 2 blocks of cream cheese at a time, on a plate, for 5 seconds on each side. Repeat with remaining blocks. Heat a bowl of sour cream for 4-6 seconds, stir, and repeat if needed. Place eggs in a bowl of hot water for about 10 minutes.
Yes, bake a half batch of this recipe in an 8×8 or 9×9 square pan lined with parchment paper. I think half the batter may still be a bit much for a 6-inch springform pan.
Yes! That’s the nature of cheesecake. Allow the cheesecake to come to room temp after it’s baked, and then transfer to the fridge to chill at least 6 hours or up to 1 day before serving.
I highly recommend it. The hot water produces steam, which helps the cheesecake cook evenly & remain nice and creamy, without cracking. It also helps prevent the edges from cooking at a faster rate than the center.
You have two options – place the roasting pan filled with water on the rack below your cheesecake, or place your cheesecake pan (still wrapped in aluminum foil) into a 10-inch cake pan inside of the roasting pan. Pour water into the roasting pan only. If you place the foil-wrapped cheesecake pan into the roasting pan and pour in water, it will almost always leak to some degree.
It’s richer than “traditional” cheesecake, which often has heavy cream. New York style has sour cream instead. It’s made with more cream cheese and eggs as well, for an extra rich and decadent cheesecake.
Special Tools:
- Springform Pan – This recipe uses a 9-inch springform pan.
- Roasting Pan – You’ll need a roasting pan (with the rack removed) for the water bath.
- 10-Inch Cake Pan – A 10-inch cake pan creates a no fail barrier between the cheesecake and water bath. If you don’t want to purchase this, you can wrap the cheesecake very well in aluminum foil, but it will take many layers – most people say 8 to 10 to ensure no water gets through. When I used to do 2 layers in the past, water always got in. You can also use any pan you already own that fits around the 9-inch springform, and fits inside the roasting pan.
Now that You’ve Mastered Cheesecake, Try These Recipes:
- Key Lime Cheesecake
- Strawberry Cheesecake
- Pecan Pie Cheesecake
- Bailey’s Chocolate Cheesecake
- Biscoff Cheesecake
- Triple Nutella Cheesecake
- Lemon Blueberry Cheesecake
Did you make this recipe? Leave a comment & star rating!
Click the little stars in the header of the recipe card below to leave a comment & star rating, letting me know how you liked the recipe. I take all feedback seriously, & leaving a rating helps my small business immensely!

Classic New York Cheesecake
Ingredients
For the Crust:
- 3 cups graham cracker crumbs, 276 grams
- 1/2 cup salted butter, melted, 113 grams
For the Cheesecake:
- 32 ounces full fat cream cheese, at room temperature , use the block style – 904 grams
- 1 and 1/2 cups granulated sugar , 308 grams
- 4 large eggs, at room temperature
- 3/4 cup full fat sour cream, at room temperature , 180 grams
- 1 and 1/2 tsp corn starch
- 2 tsp vanilla extract
- pinch of salt
Instructions
- Make the Crust: Preheat oven to 350° F. Spray a 9-inch springform pan with nonstick spray and make sure the bottom is securely fastened. Stir together crust ingredients and press into prepared pan and up the sides a bit (see photos above). Bake this for 10 minutes. Set aside. Keep the oven on at 350. Fill a large pot with water and set it on your stove, and get out a large roasting pan – you'll need this for your water bath later.3 cups graham cracker crumbs, 1/2 cup salted butter, melted
- Make the Cheesecake Filling: Remember that your cold ingredients need to come to room temp before you start or the filling won't turn out. In a large mixing bowl, beat the softened cream cheese with electric mixer until creamy, about 1-2 minutes. Add the sugar & mix until well incorporated, about 1 minute. Scrape the sides of the bowl with a rubber spatula as you go. Add the eggs one at a time, mixing on medium speed after each until just incorporated – if you over-mix, the cheesecake can inflate and overflow in the oven. Be sure to scrape the bottom of the bowl between each egg addition, as little lumps of cream cheese will hide down there. Add the vanilla, sour cream, corn starch, and salt and mix until just combined.32 ounces full fat cream cheese, at room temperature , 1 and 1/2 cups granulated sugar , 4 large eggs, at room temperature , 3/4 cup full fat sour cream, at room temperature , 1 and 1/2 tsp corn starch, 2 tsp vanilla extract , pinch of salt
- Prepare the Water Bath: Bring the large pot of water to a boil. Set your springform pan on a rack positioned in the center of the oven, and place the roasting pan on the rack below, or wrap the base of the cheesecake pan in foil and place it inside a 10-inch cake pan inside the roasting dish. Pour the boiling water into the roasting pan. Both of these methods ensure no leaks.
- Assemble & Bake Cheesecake: Pour the batter over your prepared curst.Bake the cheesecake for 74 to 85 minutes. When done, the cheesecake will have only a slight wobble in the center, and a knife inserted into the center will have just a small bit of thick batter. An instant read thermometer inserted into the center should read about 156℉ to 160℉ (avoid poking the bottom of the pan as this will give you a false reading).Turn off the oven and crack the oven door open. Let the cheesecake cool in the oven for 1 hour before removing it.
- Cheesecake Cooling: Once the hour is up, remove the pan from the oven. It should be cool enough to handle. Remove the foil and set the springform pan on a wire rack. Let cool to room temperature, about 1 hour more, then cover with foil and refrigerate at least 6 hours or up to 1 day before removing from the pan and serving.
- Serve + Store: Remove the sides of the springform pan, and if desired, transfer cheesecake to a cake stand or plate. Add any desired topping (see ideas in the blog post above). Then, slice, and serve! Store leftovers, in an airtight container, in the fridge for 3-4 days.
- Optional: Serve with whipped cream – make the whipped cream from my Key Lime Cheesecake recipe. No need to pipe it on. You can simply let folks dollop it onto a slice themselves.
Notes
Nutrition
Nutrition information is automatically calculated, so should only be used as an approximation.


This is a fantastic cheesecake! My husband doesn’t bake and I randomly found this recipe. He used it for Christmas Eve and everyone was raving about it!
Thanks so much for your kind comment, Mary Jane!
I followed the instructions to not over mix the eggs, and it still puffed up like a soufflé somehow. It’s currently in the hour oven stage. Just not sure what happened. Everything was room temp.
Hi Heather! Some puffing up is normal during the bake. As long as the batter didn’t overflow, it sounds like you are okay! The puffiness will subside as the cheesecake cools. Thanks for noting this – I should add a photo of what the cheesecake will look like when it’s done baking but before it has cooled! Let me know how you like the recipe!
It did end up going back down, with some cracks. But I am remaking another one today, because I feel like it got too brown on top, maybe over baked. I know that the batter alone tasted so good though! Thank you for the reply!
Thanks, Heather! It sounds like your oven may be running a bit hot. Or, the bake time may need to be reduced just a bit for your oven – unfortunately ovens vary so much from one to the next. The good news is that even when mine have browned on top, they were still always creamy and delicious inside! Happy baking!