This post contains affiliate links. Please see our disclosure policy.
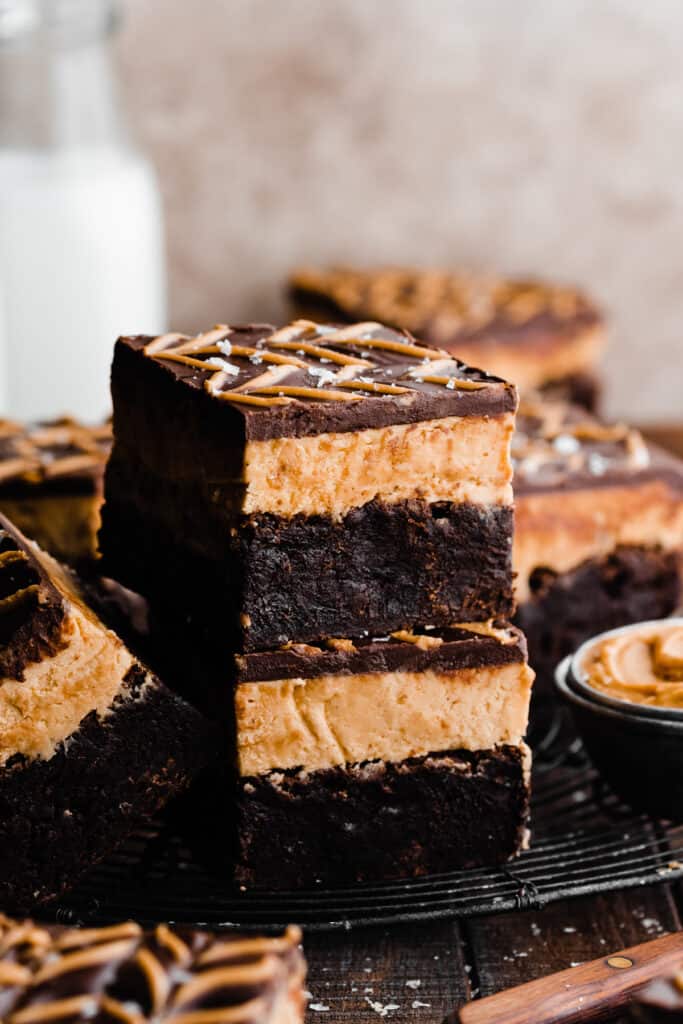
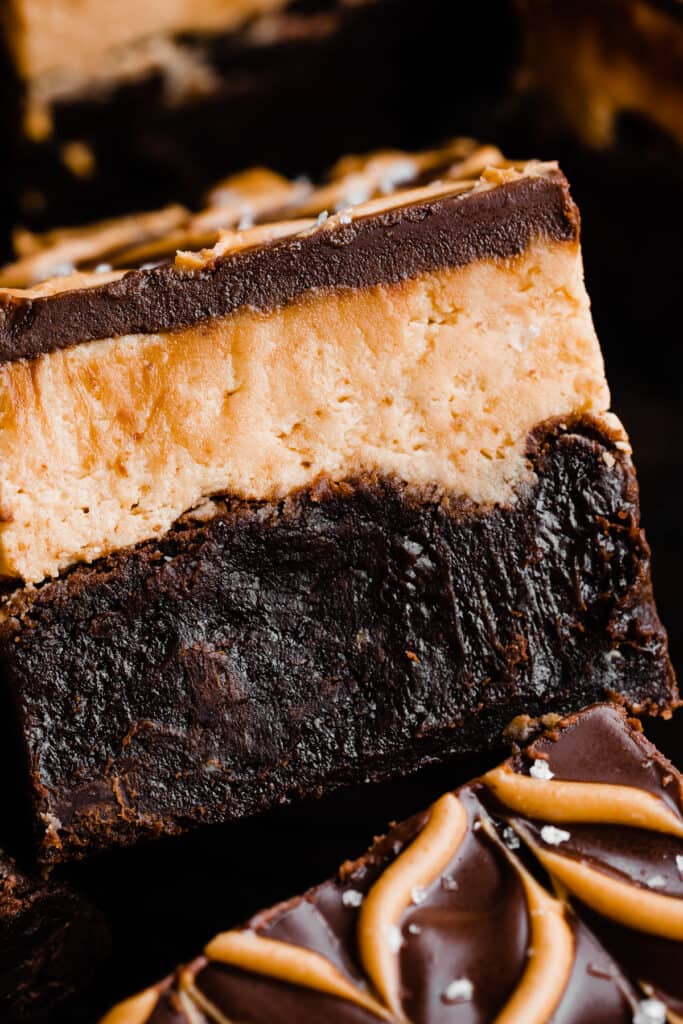
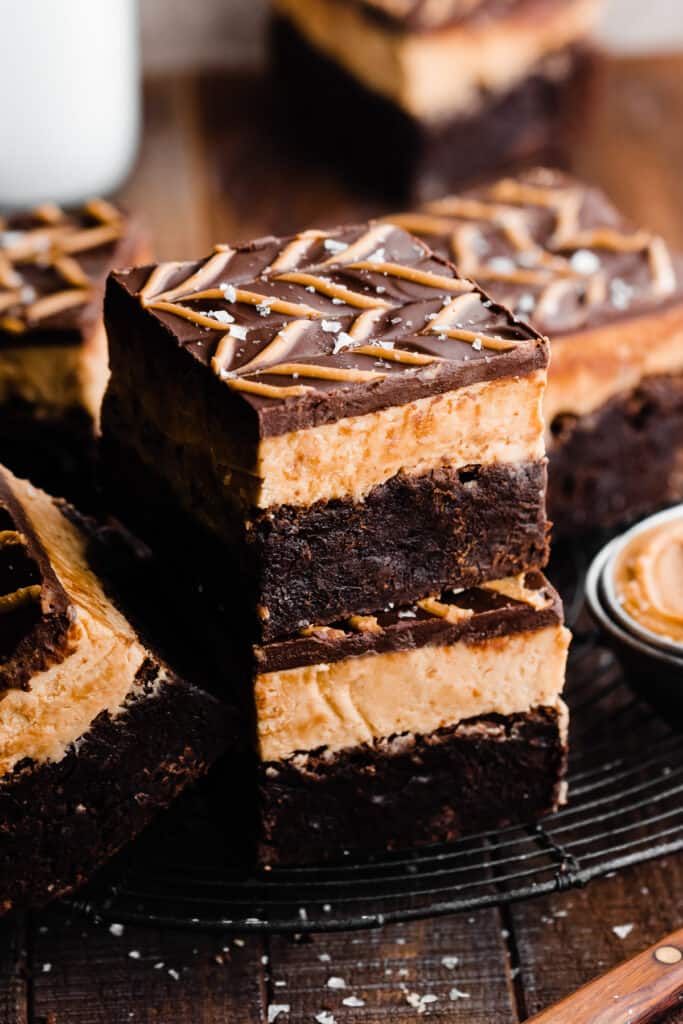
Buckeye Brownies are made with a fudgy layer of brownies, a layer of creamy peanut butter filling, and a smooth chocolate topping. Add an easy (no, really!) peanut butter herringbone design on top for a bakery-worthy dessert that will impress any peanut butter lover!

Why you’ll love this Buckeye Brownies Recipe:
- Rich Chocolate Brownies – An ultra fudgy, brownie layer makes up the base of this delicious treat!
- Creamy Peanut Butter Filling – This peanut butter filling is thicker than frosting, but is still ultra creamy and packed with peanut butter flavor.
- Crowd-Pleasing Dessert – This dessert is sure to impress anywhere you take it! It tastes just like the classic buckeye candies in brownie form.
Ingredient Overview:
As always, the full recipe with measurements & directions can be found at the bottom of this post.
- Melted Butter – I always use salted buter for the best flavor, but feel free to use unsalted butter if you prefer.
- Chocolate – You can use chocolate chips or chopped up baking bars like Ghirardelli or Baker’s.
- Eggs – Use large eggs.
- Vanilla Extract – Be sure to use real vanilla extract for the best flavor.
- Peanut Butter – I used creamy peanut butter, but feel free to use chunky if you prefer!
Ingredient Substitutions:
- Gluten-free – I have not tested a gluten-free version of this recipe.
- Dairy-free – Swap in your favorite dairy-free chocolate and butter to make this recipe dairy-free.
How to Make this Peanut Butter Brownie Recipe Step-by-Step:
Step 1: Make the Brownies. Melt together your chocolate and butter in a large bowl. Then, whisk the eggs, sugar, and vanilla into the chocolate mixture. Whisk in the flour, salt, cocoa powder, and a pinch of espresso powder. Then, stir in the chocolate chunks.
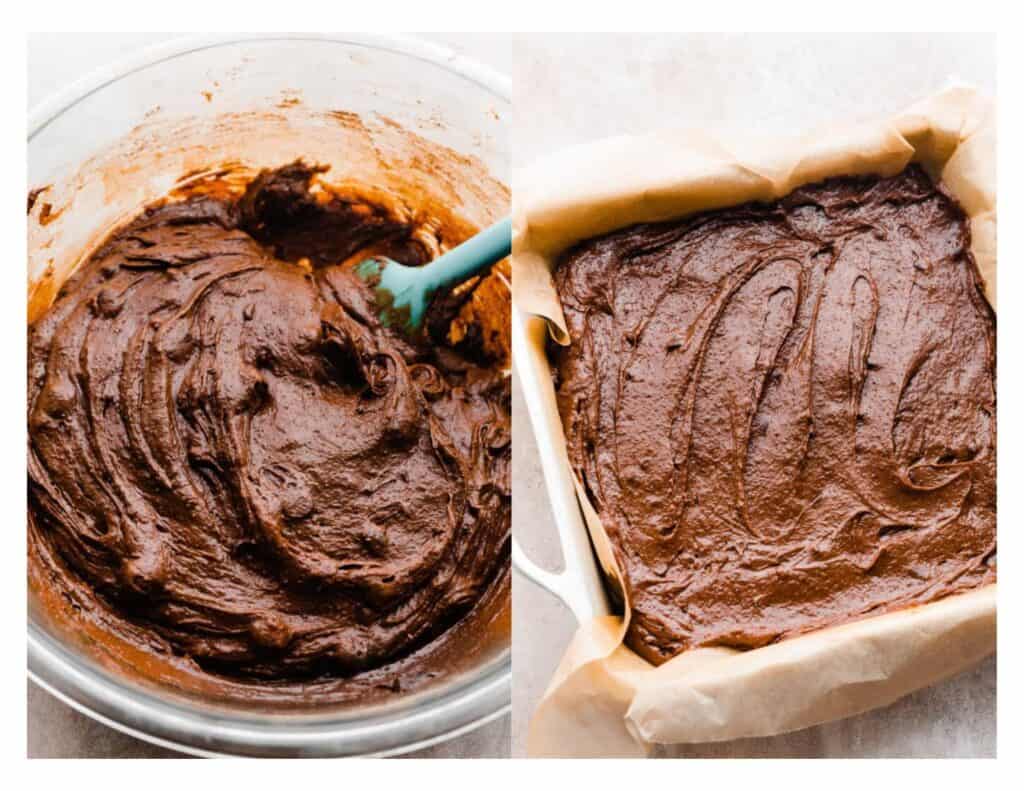
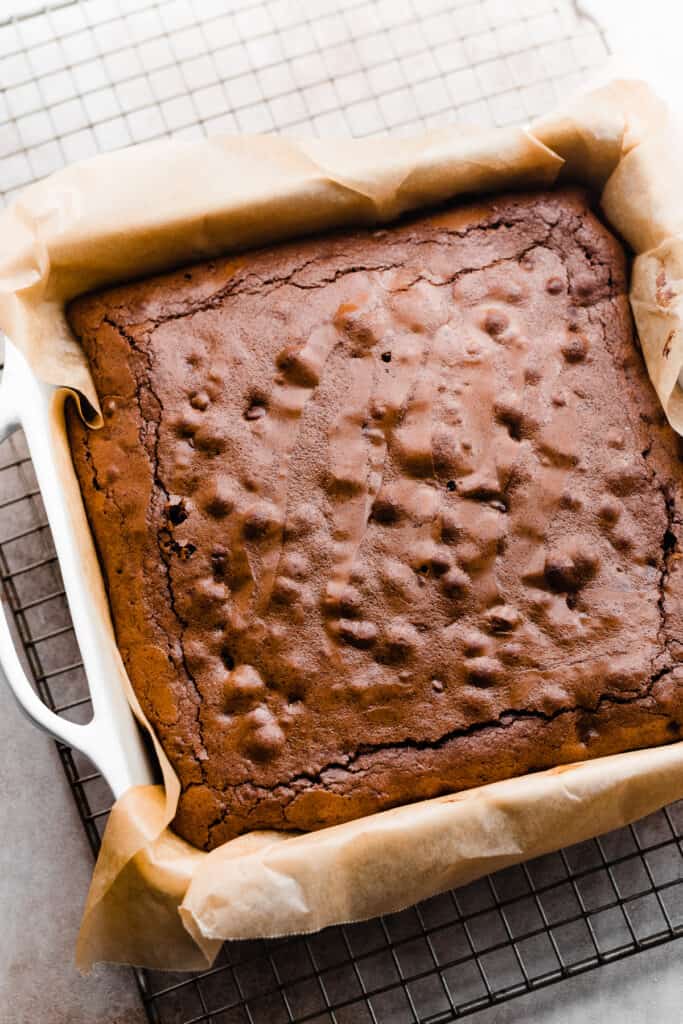
Step 2: Bake the Brownies. Spread the batter into a prepared 9×9 pan and bake your Buckeye Brownies as directed in the recipe card below. Let cool completely before topping.
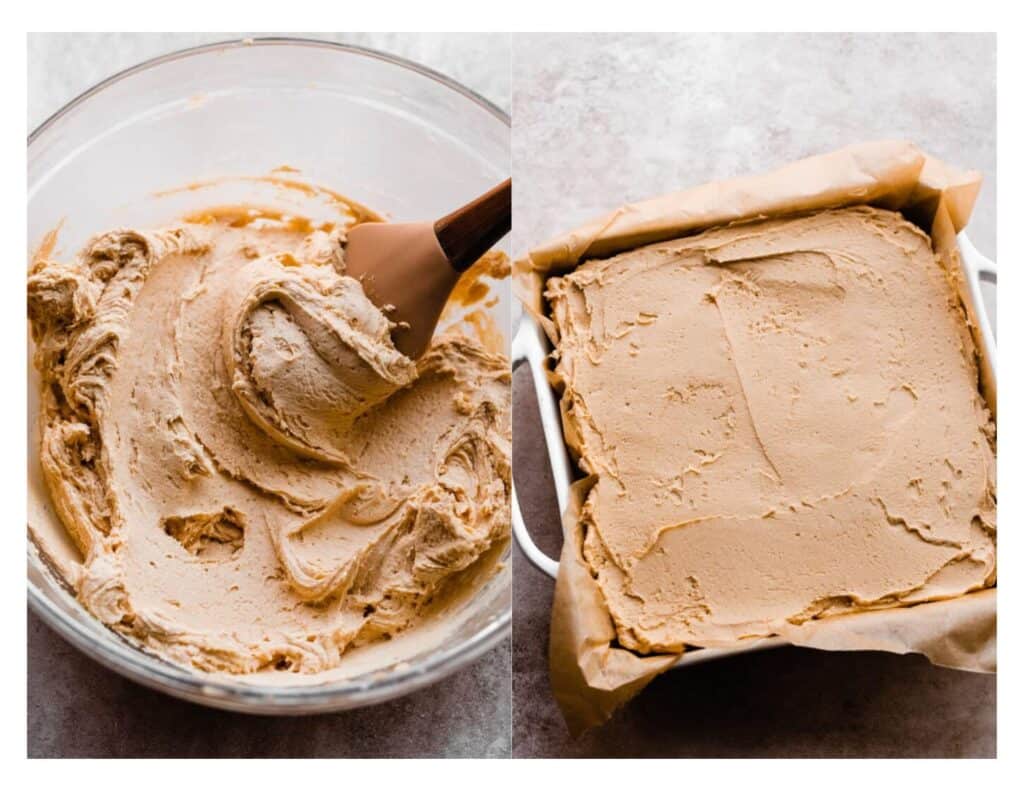
Step 3: Make the Peanut Butter Layer. Cream together butter and peanut butter with a hand mixer or stand mixer, then mix in powdered sugar, vanilla, and a pinch of salt. Add a little heavy cream or milk to smooth the mixture out. Spread over the top of the brownies, then chill for 20-30 minutes.
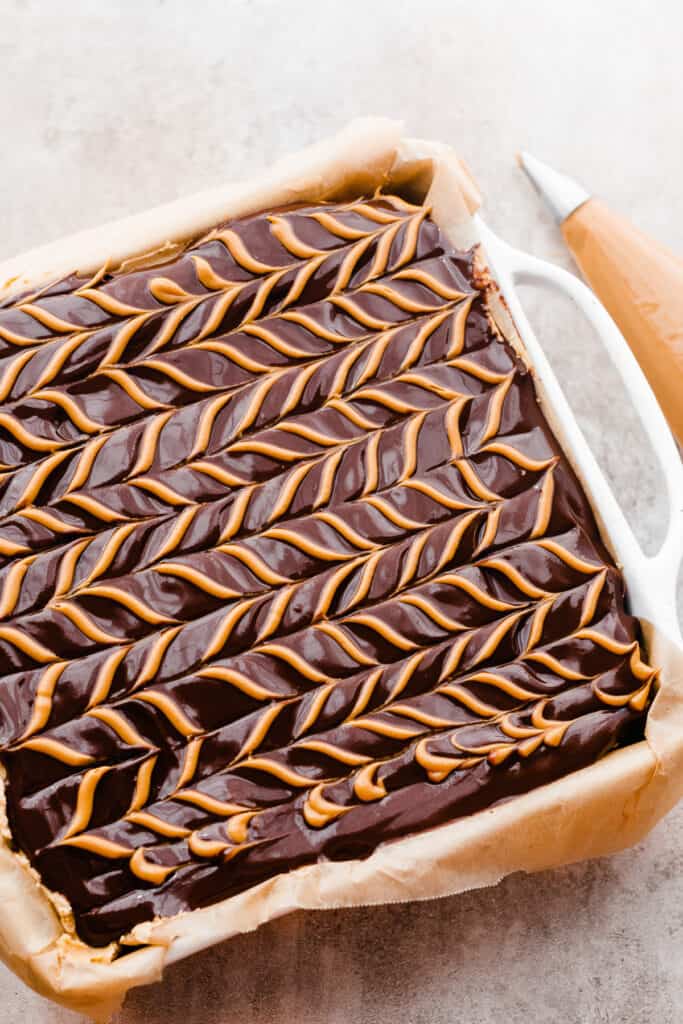
Step 4: Top the Brownies. Melt together chocolate and butter, and pour over the brownies. To make the herringbone decoration on top, melt some peanut butter and add to a piping bag with the tip snipped off. Pipe rows of peanut butter along the entire length of the bars.
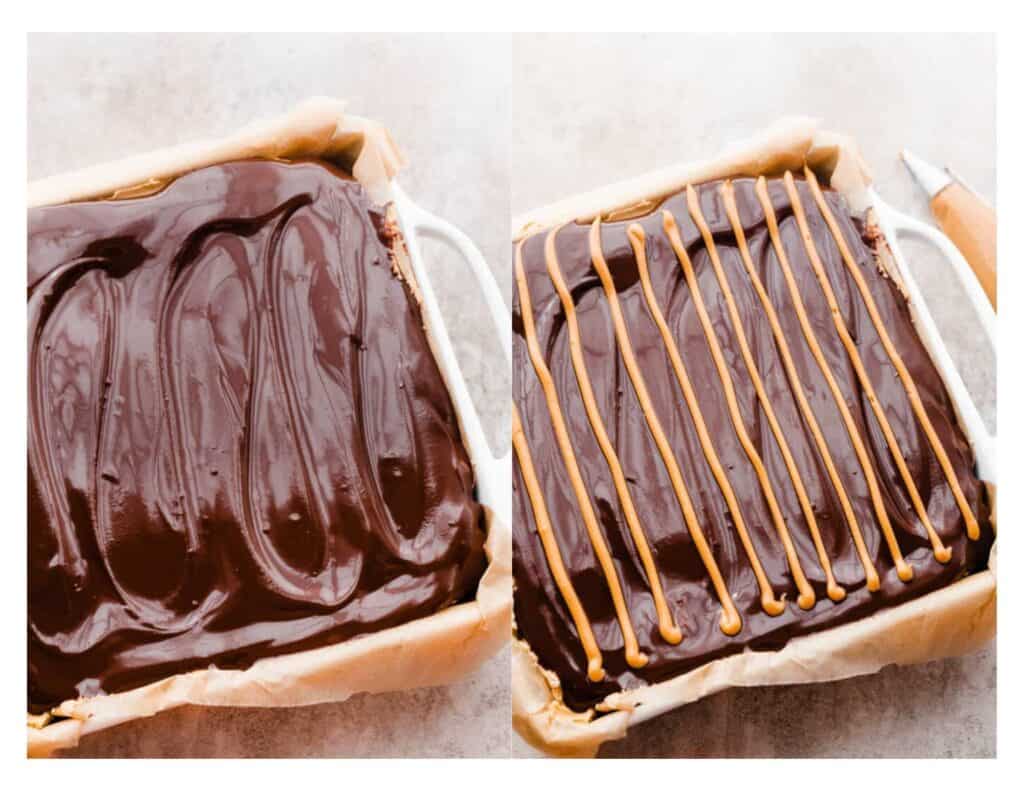
Then, drag a toothpick through them from the opposite side, alternating from left to right, then right to left.
Serving + Storing this Recipe:
Let the brownies chill in the fridge for 30-60 minutes, or until the chocolate topping sets. Slice and enjoy!
Expert Success Tips:
- Oven Thermometer – An oven thermometer will tell you if your oven is actually running at the temperature you set it to. It may not be accurate. Accurate temperature is crucial for most bakes, so I leave an oven thermometer in at all times to keep an eye on the calibration.
- Kitchen Scale – A food scale is the best way to make sure your flour is at the proper weight, since amounts will vary SO widely based on how you measure it, as well as the measuring cup you use, as they are not standardized. If you add too much flour, you may not have fudgy brownies, but cakey ones.
- Stretch the yield – These brownies are rich, so slice them into 12, 16, or even 18+ squares to stretch the yield. I sliced mine into 9 large squares for photo purposes, but then I sliced each of those 9 squares in half again before serving them to friends.
- Herringbone Design – This must be done while the chocolate is still wet, otherwise it won’t turn out.
FAQs:
Yes, you can. Use a 9×13 pan for a larger batch of brownies.
Yes, use a 9×9 pan to get a thinner layer of everything, or use a loaf pan or 6-inch round pan if you still want thick-ish layers.
Yes, try nutella or almond butter in place of the peanut butter if you have a peanut allergy! Or, try sun butter which is nut free.
A buckeye is a treat made of a sweet peanut butter ball dipped in chocolate, leaving just a small portion of peanut butter visible at the top. They originated in Ohio, where the buckeye tree is common – buckeye candies are made to look like nuts from the buckeye tree.
Recipe Variations:
- Decoration – If you’re pinched for time, you can certainly skip the extra bit of decoration on top.
- Boxed Mix – If you’re really stretched for time, use a box of brownie mix for the brownie base, and top with the homemade filling and chocolate topping.

Special Tools:
- 9×9 Pan – A ceramic or metal 9×9 square pan is ideal for these Buckeye Brownies.
- Cordless Mixer – I love the flexibility of a cordless electric mixer!
- Offset Spatula – An offset spatula makes spreading batter a breeze, and I use it for tons of things – especially when frosting cakes, bars, etc.
More Brownie Recipes to Love:
- Gooey S’mores Brownies
- Fudgy Gluten-Free Brownies
- Black Forest Brownies
- Layered Mint Chocolate Brownies
- Salted Caramel Pretzel Brownies
- 5-Ingredient Brownies
Did you make this recipe? Snap a photo and leave a comment!
Be sure to follow bluebowlrecipes on instagram and tag #bluebowlrecipes with your photo! You can also post a photo of your recipe to the bluebowlrecipes Facebook page. I’d love to see what you make!

Buckeye Brownies
Ingredients
For the Brownies
- 3/4 cup salted butter, 170 grams
- 2 ounces semi-sweet chocolate, chopped, use a baking bar or good quality chocolate chips
- 2 ounces milk chocolate, chopped, use a baking bar or good quality chocolate chips
- 1 and 1/2 cups granulated sugar
- 1/2 cup light brown sugar, packed
- 4 large eggs
- 1 and 1/2 tsp vanilla extract
- 1 cup all-purpose flour , 130 grams
- 2/3 cup cocoa powder, 66 grams
- 1/2 tsp salt
- 1/8 tsp espresso powder, optional
For the Peanut Butter Filling
- 1/2 cup salted butter, softened at room temperature
- 3/4 cup + 2 tbsp peanut butter, I prefer creamy here
- 2 cups powdered sugar
- 2 tbsp milk, as needed to smooth things out, or heavy cream
- 1/2 tsp vanilla extract
- pinch of salt, to taste
For the Topping
- 6 tbsp salted butter
- 1 heaping cup semi-sweet chocolate chips, I also like half semi-sweet & half milk chocolate chips here!
For the Peanut Butter Design (optional)
- 1/3 cup peanut butter
Instructions
- Prep: Preheat your oven to 350° F. Grease a 9×9 baking dish with cooking spray and line with parchment paper.
- Make the Brownie Batter: Melt the butter, the 2 ounces of semisweet, and the 2 ounces of milk chocolate together in a large microwave-safe mixing bowl. Melt in 30 second intervals, stirring between each, until fully melted and smooth. Add the sugars, and whisk until just combined. Add the eggs and vanilla, and whisk until combined, then continue whisking for 2 minutes (this will create that crackly top on the brownies!). Add the flour, salt, cocoa, and espresso flour, and fold in with a rubber spatula until the last streaks of flour just disappear into the batter.
- Bake: Spread the batter evenly in your prepared skillet, and scatter any extra chocolate chunks over the top. Bake for 37 to 43 minutes. A toothpick inserted into the center should pull out moist crumbs, not wet batter, and should come out clean at the edges. (You can also use the tip of a knife to lift up a little piece from the center to see the doneness more clearly, if you have a hard time judging when brownies are done). It should look like thick batter that's still a tad undercooked, but shouldn't look like complete liquid. The brownies will set up more as they cool.
- Make the Peanut Butter Topping: Beat butter in a medium mixing bowl until creamy, 30 seconds. Add peanut butter and mix until well creamed, about 1 minute. Add powdered sugar and mix until smooth, adding milk as needed to help it come together. Add the vanilla and salt. Spread mixture in an even layer over the cooled brownies. Let chill in the fridge for 10-20 minutes, while you prepare the topping.(No need to cover with plastic wrap for a short chill, but do cover these if letting chill overnight before adding the chocolate.)
- Make the Chocolate Topping & Add the Design: Measure your peanut butter into a microwave-safe bowl, and microwave in two to three 15-second intervals, stirring between each, until melty. Get a piping bag ready. Melt the butter and chocolate together in a medium microwave safe bowl, in 30 second intervals, stirring between each until completely smooth. Pour melted chocolate mixture over the bars. Add the melted peanut butter to a piping bag and snip the tip off. Pipe lines down the brownies. Then, drag a toothpick (wiping between each line) perpendicularly through the lines we piped, alternating from right to left, then left to right. Chill the bars for 30-60 minutes (or up to overnight) to let the chocolate set.
- Serve & Store: Once the chocolate is set, slice and enjoy! These don't *have* to be stored in the fridge, but if you leave them in a particularly warm room or in direct sunlight the chocolate will naturally melt. Let come to room temp for 30 minutes or so before serving from the fridge, so things aren't so stiff from being chilled. Leftovers keep in an airtight container in the fridge or at room temp for 4-5 days.
Notes
Nutrition
Nutrition information is automatically calculated, so should only be used as an approximation.

Super decadent and delicious! I made these for a Father’s Day gift and they were happily devoured by the whole family!
So glad to hear that, Natalie!
These are a must make for any chocolate peanut butter lovers. I made them for Easter and anyone who tried them loved them. They’re so good.
So glad to hear these were a hit, Katelyn!