This post contains affiliate links. Please see our disclosure policy.
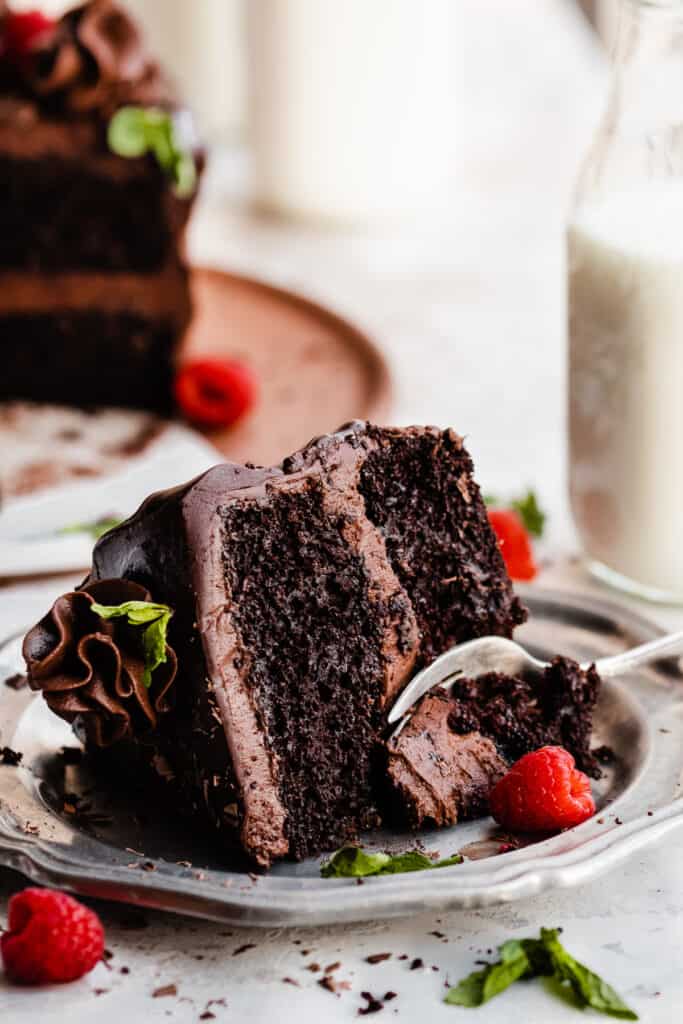
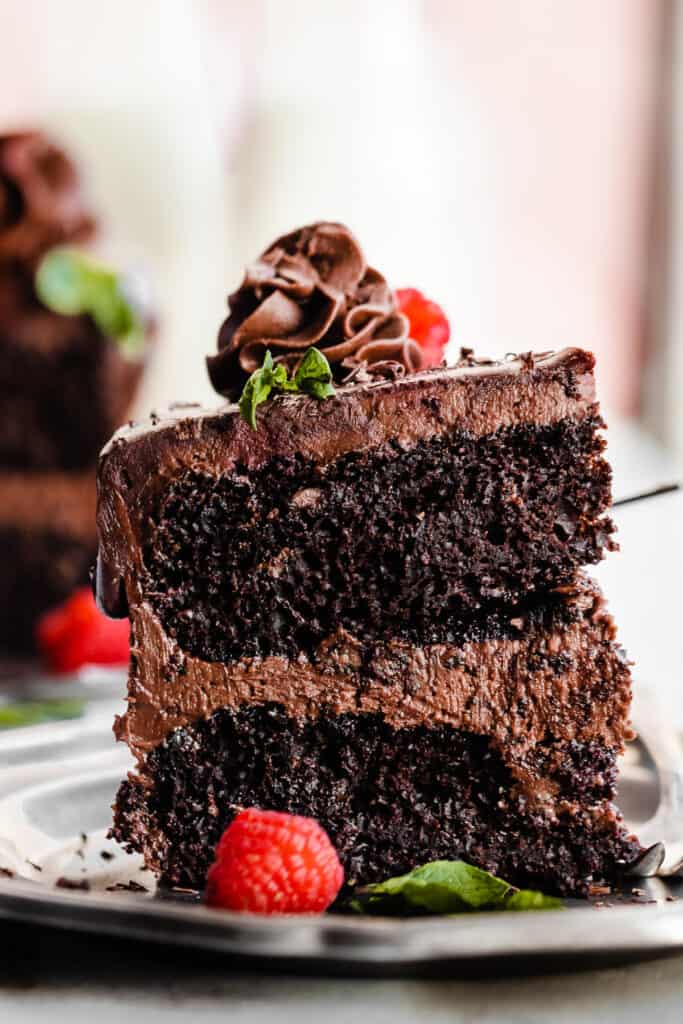
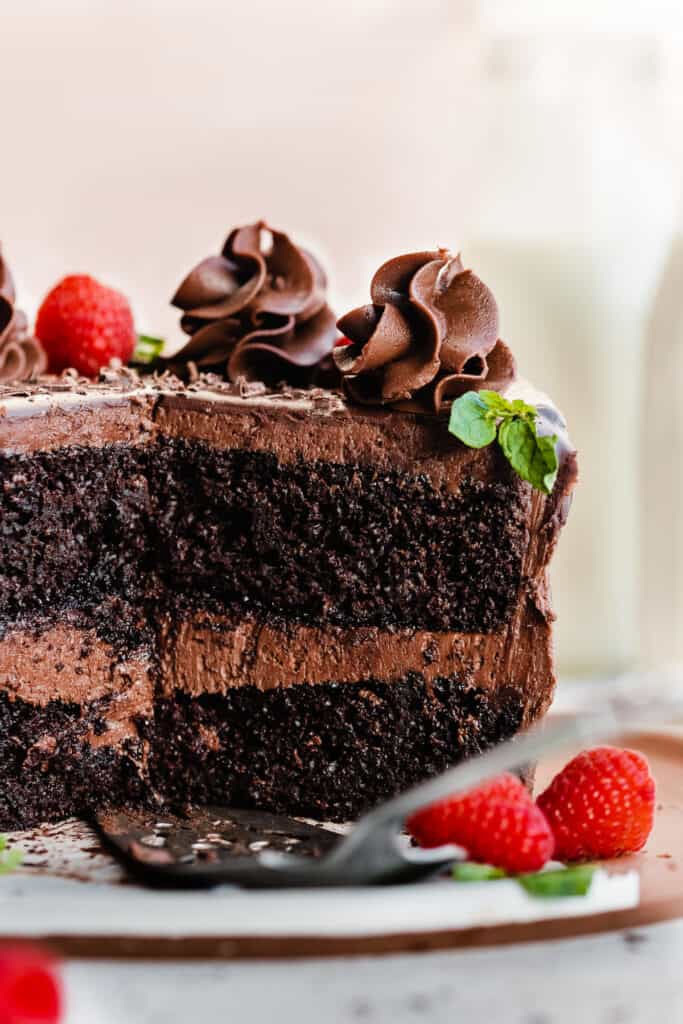
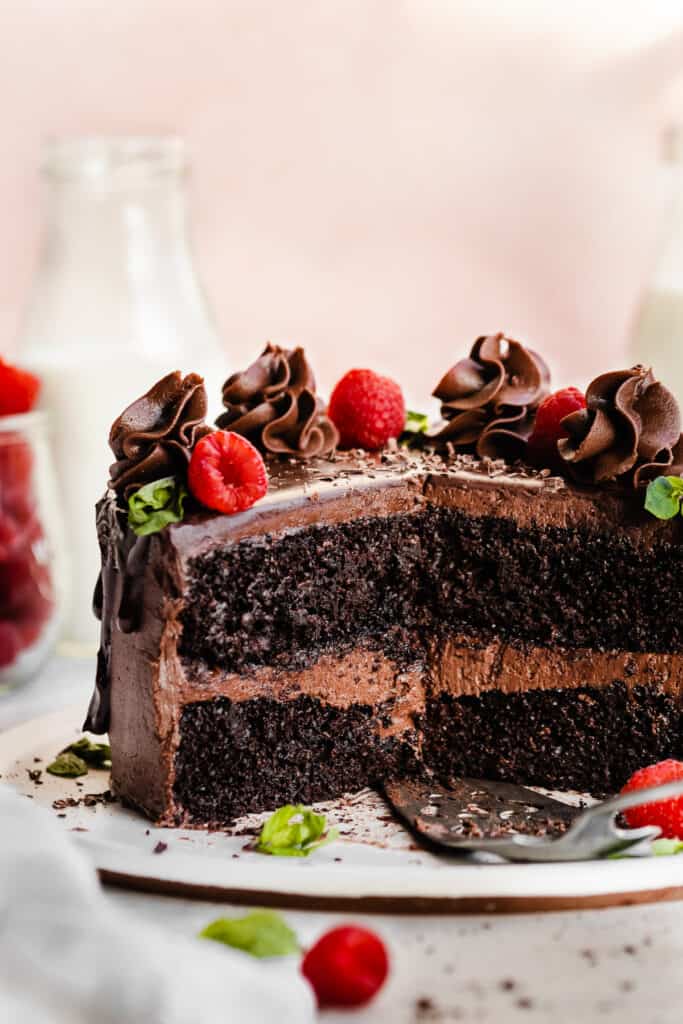
Mini Chocolate Cake comes together quickly in one bowl, and is topped with the creamiest fudgy chocolate frosting. Dress it up with chocolate ganache and fresh berries, or enjoy it as is. You’re sure to fall in love with this chocolate lover’s dream cake!

This recipe was originally published in February of 2021, but I’ve just updated it to make the cake even more moist & rich, and I halved the recipe to make two 6-inch cake layers instead of one huge layer in a 9-inch square pan.
‘Tis the season for all things chocolate, but please don’t let that stop you from making this cake any time of the year! It’s the perfect size for two people (plus a bit leftover for the next day), and makes a fabulous birthday or Valentine’s Day treat!
Why you’ll love this Mini Chocolate Cake recipe:
- Small Cake – This small chocolate cake is quicker and easier to make because it’s a smaller batch of batter, and it’s a smaller cake to assemble and decorate!
- Moist Chocolate Cake – This little cake is ultra moist and full of rich chocolate flavor.
- Creamy Chocolate Frosting – My creamy chocolate frosting is incredibly rich and never too sweet thanks to the addition of a bit of cream cheese.
- Easy Recipe – This Mini Chocolate Cake recipe is easy enough for any level of baker to make!
Ingredient Overview:
- Vegetable Oil – Vegetable oil provides tenderness and keeps this cake moist!
- Vanilla Extract – Use real vanilla extract for best results.
- Cake Flour – Spoon & level your flour for best results, or use a scale. Scooping the measuring cup directly in will lead to too much flour. Cake flour provides a lighter crumb in cakes, so I recommend using it rather than all-purpose flour.
- Sour Cream – Use full fat sour cream, at room temperature.
- Eggs – Use large eggs, at room temperature.
- Cream Cheese – A little cream cheese in the frosting helps keep it from being too sweet as many frostings can be.
- Butter – I always use salted butter for the best flavor, but feel free to use unsalted butter if you prefer.
Ingredient Substitutions:
- Dairy-free – This cake is dairy-free as is! Use your favorite dairy-free cream cheese and butter to make the frosting dairy-free as well.
- Gluten-free – I have not tested a gluten-free version of this cake
How to Make this Chocolate Cake Recipe Step-by-Step:
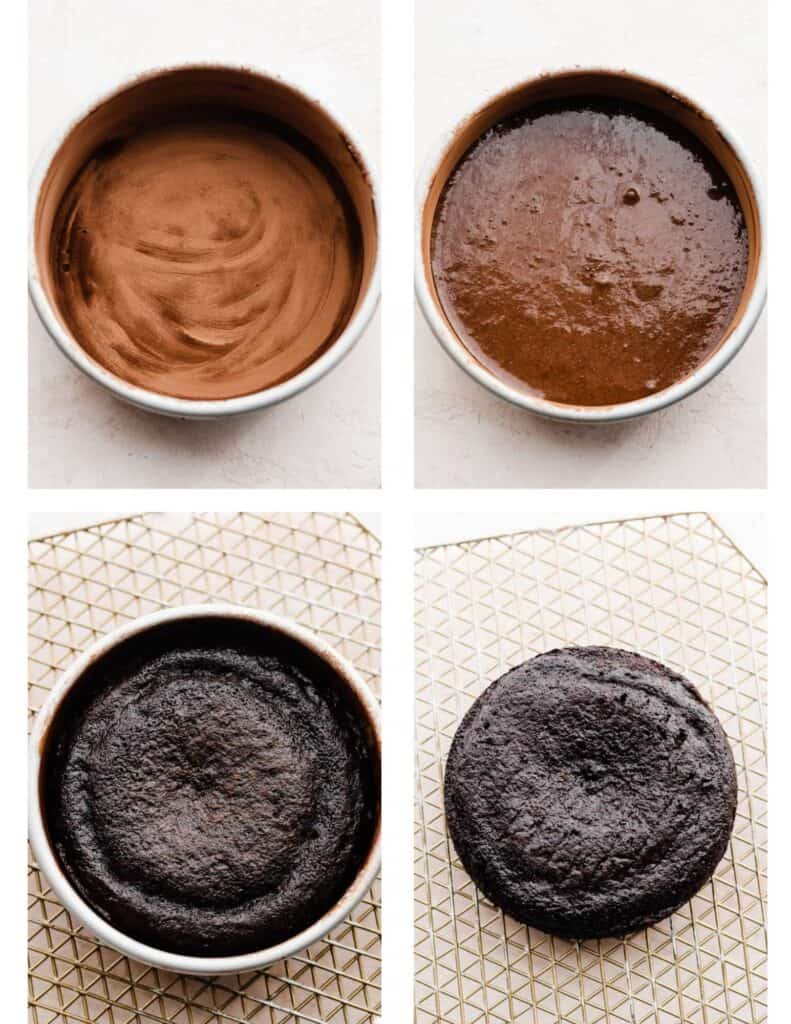
Step 1: Make the Cake Batter. Bloom your cocoa powder (explained below in the FAQs). Whisk together your dry ingredients, including the sugars, in a medium bowl. Add the wet ingredients to the dry ingredient mixture, including the bloomed cocoa powder in hot water. Whisk just until combined.

Step 2: Bake the Cake Layers. Divide the batter between two prepared 6-inch cake pans and bake as directed in the recipe card below. (I only had one 6-inch cake pan, so I baked one layer at a time.)
Step 3: Make the Frosting. While the cakes cool, make the frosting. Beat together butter and cream cheese in a large mixing bowl with an electric mixer. Add the powdered sugar, vanilla extract, cocoa powder, and a pinch of salt.

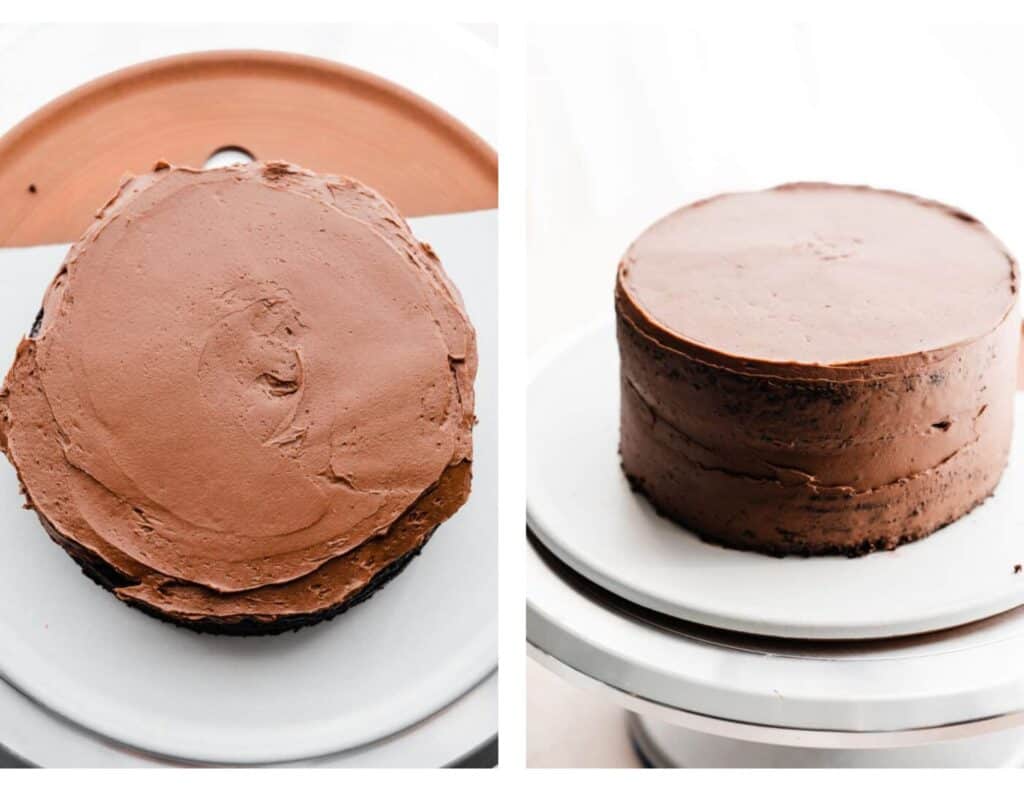
Step 4: Frost the Cake. Frost the cooled cake layers, starting with a crumb coat before applying the final layer of frosting. More details on frosting a cake can be found in the recipe below.
Finish the cake off with chocolate ganache (completely optional – details below) and swirls of frosting. Add some fresh berries and sprigs of mint for a beautiful centerpiece cake. Slice, and enjoy!
Expert Success Tips:
- Moist Chocolate Cake – Don’t skip the step of blooming your cocoa powder in hot water – it adds moist texture and rich flavor to the cake.
- Creamy Frosting – Don’t over soften your butter or cream cheese. I find this is a common error that leaves people with runny frosting. It should still feel cold to the touch, and your finger should just make a slight indent. Cream cheese doesn’t need to soften as much as butter does for frosting.
- Chill the Cake – Be sure to chill the cake at least 20-30 minutes between frosting it and slicing it, so it has a chance to firm up a bit.
- Oven Thermometer – An oven thermometer will tell you if your oven is actually running at the temperature you set it to. Your oven may not be accurate. Accurate oven temperature is crucial for most bakes, so I leave an oven thermometer in at all times to keep an eye on my oven’s calibration.
- Kitchen Scale – A food scale is the best way to make sure your flour is at the proper weight, since amounts will vary SO widely based on how you measure it, as well as the measuring cup you use, as they are not standardized.
FAQs:
Yes, absolutely! To measure half an egg, beat one egg in a cup and either weigh half to use, or use 2 tablespoons (it should be about 4 tablespoons total).
Yes! You can double the recipe and bake in two 8-inch or 9-inch round cake pans, or bake all the batter in a 9×9 square pan.
Coat your cake pans in shortening, and then dust generously with flour (for a white cake) and cocoa (for a chocolate cake). It releases the cake perfectly every time, with no sticking. Once your pan is prepared, pour the batter in and bake your cake.
yes! The cake layers can be baked, cooled, and wrapped tightly in plastic wrap and stored at room temperature for a day before frosting and assembling. Alternatively, you can make and assemble the whole cake, refrigerate it (covered) and serve it the next day.
Recipe Variations:
- Chocolate Ganache Drip – You can add a chocolate ganache drip to this cake if desired! See recipe notes in the recipe card below for how to make and apply it.
- Fillings – You can add 1/3 cup of salted caramel sauce, jam, or chocolate ganache between the layers, on top of the layer of frosting, if desired. Pipe a border to hold the filling in and proceed as usual.
Serving + Storing this Recipe:
Once the cake is assembled, chill it for 20-30 minutes so everything is set up nicely then slice and serve!
Special Tools:
(The links below are affiliate links, which means I earn a small commission if you make a purchase using that link.)
- Offset Spatula – Offset spatulas make frosting a cake so easy! They can also be used for spreading cake and brownie batters evenly.
- Cake Turntable – If you make even a few cakes a year, a cake turntable makes the frosting process a breeze!
- Piping Bag & Piping Tip – I like to use a reusable piping bag and a Wilton 1A or 2A piping tip for piping the borders between layers, but you can use a plastic bag with the corner snipped off in a pinch. I used a Wilton 1M piping tip for the swirls.
More Cake Recipes to Love:
- Chocolate Lava Cakes for Two
- Gingerbread Cake with Mascarpone Cream Cheese Frosting
- Ultimate Pumpkin Cake
- Salted Butterscotch Crunch Cake
- Biscoff Swirled Cake
- White Forest Cake
- Mojito Cake
Did you make this recipe? Snap a photo and leave a comment!
Be sure to follow bluebowlrecipes on instagram and tag #bluebowlrecipes with your photo! You can also post a photo of your recipe to the bluebowlrecipes Facebook page. I’d love to see what you make!

Mini Chocolate Cake with Fudgy Chocolate Frosting
Ingredients
For the Cake:
- 1/3 cup + 1 and 1/2 tbsp unsweetened cocoa powder, 42 grams
- 1/2 cup hot water, 118 mL
- 3/4 cup cake flour, spooned & leveled, 83 grams
- 1/2 cup + 1 tbsp brown sugar, packed, 120 grams
- 1/4 cup granulated sugar, 53 grams
- 3/4 tsp baking soda
- 1/4 + 1/8 tsp baking powder
- 1/4 tsp salt
- 1/4 tsp espresso powder, (No this won't make it taste like coffee, it just helps intensify the chocolate flavor!)
- 1/3 cup + 1 tbsp full fat sour cream, at room temperature , 95 grams
- 2 tbsp vegetable oil, 29 grams
- 1 large egg, at room temperature
- 1 and 1/2 tsp vanilla extract
For the Frosting:
- 3/4 cup salted butter, softened at room temperature, 1 and 1/2 sticks, 12 tbsp, or 170 grams
- 3 cups powdered sugar, 360 grams
- 1-2 tsp milk or heavy cream
- 2 tsp vanilla extract
- 3/4 cup cocoa powder, 75 grams
- pinch of salt
- 4 ounces full-fat cream cheese, softened at room temperature, use the block style
Instructions
- Prep: Preheat your oven to 350 degrees F. Grease two 6-inch round pans well with shortening (use a paper towel to rub it around), then dust with cocoa powder, tapping and shaking the pan to coat completely. Tap out the excess.
- Make the Cake Batter: Bloom the Cocoa Powder. Heat the water in a glass measuring cup in the microwave until hot, then whisk in the cocoa powder until dissolved. Set aside to cool a bit while you make the batter. Whisk together the dry ingredients (including the sugars) in a large mixing bowl. Add the wet ingredients, including the cooled-to-room-temp cocoa water, and mix until just combined. There may be a few small lumps – that's fine. Divide the batter between your prepared pans.
- Bake: Bake for 15-17 minutes. A toothpick inserted into the center will come out with a few moist crumbs. Let the cakes cool in the pans for 10 minutes, then run a butter knife around the edges, and invert onto a plate, then back onto a cooling rack (this way it will be right side up) to cool completely before frosting.
- Make the Frosting: Cream the softened butter in a large mixing bowl until creamy, about 30 seconds. Add half the powdered sugar, and mix until well combined. Repeat with remaining powdered sugar, adding milk as needed to help it come together.. Add the cocoa, salt, and vanilla and mix until combined. Mix in the cream cheese last. Place one cake layer on your cake plate, and spread with 3/4 cup of frosting. Place the top layer on upside down for a flat top, and frost the top and sides of the cake lightly – this is your crumb coat. Refrigerate for 10-20 minutes to set the crumb coat, then apply the remaining frosting. Chill for 10-20 minutes before applying the optional ganache drip (see recipe notes below), or immediately add the piped swirls on top, if desired. Make-Ahead Tip: Frosting can be made 1-2 days ahead and stored in an airtight container in the fridge. Let it sit out a bit at room temp before using, then run the mixer back through it to make it spreadable again.
- Serve + Store: Slice and enjoy with a glass of cold milk or a scoop of vanilla ice cream! Store leftovers, in an airtight container, in the fridge for up to 5-6 days. (The cake does need to be refrigerated because of the frosting).
Notes
- Make your ganache by simmering 1/4 cup of heavy cream, then pouring it over 2 ounces of finely chopped semi sweet chocolate in a small bowl. Let sit 5 minutes, then stir until smooth. Let cool at room temp a few minutes until it’s a tad thicker (test the drip on the rim of a glass) then apply it to the cake, spreading it evenly across the top, with an offset spatula, and allowing it to drop down the sides. Chill in the fridge 10-20 minutes to set the ganache.
Nutrition
Nutrition information is automatically calculated, so should only be used as an approximation.

yummy recipe! simple and easy chocolate cake
So glad to hear you enjoyed this recipe, Kayla!
My new go-to recipe for chocolate cake. The frosting is the perfect level of sweetness and the cake is super moist, rich and delicious. I doubled the recipe (baked in two 8 inch round tins) for a family event and everyone loved it!
Thanks so much, Lucie! Glad to hear you the cake was a hit. 🙂
Loved the taste. But the cake expanded beyond the glass 9×9 pan and spilled over. What could have gone wrong?
Hi Susan! I’m sorry to hear that happened – but glad it tasted good anyways. 🙂 I’m not sure what would cause that – is your pan actually a 9×9 pan? I know pans can vary quite a bit even if they say they’re 9×9 – for example, I have ones that have slanted sides so the width at the top and bottom of the pan are actually different. Did you make any changes to the recipe? Let me know and perhaps we can figure out what happened!