This post contains affiliate links. Please see our disclosure policy.
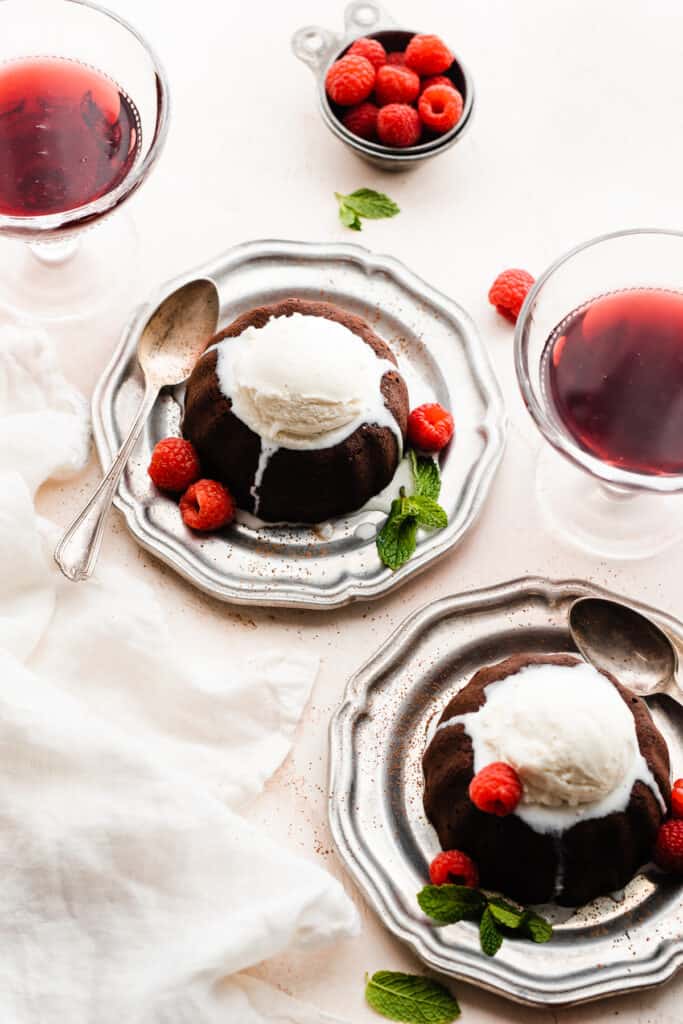
Molten Chocolate Lava Cakes are an impressive and decadent treat you can make at home. They require just 7 ingredients and 20 minutes from start to finish! The recipe is perfectly portioned for two people, making it the perfect dessert for Valentine’s Day.

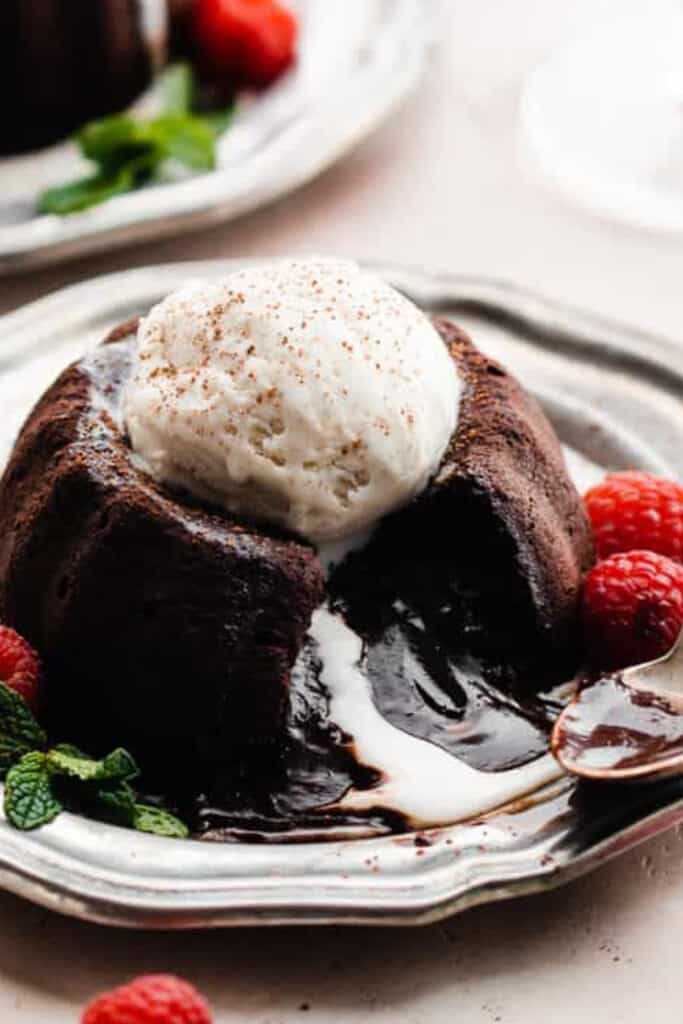
Can’t you just imagine taking that first bite of decadent chocolate cake, and seeing that river of chocolate spill out? Perhaps mingling with a scoop of vanilla ice cream? Swoon! Let’s learn how to make these – it couldn’t be easier!
Table of Contents
Why you’ll love these Lava Cakes:
- Molten Chocolate Centers – These molten lava cakes have molten chocolate centers that gush out when you dig into them. Prepare to swoon, chocolate lovers!
- Rich Chocolate Cake – These cakes are rich, but perfectly balanced in sweetness.
- Perfectly Portioned for Two – This recipe makes two molten cakes – perfect for Valentine’s Day! (There are notes about changing the yield in the FAQs at the bottom of the post.) Need one giant lava cake instead? Try my Chocolate Pudding Cake!
Ingredient Overview:
As always, the full recipe with measurements & directions can be found in the recipe card at the bottom of this post. Use the table of contents (back at the top, below the first image, to navigate).
- Bittersweet Chocolate – This can be found in the baking aisle, near the other chocolate in most grocery stores. Use baking chocolate bars, not chocolate chips.
- Semi-sweet Chocolate – Combining semi sweet and bitter sweet chocolates keep these cakes nice and rich, without being too sweet. Use baking chocolate bars, not chocolate chips.
- Butter – I always use salted buter for the best flavor, but feel free to use unsalted butter if you prefer.
- Eggs & Egg Yolks – Use large eggs for best results.
- Vanilla Extract – Use real vanilla extract for the best flavor.
- All-Purpose Flour – Flour provides structure, but we’re using very little compared to the other ingredients to help give that molten texture on the inside.
Recipe Variations & Substitutions:
- Dairy-free – Use your favorite dairy-free butter sticks and dairy-free chocolate to make this recipe dairy-free.
- Ice Cream – Top this with flavored ice cream for a fun twist! I recommend salted caramel, raspberry, or mint chip.
- Ramekin Alternatives – See FAQs below for other baking dish options (no need to run out and buy ramekins just for this!)
How to Make Molten Lava Cakes:
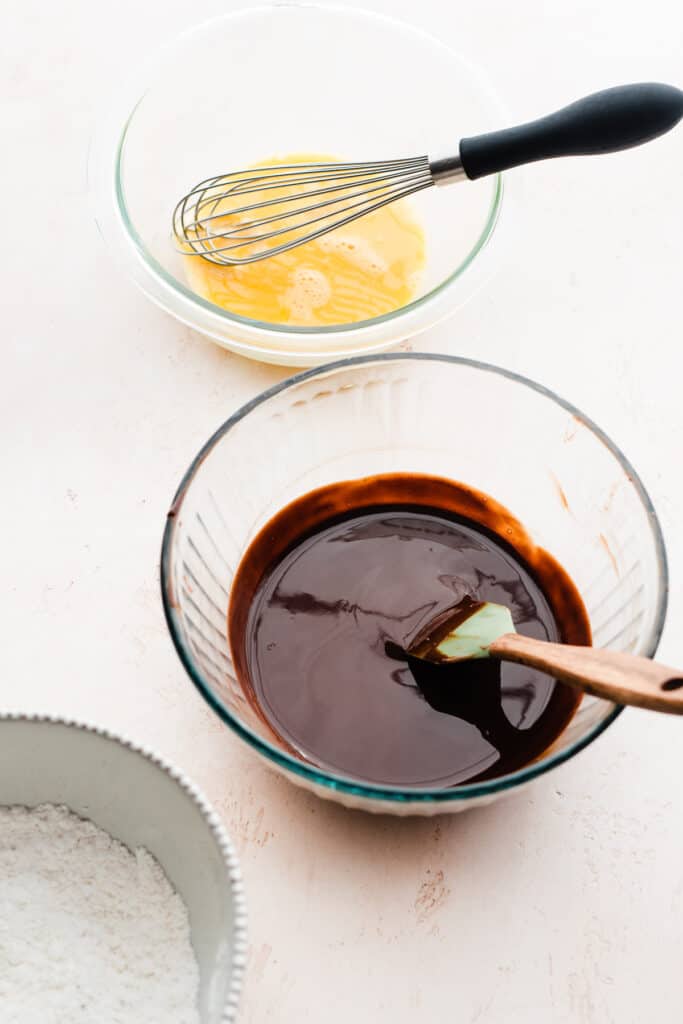
Step 1: Start the Lava Cake Batter. Melt chocolate and butter together in a medium bowl. In a small bowl, whisk together the eggs and egg yolks, along with a splash of vanilla. In another small bowl, whisk together the dry ingredients.
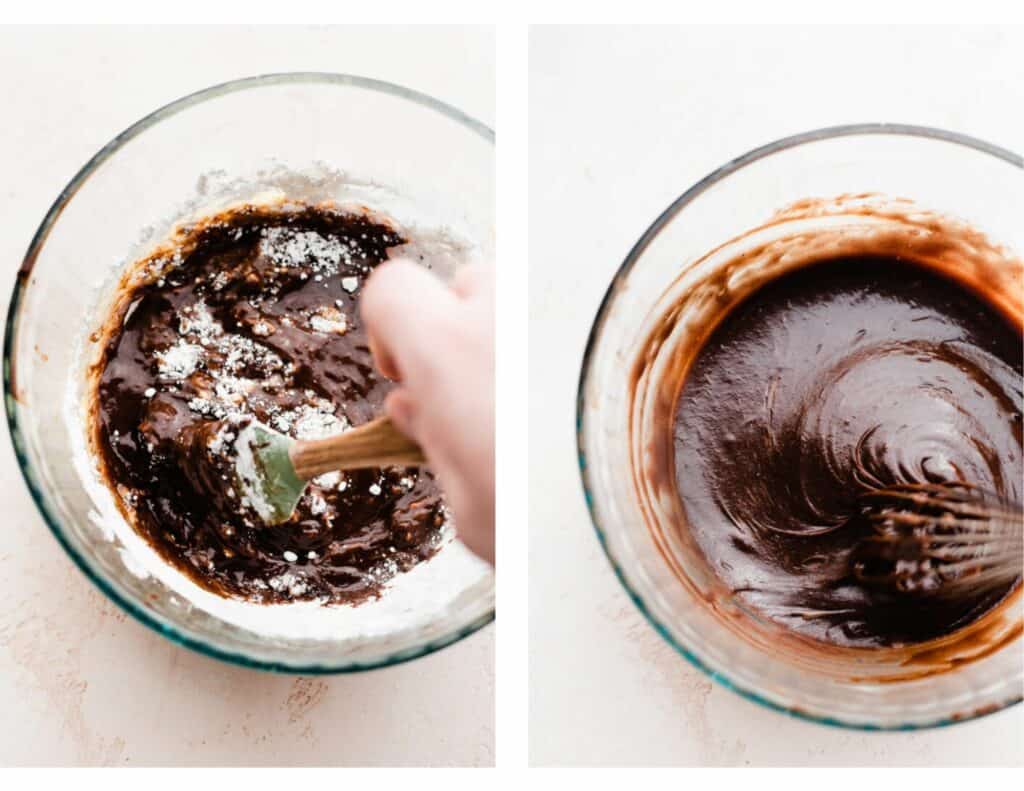
Step 2: Finish the Batter. Add the egg mixture and the dry ingredients to the bowl with the chocolate mixture and gently fold together with a rubber spatula. It will be a bit lumpy, so switch to a whisk to gently whisk until smooth. It will be slightly thick – like a brownie batter.
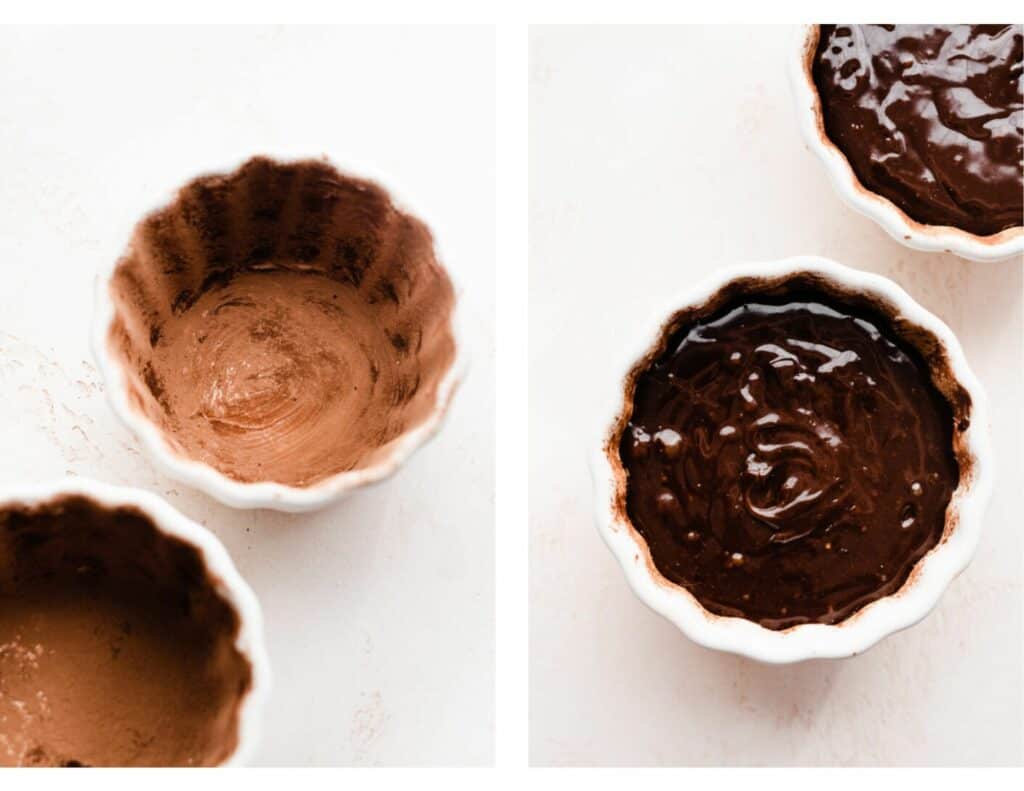
Step 3: Prepare your Ramekins and Bake your Cakes. Butter each of your ramekins well and dust them with cocoa powder – this ensures that the cakes will come out easily once they’re finished baking! Place ramekins on a baking sheet if desired. Bake as directed in the recipe card below.
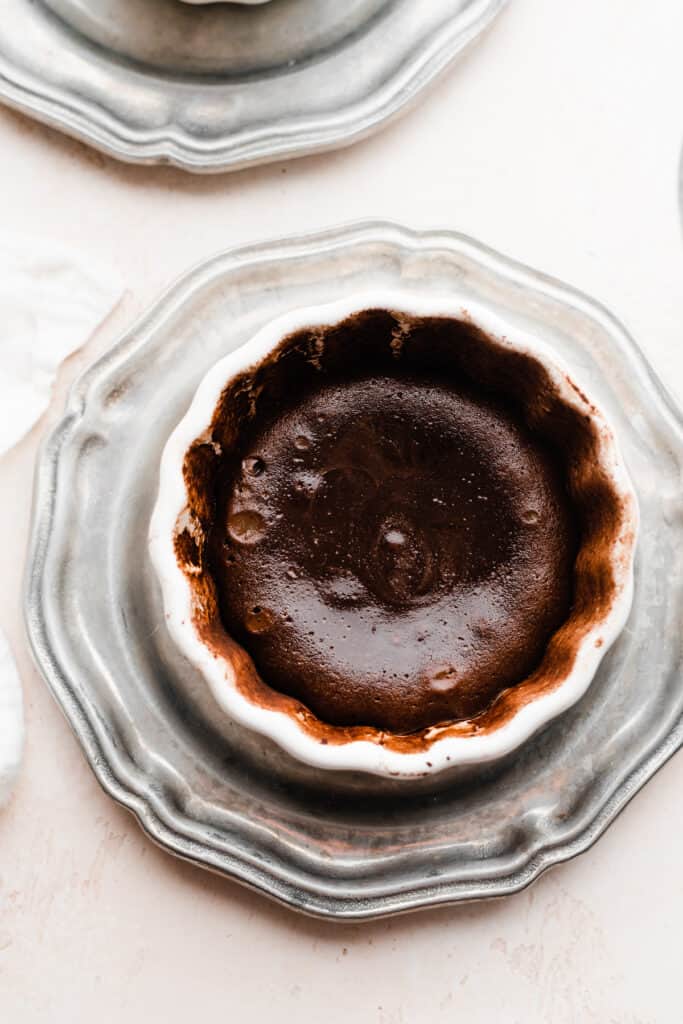
Expert Tip: The bake time is very important here – we want to ensure that the centers come out perfectly molten. The edges will look set and cakey, but the centers of the top of the cakes should look just shy of fully baked, with a bit of a glisten or shine.
Serving + Storing:
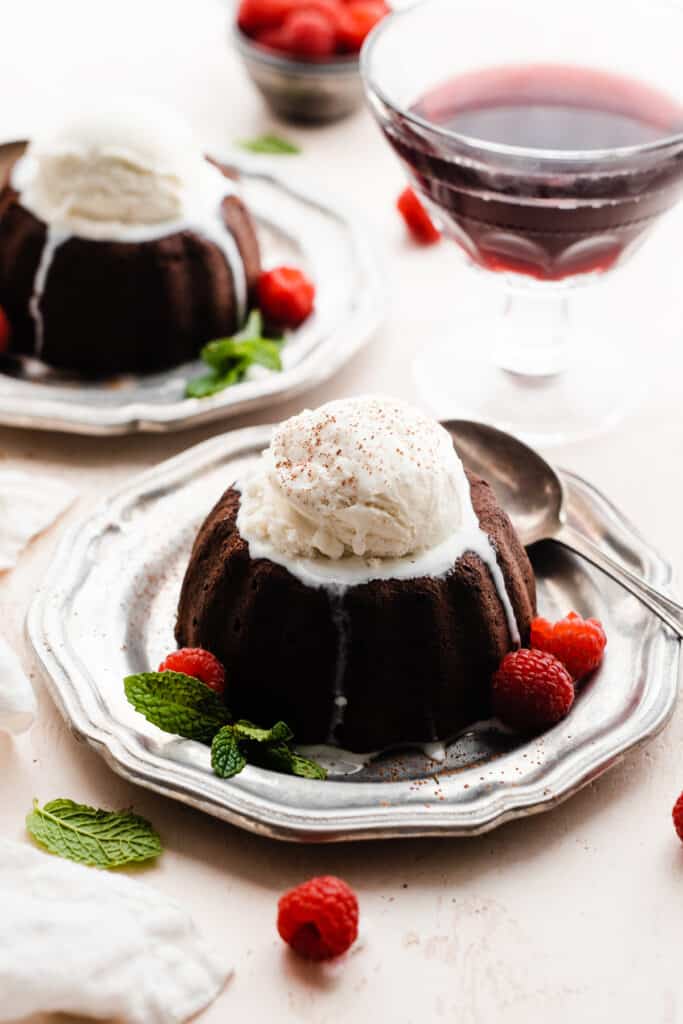
Let cakes rest in the dish for 1 minute, then invert them onto plates and serve immediately. If you’re feeling extra decadent, drizzle them with my easy 10-minute Salted Caramel Sauce or my 10-Minute Raspberry Coulis.
If you have leftovers, refrigerate in an airtight container and reheat gently in the microwave. They’re actually pretty good this way, but I still recommend enjoying them fresh from the oven!
Expert Success Tips:
- Don’t Over Bake – Follow the doneness indicators given in the recipe card for best results. If you over bake, these lava cakes won’t have that rich molten chocolate center.
- Oven Thermometer – An oven thermometer will tell you if your oven is actually running at the temperature you set it to. Your oven may not be accurate. Accurate oven temperature is crucial for most bakes, so I leave an oven thermometer in at all times to keep an eye on my oven’s calibration.
- Kitchen Scale – A food scale is the best way to make sure your flour is at the proper weight, since amounts will vary SO widely based on how you measure it, as well as the measuring cup you use, as they are not standardized.
FAQs:
You can use a regular muffin or cupcake pan. Prepare them in the same way, with butter and cocoa. You’ll get 3 smaller cakes if you use a standard size muffin pan. See additional notes about baking in these options in the recipe card below.
Yes, double it to get 4 lava cakes, or 6 smaller cakes in a muffin pan.
Yes! You can halve it to make one larger cake, 3 cakes in a muffin tin, or you can halve it and divide the batter between two ramekins for smaller portions.
Special Tools:
- Ramekins – These ramekins are a similar size to what I used.
More Valentine’s Day Recipes to Love:
- Fudgy Red Velvet Oreo Brownies
- Chocolate Cherry Pie Cookies
- 5-Ingredient Brownies
- White Chocolate Raspberry Cheesecake Cookies
- Jumbo Bakery-Style Chocolate Chip Cookies
- White Forest Cake
More Chocolate Desserts to Love:
- Mini Chocolate Cake
- Black Forest Chocolate Truffles
- Fudgy Triple Chocolate Skillet Brownie
- Nutella Filled Cupcakes with Nutella Buttercream
- Brown Butter Chocolate Chip Cookie Bars
- No Bake Black Forest Pie
- No Bake Nutella Tart
Did you make this recipe? Leave a comment & star rating!
Click the little stars in the header of the recipe card below to leave a comment & star rating, letting me know how you liked the recipe. I take all feedback seriously, & leaving a rating helps my small business immensely!

Molten Chocolate Lava Cakes for Two
Ingredients
- 1/2 cup salted butter, 113 grams
- 2 ounces bittersweet baking chocolate, See note, 56 grams
- 4 ounces semi-sweet baking chocolate, See note, 113 grams
- 2 large eggs, at room temperature
- 2 large egg yolks, at room temperature
- 1 and 1/2 tsp vanilla extract
- 2/3 cup powdered sugar, 78 grams
- 1/4 cup + 2 tbsp all-purpose flour, spooned & leveled, 50 grams
- pinch of salt
- pinch of espresso powder , optional
- extra butter + cocoa powder, to grease ramekins
- Optional Toppings: ice cream, berries, whipped cream, dusting of cocoa powder
Instructions
- Prep: Grease two small ramekins (see note for alternative) well with butter, and dust with cocoa powder until completely coated, tapping out the excess. This is essential – it prevents the cakes from sticking. Preheat your oven to 425° F.extra butter + cocoa powder, to grease ramekins
- Make the cake batter: Break up the two types of chocolate a bit and add to a medium microwave-safe bowl with the butter. Melt in 30 second intervals, stirring between each, until completely smooth. Set aside. In a small bowl, whisk together eggs and vanilla. In another small bowl, whisk together the powdered sugar, flour, salt, and espresso powder. Add the egg mixture and the dry ingredient mixture to the bowl with the chocolate and gently fold everything together. The batter will be a bit lumpy – switch to a whisk and gently whisk until the batter is smooth. It will be thick, sort of like a brownie batter.1/2 cup salted butter, 2 ounces bittersweet baking chocolate, 4 ounces semi-sweet baking chocolate, 2 large eggs, at room temperature , 2 large egg yolks, at room temperature , 1 and 1/2 tsp vanilla extract, 2/3 cup powdered sugar, 1/4 cup + 2 tbsp all-purpose flour, spooned & leveled, pinch of salt, pinch of espresso powder
- Bake: Divide batter between the two prepared ramekins or 6 muffin tin cavities. Bake for 11 minutes for the ramekins, and start with 7-8 for the muffin tin – the sides of the cake will appear set and the center will look a bit under done, with a glisten or wet appearance to it (see photos above). This is exactly when to take them out! Let the cakes cool for 1 minute before removing them from the ramekins. While they cool, grab a damp kitchen washcloth – you'll need it for grip on the hot ramekins. Get out your plates and toppings.
- Serve: Set a plate upside down over the top of the cake. Using an oven mitt, flip the whole thing over. Use the damp cloth to grab the ramekin and gently lift it straight up off the cake. Enjoy immediately with desired toppings – we love vanilla bean ice cream, fresh raspberries, and a dusting of powdered sugar.Optional Toppings: ice cream, berries, whipped cream, dusting of cocoa powder
- Store: These are best eaten hot out of the oven, but if you need to store any for later, just wrap up leftovers in plastic wrap or an airtight container, and refrigerate for 2-3 days. Reheat in the microwave in 15 second intervals. We've tried this a few times, and they really do hold up surprisingly well (but they're still at their absolute best fresh from the oven).
Notes
Nutrition
Nutrition information is automatically calculated, so should only be used as an approximation.

Absolutely delicious! A big hit with my husband for Valentines Day dessert. Directions were easy to follow and I had perfect results. I was intimidated at first because I’d never made them before so I was very excited when they turned out! Try them you won’t be disappointed!
Thanks for your kind comment, Lynne! Glad to hear these were a hit.
Delicious! Made a little more batter than needed for my two ramekins. So decadent, so easy to make, and a perfect romantic dessert for an at-home date night.
Glad you enjoyed this recipe, Natalie!
I’ve never made a lava cake but if it only takes 7 ingredients and 20 minutes I’m not sure why I waited so long to try this dessert before. I can’t wait to make this for me and my hubby.
Made these for the family for Valentine’s Day (doubled the recipe) and they were a hit! Thank you so much. It’s such an easy one that really looks impressive.
Bri, I’m so glad to hear that! I totally agree – the best desserts are ones that look fancy but are secretly super simple 🙂
Who doesn’t like molten lava cake! It’s one of my favorite desserts. Yours looks fantastic!
One of my favorite desserts! I love that beautiful whipped cream and fresh berries on top! It looks incredible!
I am totally in love with your chocolate lava cakes! They look fabulous and I can’t wait to try them! Great mouth-watering photos too!
These lava cakes are such a great find! They look so nice and I would imagine taste like it is nobody’s business! Super excited to try them for my next special occasion – I am sure they will make the whole evening special.
Definitely one of the best treats you can make! And it is a wonderful way to celebrate a special day because it is delicious, romantic and sooo goood! Saving these lava cakes for the near future 🙂