This post contains affiliate links. Please see our disclosure policy.
Nutella Tart is equal parts easy and impressive! It has a luscious filling made with cream cheese, nutella, and whipped cream. The creamy filling is nestled in a press-in chocolate cookie crust. You will fall head over heels for this one!

Why you’ll love this Nutella Tart:
- Creamy Nutella Filling – This Nutella Tart gets its creamy filling from folding cream cheese, nutella, and whipped cream together.
- Oreo Crust – This tart has a crisp chocolate crust made with crushed oreo cookies and melted butter. Press-in cookie bases like this are so easy – no rolling pin or pie dough necessary!
- No-Bake – This delicious recipe is completely no-bake!
Ingredient Overview:
This tart uses fairly simple ingredients! See the recipe card below for the full recipe as always.
- Cream Cheese – Use full-fat cream cheese at room temperature for the best results.
- Nutella – Use brand name or off brand nutella – there are tons of great options and all the ones I’ve tried have great nutella flavor.
- Whipped Cream – We’re whipping heavy cream to make homemade whipped cream to fold into our tart for extra creaminess.
- Butter – I always use salted buter, but feel free to use unsalted butter if you prefer.
Ingredient Substitutions:
- Whipped Cream – In a pinch, you could use cool whip in place of the whipped cream.
- Crust – Try chocolate graham crackers or a pre-made chocolate or graham cracker crust instead of the oreo crust, if you prefer.
- Gluten-Free – Use your favorite gluten-free chocolate cookies to make this recipe gluten-free.
How to Make this Nutella Tart Recipe Step-by-Step:
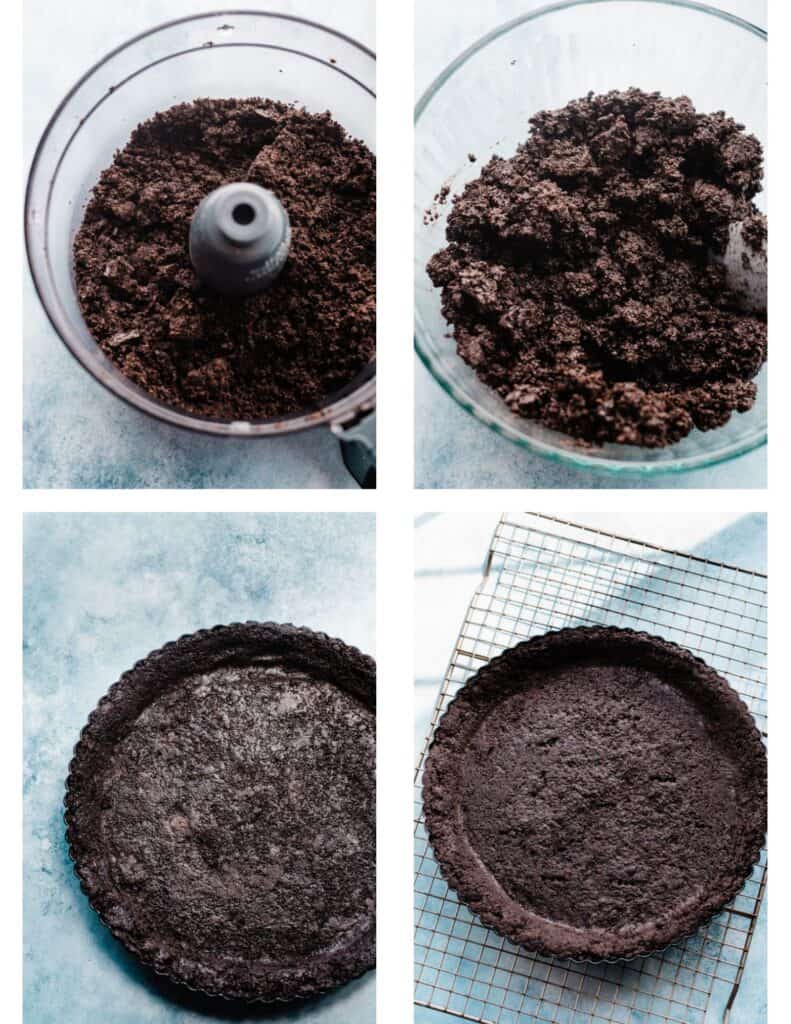
Step 1: Make the Tart Crust. Blend oreos in a food processor until they’re broken down into fine crumbs. Mix oreo crumbs with butter in a small bowl, and press this into a 9-inch tart pan. Be sure to press it in really well.
Step 2: Make the Nutella Filling. Start by creaming together cream cheese and nutella in a large bowl. Then, beat heavy cream until you have soft peaks to make your whipped cream. Mix 1/3 of the whipped cream into the nutella mixture.
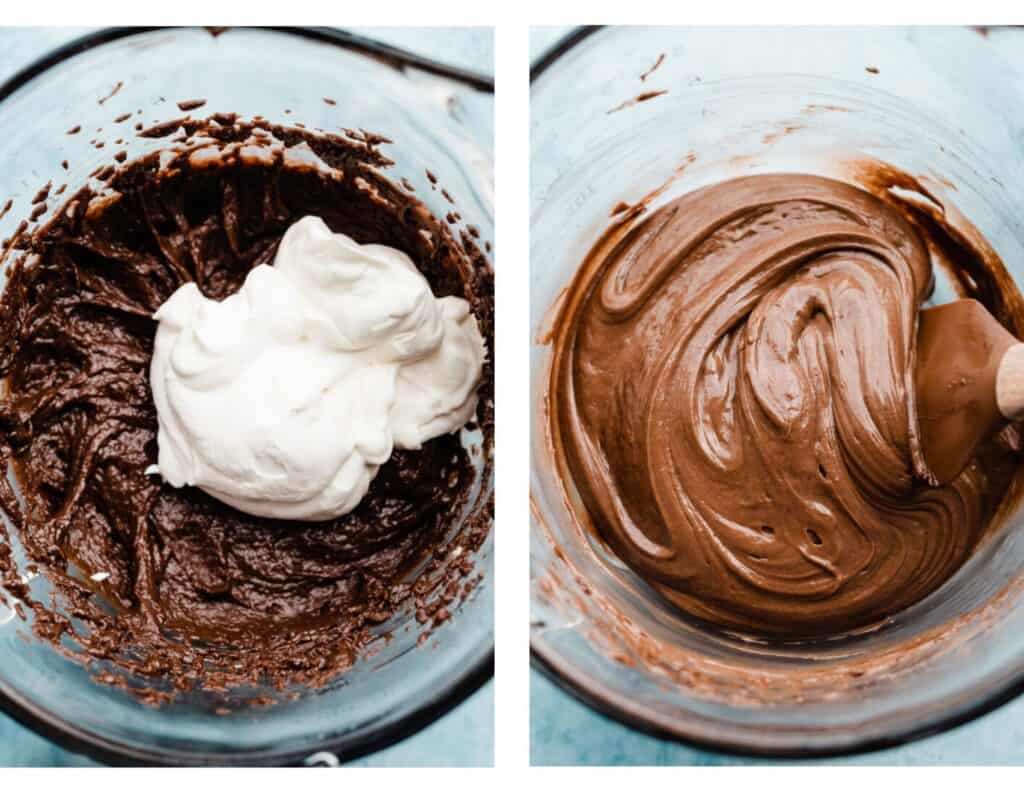
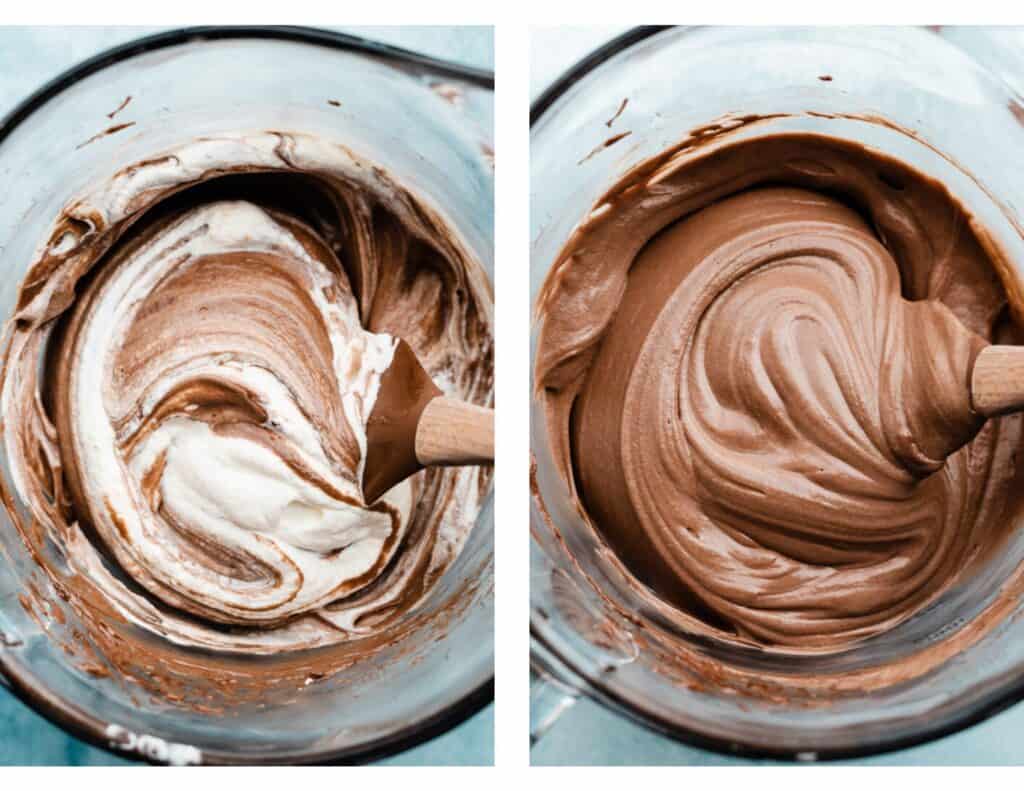
Step 3: Fold in the Whipped Cream. Gently fold in the rest of the whipped cream. It’s important to be gentle so you don’t knock all the air out.
Step 4: Finish the Tart. Spread the filling into your prepared crust, and chill for at least 6 hours, or up to 2 days before serving.

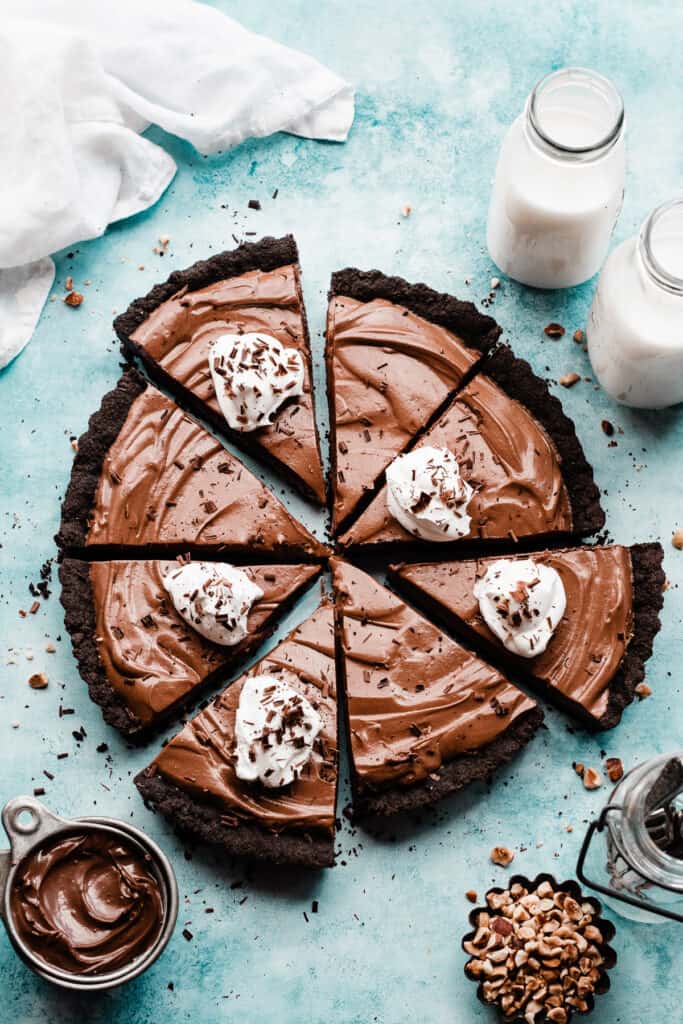
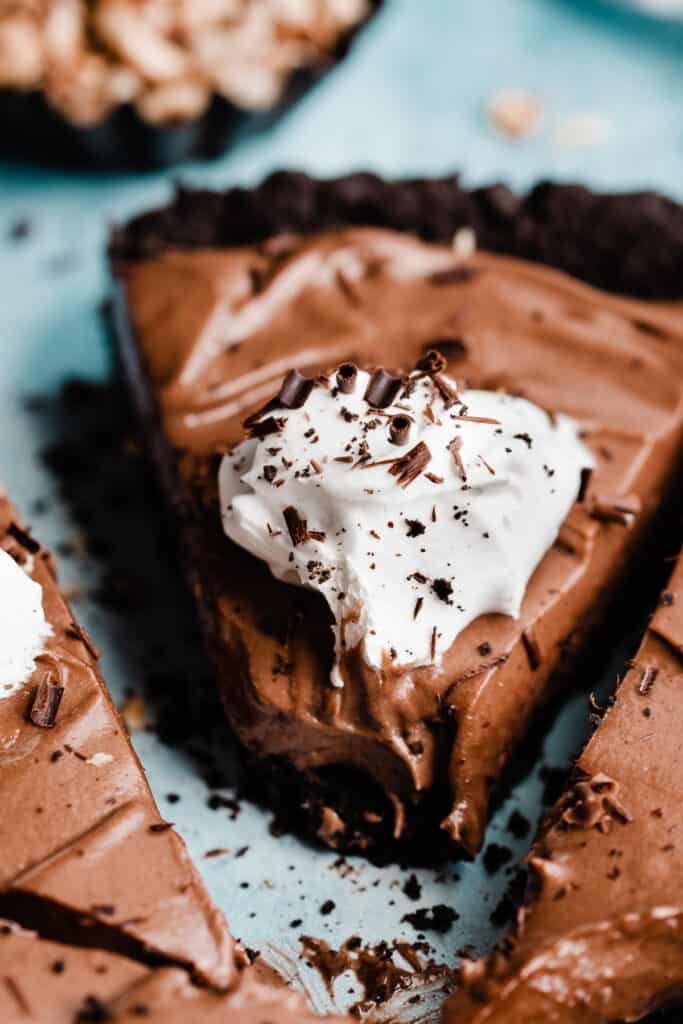
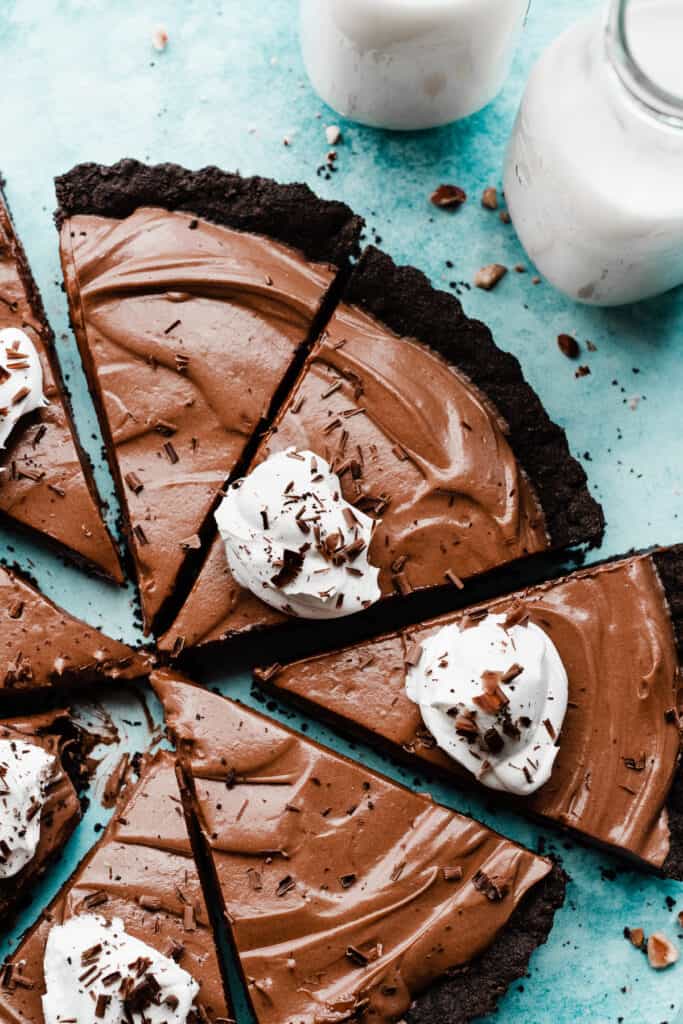
This Nutella Tart is an absolute dream! Slice it up and serve with a dollop of whipped cream and chocolate shavings on top. People will go crazy for this amazing nutella dessert.
Expert Success Tips:
- Sturdy Crust – Spend a few minutes really pressing the crust into the pan with the back of a measuring cup. This will ensure that it holds together and isn’t super crumbly. You can bake the crust to give it a slightly crispier crust and a little more stability , but it isn’t 100% necessary.
- Fold in Gently – Folding the whipped cream into the nutella mixture is important as it will make sure the filling sets up in the fridge. Be gentle here, so you don’t knock out all the air we just beat into the whipped cream. To fold something in, run your spatula down along the side of the bowl, across the bottom, and then back over the top. It’s essentially a much gentler way of stirring something to
FAQs:
If you skip the full chill time, or if you don’t whip your cream stiff as directed, your tart may come out soft. You also may not have folded the cream in gently enough – if you are rough with it, it’ll knock the air out and the tart may not set up.
Recipe Variations:
- Other Nut Butters – If you don’t like nutella, try substituting it for almond butter, peanut butter, or even cookie butter!
- Crust – You could use chocolate graham crackers for the crust if you prefer.
- Chocolate Ganache – If you want extra chocolate, top this tart with chocolate ganache!
Serving + Storing this Recipe:
Serve the tart with a dollop of fresh whipped cream and chocolate shavings! Everyone you serve this Nutella Tart recipe to will be so impressed. Store leftovers in an airtight container in the fridge for up to 5-6 days.

Special Tools:
- Tart Mold – I used a 9-inch tart pan for this recipe. It has a removable bottom which makes serving the tart so easy! You can use a pie pan instead, it just doesn’t lend itself to un-molding the tart like a tart pan does.
More Chocolate and Nutella Lovers Recipes:
- Bakery-Style Peanut Butter Chocolate Chip Cookies
- Molten Chocolate Lava Cakes
- Salted Chocolate Peanut Butter Tart
- Fudgy Triple Chocolate Skillet Brownie
- Small Batch Chocolate Cake with Fudgy Chocolate Frosting
- Triple Chocolate Chunk Cookies
Did you make this recipe? Snap a photo and leave a comment!
Be sure to follow bluebowlrecipes on instagram and tag #bluebowlrecipes with your photo! You can also post a photo of your recipe to the bluebowlrecipes Facebook page. I’d love to see what you make!

No-Bake Nutella Tart
Ingredients
For the Crust
- 36 double chocolate oreos
- 5 and 1/2 tbsp salted butter, melted
For the Nutella Filling
- 3/4 cup heavy whipping cream, cold
- 3 tbsp powdered sugar
- 4 ounces cream cheese, softened at room temperature , use full-fat, block style
- 1 cup Nutella
- 2 tsp vanilla extract
- pinch of salt
For Serving
- chocolate shavings
- whipped cream
- chopped hazlenuts
Instructions
- Make the Crust: Pulse the oreos in a food processor until completely broken down. Stir together the oreos and butter, and press the mixture into the bottom and up the sides of a 9-inch tart pan. Be sure to pack it in tightly so you don't have a crumbly crust.Optional Bake Step: Bake tart crust at 350° F for 10 minutes for a more solid crust. This step is optional. Poke holes in the bottom of your crust with a fork before baking – no need for parchment paper or pie weights. Be sure your crust is completely cool before adding the nutella filling.
- Make the Filling: Add the cold heavy cream into a medium bowl using a 1 or 2-cup glass measuring cup. Beat the heavy cream with an electric mixer on high speed until you have soft peaks when you lift the mixer up from the whipped cream. Pour the softly whipped cream back into the measuring cup you used to measure it. Pop this in the fridge while you finish making the filling. Add the cream cheese to the same bowl, and beat on high speed until creamed. Add the nutella, vanilla and salt, and mix until well combined. Add about one-third (eyeball it) of the whipped cream into the bowl with the filling, and mix until just combined. Gently fold in the rest of the whipped cream with a silicone spatula until it’s completely combined.
- Chill the Tart: Pour the filling into your crust, and chill in the fridge at least 6 hours or up to 2 days before serving. Even if you let the tart set for a bit first, putting plastic wrap over it will stick to the perfectly swirled surface. Store it under the dome of a cake stand if you can.
- Serve + Store: Slice and serve with a dollop of whipped cream and chocolate shavings. Store leftovers in an airtight container in the fridge for 4-5 days.
Notes
Nutrition
Nutrition information is automatically calculated, so should only be used as an approximation.


