This post contains affiliate links. Please see our disclosure policy.
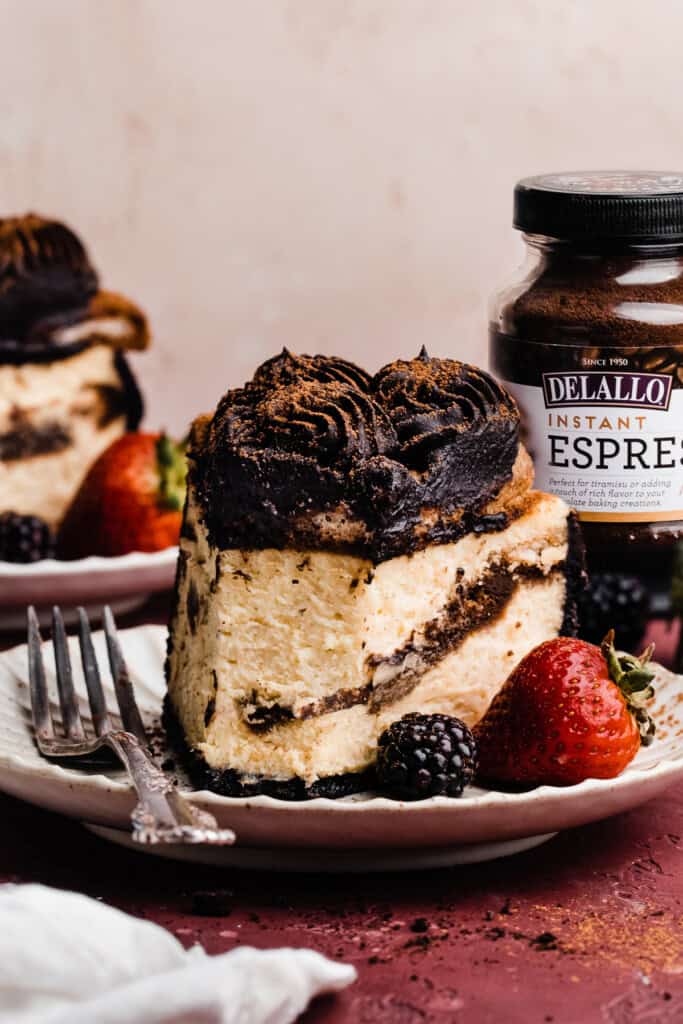
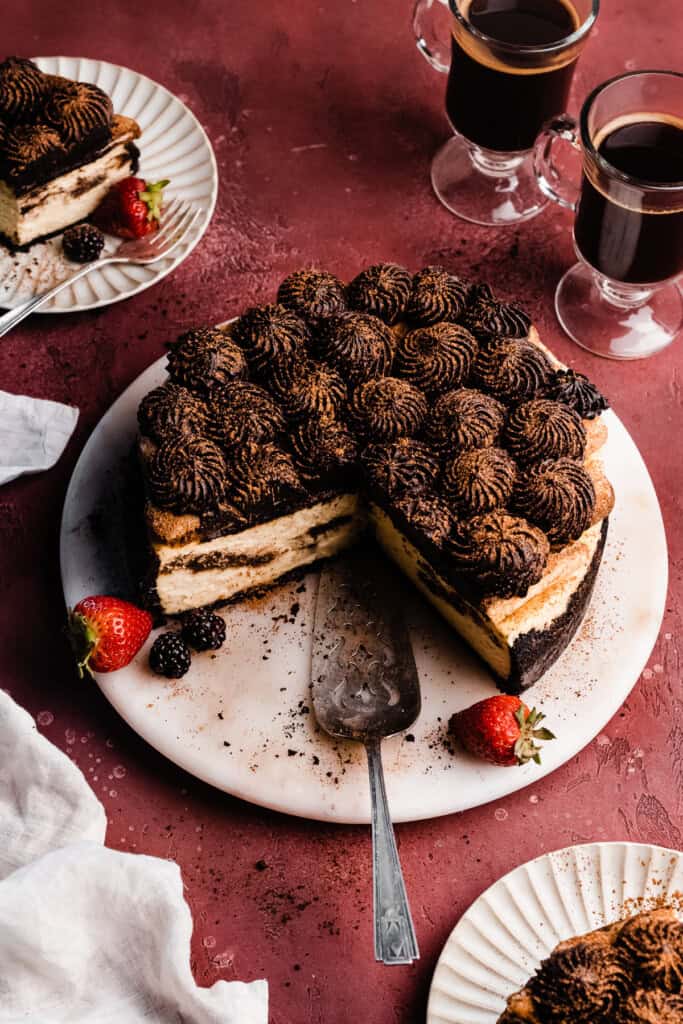
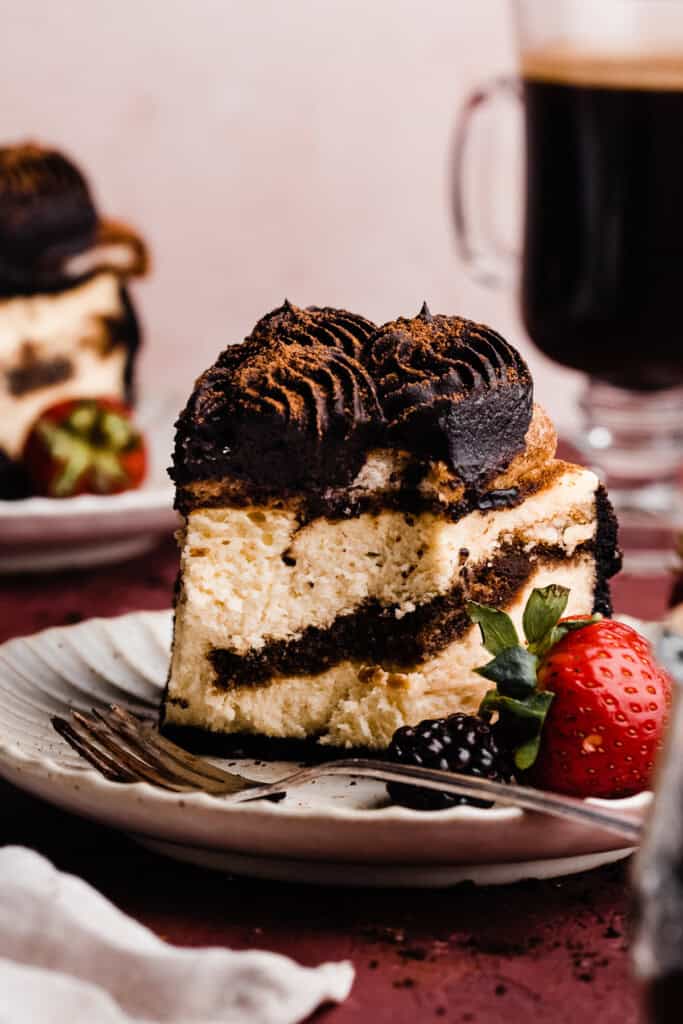
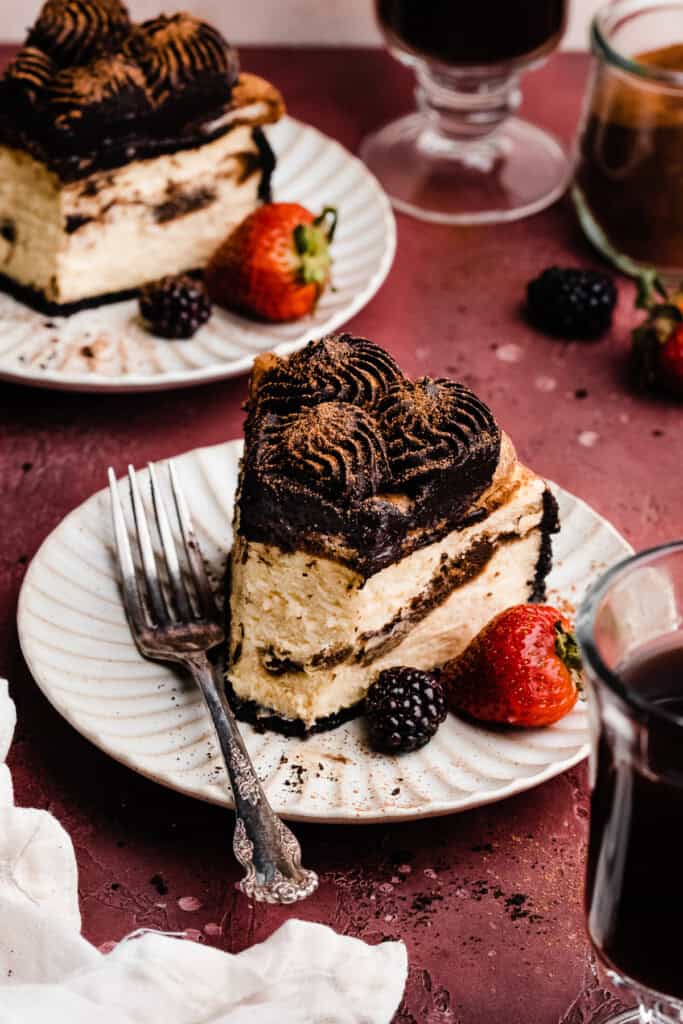
Tiramisu Cheesecake has all the flavor of classic tiramisu in an ultra creamy cheesecake! Vanilla cheesecake batter is layered with a layer of espresso soaked lady fingers and baked atop a crisp chocolate espresso crust. It’s then topped with more lady fingers, and a rich espresso chocolate mascarpone cream!

This recipe is sponsored by our friends at DeLallo. Thanks for supporting the brands that make Blue Bowl possible! All opinions are my own.
Table of Contents
Why you’ll love this Tiramisu Cheesecake:
- Ultra Creamy Cheesecake – My ultra creamy, classic cheesecake base is incredibly simple to make and comes together quickly!
- Espresso Soaked Lady Fingers – Two layers of espresso soaked lady fingers pack this cheesecake with tiramisu flavor!
- Espresso Chocolate Cream – A rich espresso chocolate cream made with a base of mascarpone & whipped cream is a fun twist on the classic mascarpone cream found in tiramisu.
- Crisp Chocolate Espresso Crust – The luscious cheesecake is baked atop a crisp chocolate crust.
Ingredient Overview:
As always, the full recipe with measurements & directions can be found in the recipe card at the bottom of this post. Use the table of contents (back at the top, below the first image, to navigate).
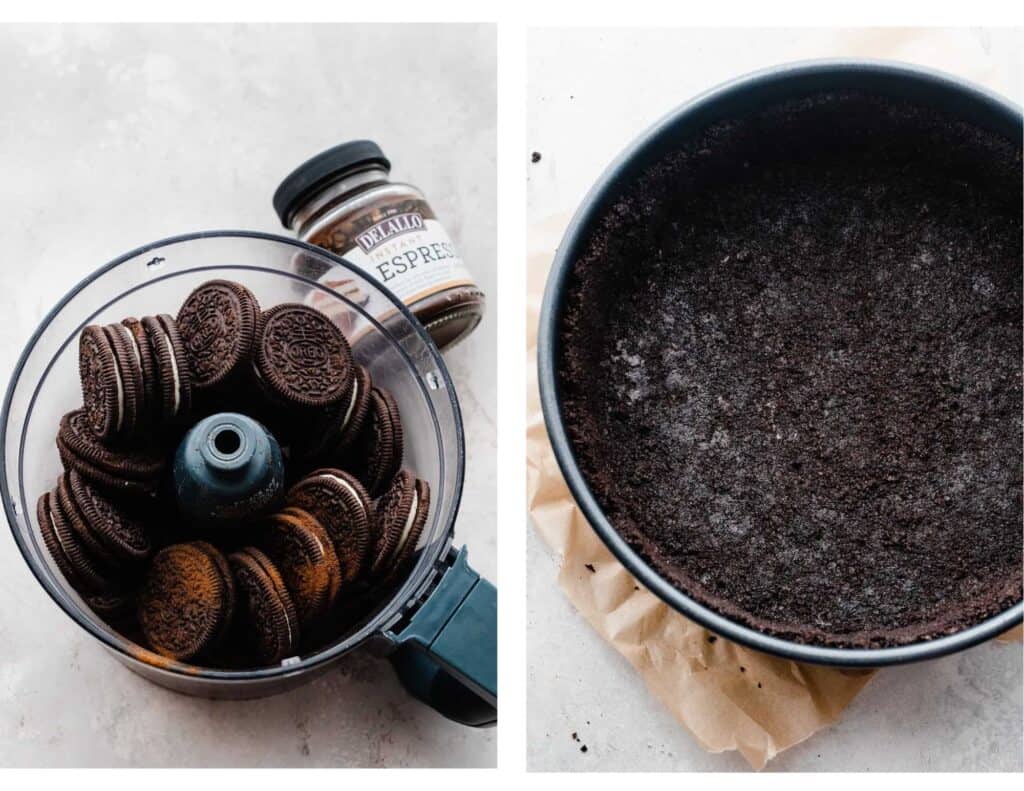
- Chocolate Sandwich Cookies – Use oreos or any similar chocolate sandwich cookies (with the cream included!) to make the crust. Pulse the whole cookies (yes, with the cream!) in a food processor until you have fine crumbs.
- Butter – I always use salted butter because in my experience, it lends the best flavor, but feel free to use unsalted butter if that’s what you prefer.
- DeLallo Foods Instant Espresso Powder – DeLallo’s Instant Espresso Powder is a workhorse in this recipe! It intensifies the chocolate flavor of the crust, creates the espresso for dipping our lady fingers into, and provides the espresso flavor in our chocolate mascarpone cream. It’s beautifully flavored, with just the right strength of espresso flavor! You can order it online (linked above) or find it in the baking aisle of many major grocery stores.
- Cream Cheese – Use full fat cream cheese, in the block style. This needs to come to room temperature before you bake.
- Mascarpone – Mascarpone is a soft, Italian tangy cheese (similar to cream cheese), traditionally used in tiramisu. It can be found in a tub, near the specialty meats & cheeses in your grocery store.
- Eggs – Use large eggs at room temperature.
- Sour Cream – Use full fat sour cream, at room temperature.
- Vanilla extract – Use real vanilla extract for best results.
- Lady Fingers – These can be found in most grocery stores – check near the cookies, or near the Italian foods. Sometimes they’re near produce or deli, on an end cap or something similar.
- Heavy Cream – Also called heavy whipping cream, this is found near the half and half and milk in grocery stores. Make sure to keep it in the fridge until just ready to use, so it’s nice and cold. If it’s not cold, your cream won’t whip up.
- Cocoa Powder – I used black cocoa powder for an extra rich chocolate flavor in my chocolate cream, but you can use natural cocoa (the most common) or dutch process, which has a little more of a dark chocolate flavor.
Recipe Variations:
- Gluten-free – Use gluten-free oreos to make the crust gluten-free. Use gluten-free lady fingers to make the rest of the cheesecake gluten-free.
- Dairy-free – Dairy-free – I have not experimented with dairy-free cheesecakes so I can’t recommend anything with confidence here, except to check out a reputable vegan baking blog.
- Chocolate Crust – If you’re in the UK, some sort of chocolate digestives would be your closest substitute if you can’t get oreos. You can also use any brand of chocolate sandwich cookies (with the creme filling!).
- Lady Fingers – If you don’t want two layers of lady fingers, you can skip one or the other. The cheesecake may need 10-15 minutes less baking time without that layer in the center. Check for doneness in the same way indicated in the recipe card.
- Mascarpone Cream – Omit the cocoa powder and lessen the powdered sugar by 2-3 tbsp (to taste) for a vanilla mascarpone cream.
How to Make Tiramisu Cheesecake:
Step 1: Make the Crust. Pulse your chocolate sandwich cookies in a food processor until you have fine crumbs. Stir in the melted butter, and press into a 9-inch springform pan. Bake at 350 degrees F for 10 minutes.
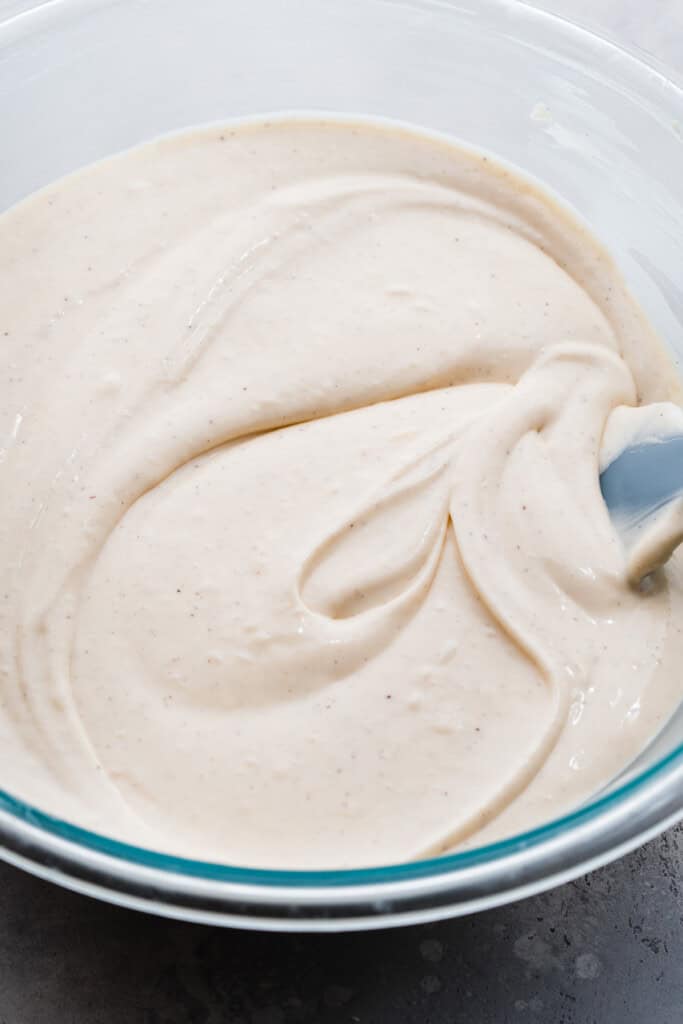
Step 2: Make the Batter. In a large mixing bowl, beat your cream cheese on high speed with an electric mixer, until creamy. (You can also do this in the bowl of a stand mixer.) Then, mix in the sugar, eggs, vanilla, and sour cream.
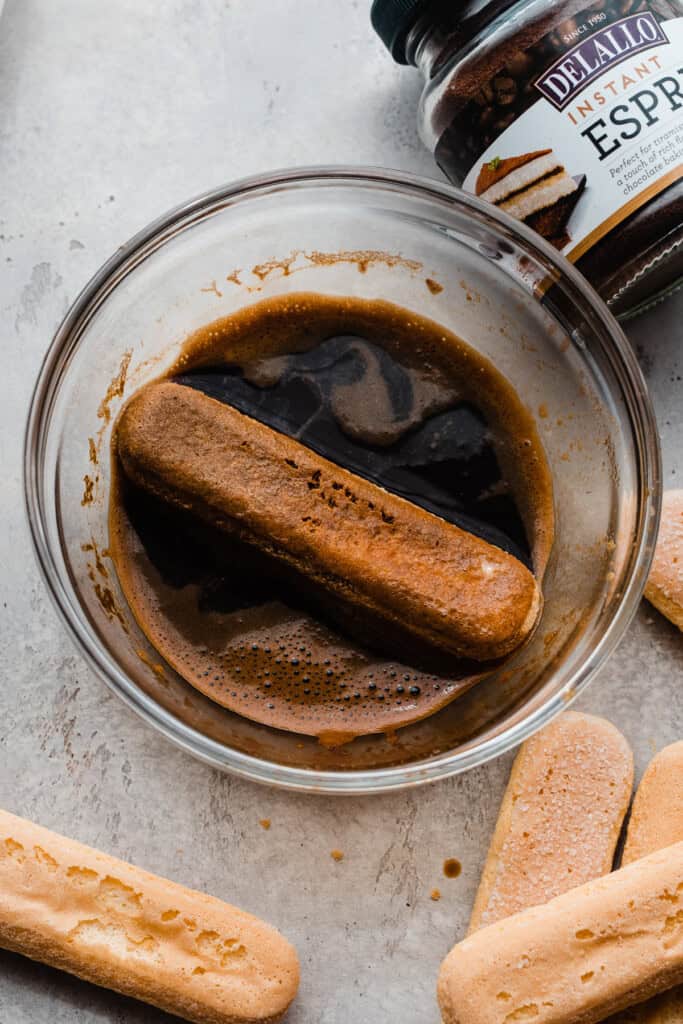
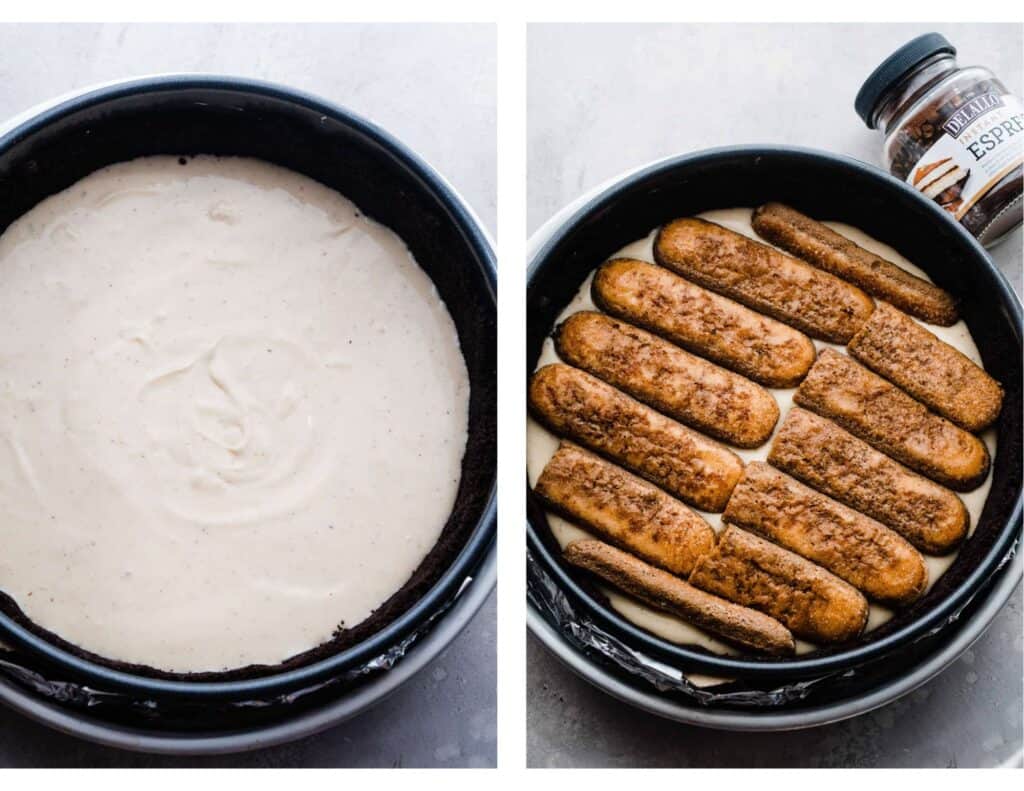
Step 3: Assemble the Cheesecake. Pour half the cheesecake batter into your baked crust. Add espresso powder to very hot water, and whisk until dissolved. Dip lady fingers into the espresso very quickly, then place in an even layer over the batter.
Pour the remaining batter on top.
Step 4: Prepare Water Bath & Bake. Wrap the sides of your 9-inch springform pan with foil, then place the pan into a 10-inch cake pan, and place that into a roasting pan. Place it on your oven rack and pour in boiling water. Bake as directed in the recipe card below for best results.
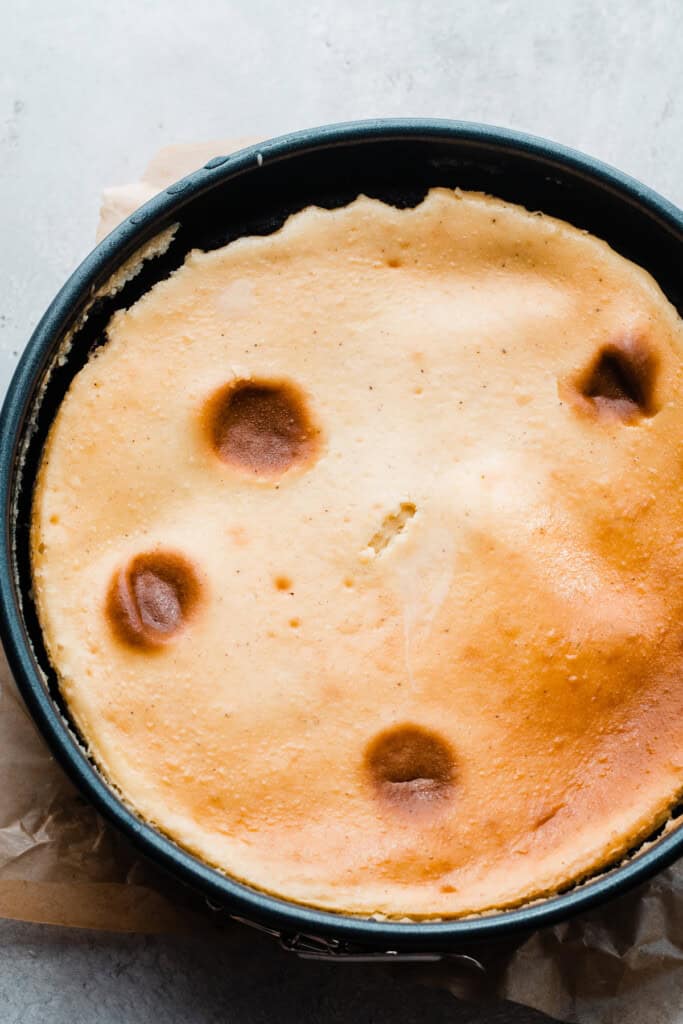
Once baked, turn off the oven and crack the door to allow the cheesecake to gently cool for 1 hour. Then, let it continue cooling on your counter for 1-2 hours. Refrigerate for at least 6 hours or overnight before serving.
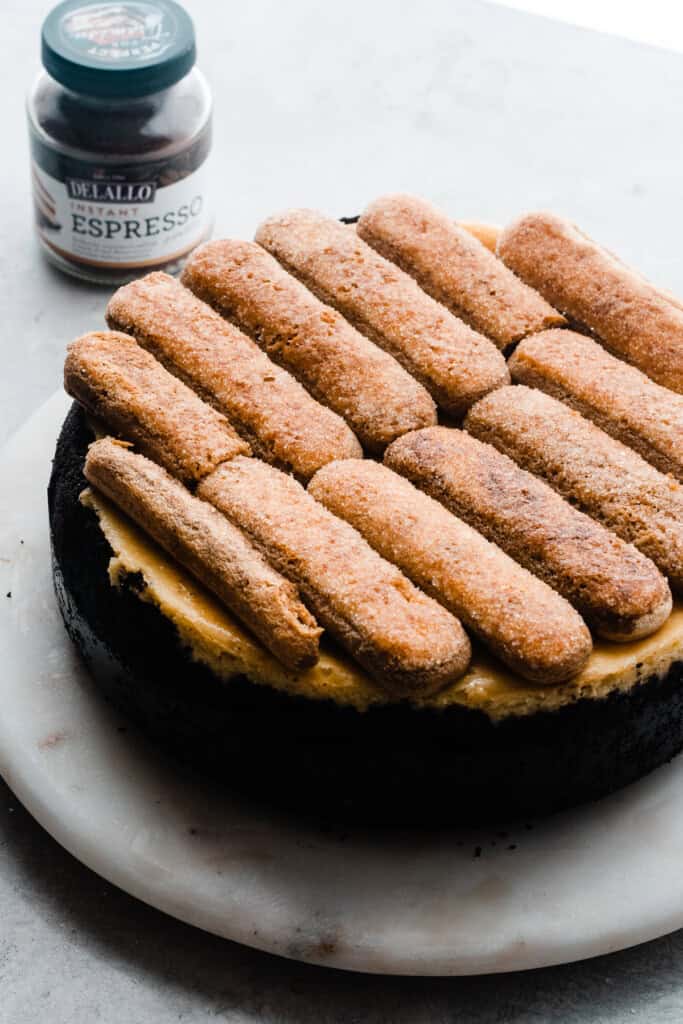
Step 5: Top the Cheesecake with Lady Fingers. Once the cheesecake has chilled, add another layer of espresso soaked lady fingers to the top.
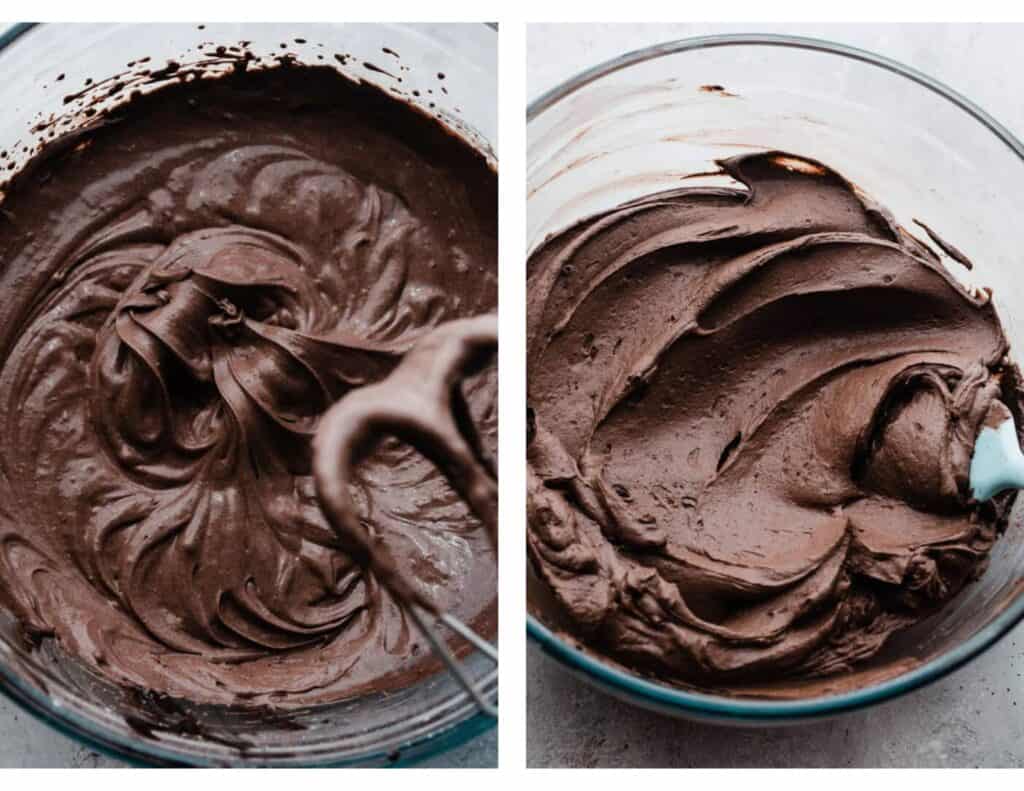
Step 6: Make the Espresso Chocolate Cream & Decorate. Beat together heavy cream, cocoa powder, powdered sugar, vanilla, and espresso powder until it begins to thicken.
Add the mascarpone, and continue mixing on medium high until the mixture is stiff and thick. Transfer to a piping bag fitted with a Wilton 6B tip, and pipe in dollops all over the top of the cheesecake.
Serving + Storing:
Once decorated, dust with a bit of cocoa powder, then slice & serve immediately! Store the leftover cheesecake in an airtight container in the fridge for 2-3 days.
Can’t get enough tiramisu? Make my Tiramisu Cookies or my Lemon Tiramisu!
Expert Success Tips for Tiramisu Cheesecake:
I’ve made dozens and dozens of cheesecakes in my baking career, and I’ve learned so many helpful tricks through trial and error!
- Forgot to Bring Ingredients to Room Temp? Bring your cold ingredients out about 30-45 minutes ahead of baking so they can come to room temperature. If you forget or are rushed for time, here’s my trick. Place two blocks of cream cheese on a plate, and microwave for 5-6 seconds, flip, and repeat. Repeat with the remaining two blocks. For sour cream, add to a bowl and heat for 5-6 seconds, stirring, then repeat once more. Place eggs in a bowl of warm water to bring them to room temperature quickly.
- Scrape the Bowl: Scrape the bowl, getting down to the very bottom, between the addition of each ingredient in this recipe. Little lumps of cream cheese love to hide in the bottom of the bowl, and scraping them up to the top is the best way to ensure no lumps!
- Oven Thermometer – An oven thermometer will tell you if your oven is actually running at the temperature you set it to. Your oven may not be accurate. Accurate oven temperature is crucial for most bakes, so I leave an oven thermometer in at all times to keep an eye on my oven’s calibration.
- Lady Fingers Shifted – If your lady fingers have shifted a bit during the bake and you have an uneven line when you cut into the cheesecake, never fear! That can happen – and I guarantee it won’t affect the taste. 😉
FAQs:
Yes. Half a batch of this recipe will fit in an 8×8 or 9×9 square pan. Start the bake time around 45-50 minutes, adding time in 5-7 increments as needed until the edges are set and the cheesecake has just a slight jiggle in the center.
Yes! That’s the nature of cheesecake. Allow the cheesecake to come to room temp after it’s baked, and then transfer to the fridge to chill for at least 6 hours or up to 1 day before serving.
The hot water produces steam that fills the oven, which helps the cheesecake cook evenly and remain nice and creamy, without cracking. It also helps prevent the edges from cooking at a faster rate than the center.
I have two great ways to prevent this – place the roasting pan filled with boiling water on the rack directly below your cheesecake, or place your cheesecake pan (with the bottom still wrapped in aluminum foil) into a 10-inch cake pan, and place that inside of the roasting pan. Pour water into the roasting pan only. If you place the foil-wrapped cheesecake pan into the roasting pan and pour in water, it will almost always leak to some degree.

Special Tools:
- Springform Pan – This lemon meringue cheesecake recipe uses a 9-inch springform pan.
- 10-Inch Cake Pan – Use a 10-inch cake pan as your barrier between the cheesecake pan and the water bath in the roasting pan.
- Roasting Pan – A roasting pan is essential for a water bath when making cheesecake.
More Cheesecake Recipes to Love:
- Key Lime Pie Cheesecake
- Lemon Meringue Pie Cheesecake
- Pineapple Upside Down Cheesecake
- Salted Caramel Crème Brûlée Cheesecake
- Biscoff Cheesecake
- Triple Nutella Cheesecake
- Lemon Blueberry Cheesecake
Did you make this recipe? Leave a comment & star rating!
Click the little stars in the header of the recipe card below to leave a comment & star rating, letting me know how you liked the recipe. I take all feedback seriously, & leaving a rating helps my small business immensely!

Tiramisu Cheesecake with Espresso Chocolate Cream
Ingredients
For the Crust:
- 35 whole chocolate sandwich cookies, with the cream included
- 1/4 cup salted butter, melted, 56 grams
- 1 tsp DeLallo Foods Instant Espresso Powder
For the Cheesecake Batter
- 24 ounces full fat cream cheese, softened at room temperature , 678 grams
- 8 ounces mascarpone, at room temperature , 226 grams
- 1 and 1/2 cups granulated sugar , 315 grams
- 4 large eggs, at room temperature
- 3/4 cup full fat sour cream, at room temperature , 180 grams
- 2 tsp vanilla extract , 10 grams
For the Espresso Soaked Lady Fingers
- 4 tbsp DeLallo Foods Instant Espresso Powder, divided, 60 grams
- 1 cup hot water, divided, 240 grams
- 20 lady fingers, divided
For the Chocolate Espresso Cream
- 4 tsp cold water
- 1 tsp plain powdered gelatin, This is available in the baking aisle of most grocery stores
- 1 cup heavy whipping cream, 240 grams
- 1/4 cup black cocoa powder, See note below, 27 grams
- 2/3 cup powdered sugar , 77 grams
- 1 tsp vanilla extract
- 1 tsp DeLallo Foods Instant Espresso Powder, If you want a more intense coffee flavor, add 1/2 tsp more
- 4 ounces mascarpone , 113 grams
Instructions
- Make the Crust: Preheat oven to 350° F. Spray a 9-inch springform pan with nonstick spray and place a piece of parchment paper over the bottom, before making sure it's securely fastened. Spray the inside of the pan with nonstick spray. Pulse the chocolate cookies in a food processor until you have fine crumbs. (You can also use a ziploc bag and a rolling pin!)Melt butter and stir it into the chocolate cookie crumbs, along with the DeLallo Instant Espresso Powder. Press the crust mixture into the bottom of the springform pan and up the sides (see photos above). Bake this for 10 minutes. Set aside. Keep the oven on at 350℉. Fill a large pot with water and set it on your stove, and get out a large roasting pan – you'll need this for your water bath later.35 whole chocolate sandwich cookies, with the cream included, 1/4 cup salted butter, melted, 1 tsp DeLallo Foods Instant Espresso Powder
- Make the Cheesecake Filling: Remember that your cold ingredients need to come to room temp before you start. In a large mixing bowl, beat the softened cream cheese & mascarpone together with an electric mixer until creamy, about 1-2 minutes. Add the sugar & mix on high speed until well incorporated, about 1-2 minutes. Scrape the sides of the bowl with a rubber spatula between each step – little lumps of cream cheese love to hide in the bottom of the bowl. Add the eggs one at a time, mixing on medium speed after each until just incorporated. Add the vanilla and sour cream, and mix on medium low speed until just incorporated.Tip: You can also do this in a stand mixer fitted with the paddle attachment. I don't like to go higher than speeds 2-4, to ensure I don't whip a bunch of air into the batter!24 ounces full fat cream cheese, softened at room temperature , 8 ounces mascarpone, at room temperature , 1 and 1/2 cups granulated sugar , 4 large eggs, at room temperature , 3/4 cup full fat sour cream, at room temperature , 2 tsp vanilla extract
- Prepare the Water Bath: Bring the large pot of water to a boil. Get your roasting pan out and place the springform pan with the crust inside of a 10-inch cake pan (or similar size pan that it can evenly sit inside of, while it sits in the roasting pan). Pour half the cheesecake batter into the springform pan. You need to be ready to place your lady fingers as soon as they're dipped!
- Prepare Espresso Soaked Lady Fingers (1 of 2): Microwave 1/2 cup of water until it's steaming hot, then pour into a shallow dish, and whisk in 2 tbsp of espresso powder until dissolved. Quickly dunk (one at a time!) 10 of the lady fingers, on each side, then place on the cheesecake batter, making an even layer. You will need to cut some of the lady fingers with a knife to make them fit (see photos in blog post above for reference). Once you have a layer of lady fingers, carefully pour the remaining cheesecake batter on top, and spread it in an even layer. Tip: Only dunk the lady fingers for about 1 second on each side – they will absorb too much liquid if you let them sit longer.4 tbsp DeLallo Foods Instant Espresso Powder, divided, 1 cup hot water, divided, 20 lady fingers, divided
- Bake: Place your roasting pan on an oven rack positioned in the center of your oven. Set the springform pan full of cheesecake inside of the 10-inch pan, inside of the roasting pan. Then, pour the boiling water into the roasting pan only, until you have water about 2 inches deep. (The 10-inch pan is your failsafe buffer against leaks!)Bake the cheesecake for 1 hour and 25 minutes to 1 hour and 45 minutes. When done, the cheesecake will have only a slight wobble in the center, and a knife inserted into the edge will come out clean, and will have just a bit of thick batter when inserted into the center. Turn off the oven and crack the door open. Let the cheesecake cool in the oven for 1 hour before removing it.
- Cheesecake Cooling: Once the hour is up, remove the pan from the oven. It should be cool enough to handle. Take the springform pan out of the 10-inch pan and set it on a wire rack. Let cool until just slightly warm or room temperature, then cover with foil and refrigerate at least 6 hours or up to 1 day before removing from the pan and serving.
- Make the Espresso Chocolate Cream: Add the water to a small bowl, and sprinkle the gelatin on top. Let sit for 4 minutes, then microwave for 5 seconds to liquify it. Keep nearby. Add the heavy cream, cocoa powder, powdered sugar, vanilla, and espresso to a medium bowl and beat on high speed with an electric mixer until the mixture begins to thicken. Then, add the mascarpone, and slowly drizzle in the gelatin liquid while you run the mixer on medium speed. Continue mixing on medium high speed until stiff peaks form. Your whipped cream is stabilized and is immediately ready to be piped, which we will do after the next step. Tip: If you moved a bit slowly and your gelatin has re-solidified, just microwave it for another 3-5 seconds.4 tsp cold water, 1 tsp plain powdered gelatin, 1 cup heavy whipping cream, 1/4 cup black cocoa powder, 2/3 cup powdered sugar , 1 tsp vanilla extract , 1 tsp DeLallo Foods Instant Espresso Powder, 4 ounces mascarpone
- Prepare Espresso Soaked Lady Fingers (2 of 2): Microwave 1/2 cup of water until it's steaming hot, then pour into a shallow dish, and whisk in 2 tbsp of espresso powder until dissolved. Quickly dunk (one at a time!) 10 of the lady fingers, on each side, then place on top of the cheesecake, making an even layer. You will need to cut some of the lady fingers with a knife to make them fit (see photos in blog post above for reference). Tip: Only dunk the lady fingers for about 1 second on each side – they will absorb too much liquid if you let them sit longer
- Serve & Store: Immediately pipe the espresso cream on top of the lady fingers, covering the entire cheesecake. Finish with a dusting of cocoa powder, then immediately slice and enjoy! Store leftovers in an airtight container in the fridge for 2-4 days.
Notes
Nutrition
Nutrition information is automatically calculated, so should only be used as an approximation.

Can I do step 8 in the morning and serve the cake for dinner. I will keep the cake in the fridge and take out an hour before serving.
Hi Sandra! Yes, that should be fine. You can add the cream on top as well – the mascarpone stabilizes the cream so it should stay in place in the fridge until you serve it, and on leftovers for the next few days. Just eyeball the cream once you’ve made it and make sure it seems thick and sturdy – if so, you should be fine! 🙂 Let me know how you like the recipe!
I’ve made this cheesecake multiple times and it’s always a hit! Everyone loves it and always requests this specific cheesecake. However, I am gonna try to lower the temperature this time. Mine always gets darker than I’d like on top. My oven may run hot though and I just dont know it! My dark cocoa powder isn’t as dark as I’d like either but maybe Ill try adding more next time as well! Thanks for the awesome recipe!!!
So glad to hear you enjoyed this cheesecake! I used black cocoa powder which made the chocolate cream darker in color. 🙂
The best cheesecake I have ever made, tasted or seen! Everyone loved it! Thank you so much for the amazing recipe!
Thanks so much for the rave review, Constance!
The recipe instructions did not say when to add the mascarpone to thr batter so I forgot! I hope it’s not ruined. Was so looking forward to this.
Hi Janet! My apologies – I have gone back and added that to the directions. Thanks so much for alerting me. How did the cheesecake turn out? I find that cheesecakes can be pretty forgiving, so I bet it still tasted good!
Two of my favorite desserts combined into one. Highly recommend everyone try this out. You won’t be disappointed. DELICIOUS!
Thanks so much, Josh!
So tasty! Everyone in my household couldn’t stop eating it. 10/10 would recommend.
Thank you, Bridgette!