This post contains affiliate links. Please see our disclosure policy.
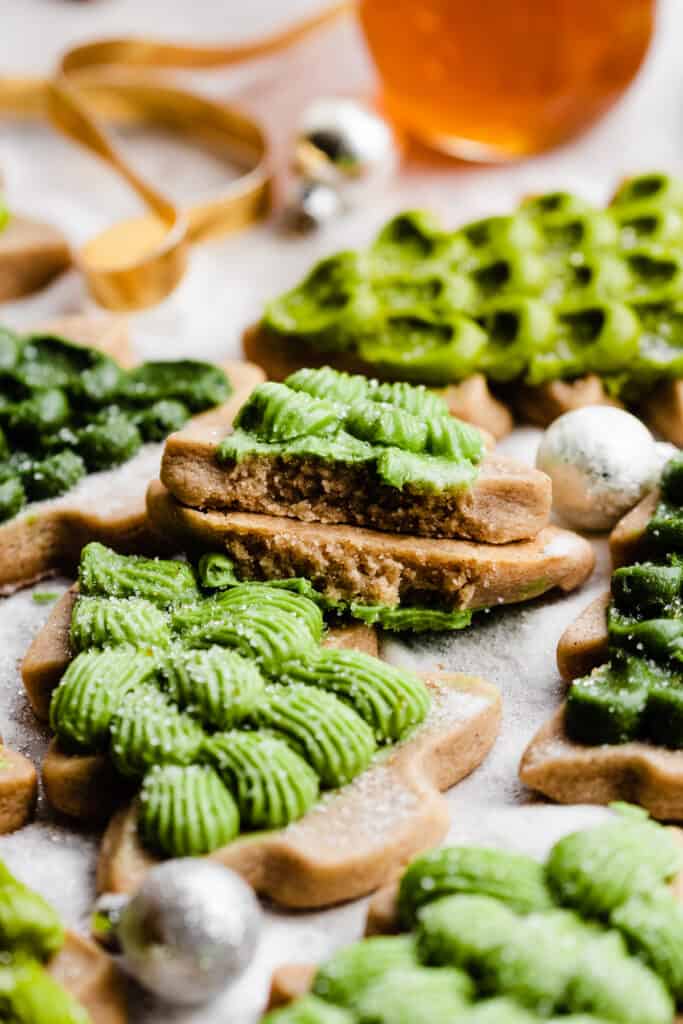
Honey Cookies are soft and thick, with a creamy honey cream cheese frosting. These chewy cookies hold their shapes perfectly while baked, and can be decorated however you like! I’ve included tips, tricks, and tools in the post to help decorate your cookies like festive Christmas trees.

Table of Contents
Why you’ll love Honey Cookies:
- Soft Honey Cookies – These delicious cookies are thick and chewy (not cakey!) cookies, with a delicious honey flavor from real honey. They’re not overly sweet at all – the flavors are perfectly balanced, and a hint of cinnamon helps with that.
- Cutout Cookies – These cutout cookies hold festive shapes perfectly when baked!
- Honey Cream Cheese Frosting – A touch of honey in the frosting adds such a delicious flavor!
Ingredient Overview:
As always, the full recipe with measurements & directions can be found in the recipe card at the bottom of this post. Use the table of contents (back at the top, below the first image, to navigate).
- I always use salted butter for the best flavor, but feel free to use unsalted if you prefer.
- Honey adds a unique and delicious flavor to these soft cookies!
- Spoon & level your flour for best results. Scooping the measuring cup directly into the bag/jar leads to too much flour. Or use a scale, and weigh 135 grams of all-purpose flour per cup.
Recipe Substitutions & Variations:
- Dairy-free – Use your favorite dairy-free butter and cream cheese (in the frosting) to make these cookies dairy-free.
- Decorations – Have fun with your decorations! Cut out any shapes you like and decorate in any way you like. For a simple look, press on sanding sugar/sprinkles in various colors before baking the cookies. This is how we decorated cutout cookies growing up.
How to Make Honey Cookies:
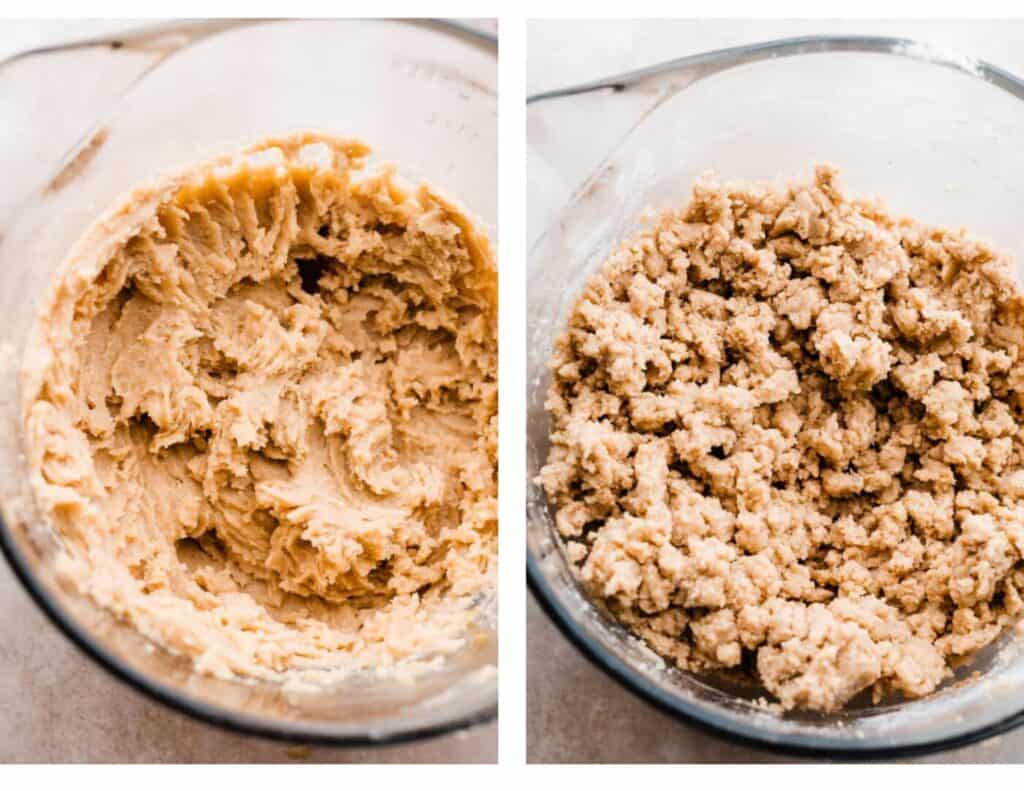
Step 1: Make the Cookie Dough. Cream together your wet ingredients in a large mixing bowl using an electric mixer, or a stand mixer with the paddle attachment. Add you dry ingredients and mix on medium speed until a cohesive dough forms.
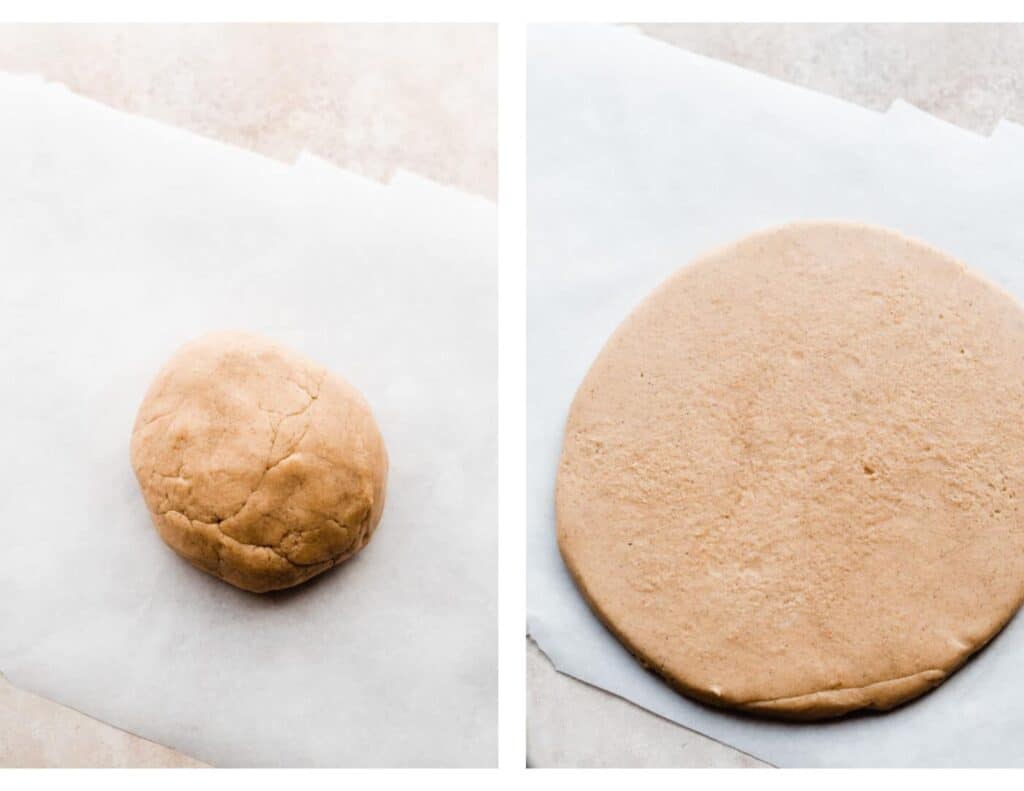
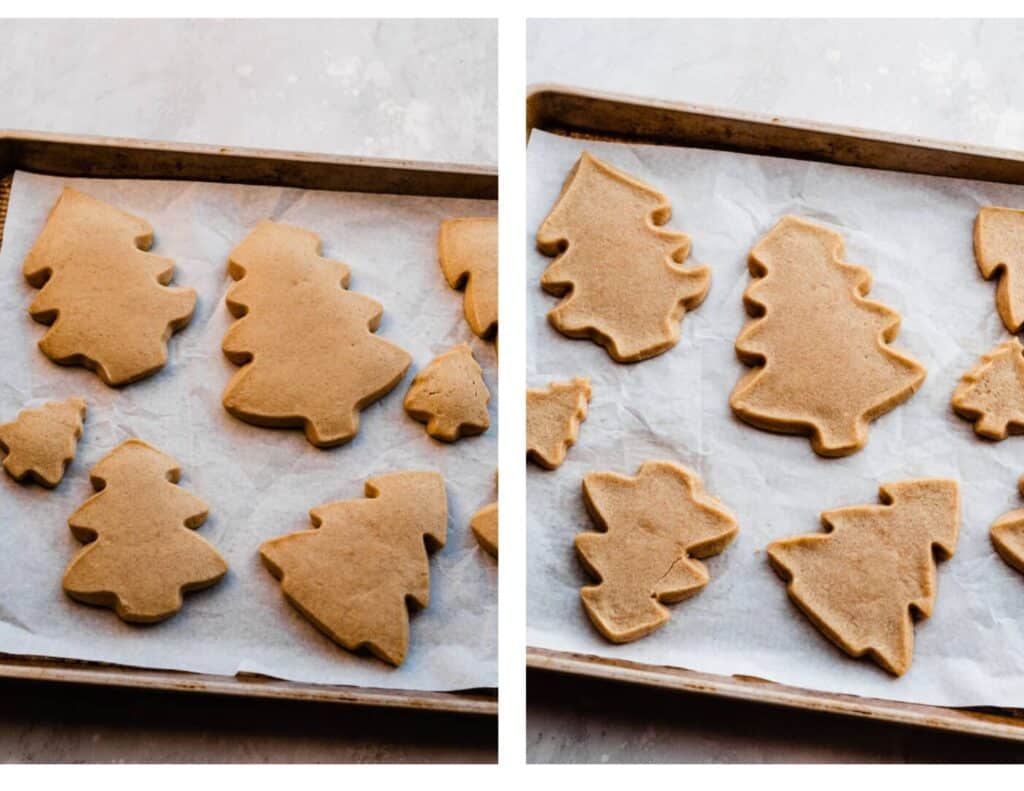
Step 2: Roll and Chill the Dough. Divide the dough in half and roll each half to 3/8 inch or 1/2 inch thick between sheets of parchment paper. Chill until firm, then use cookie cutters to cut desired shapes.
Step 3: Bake the Cookies. Bake cookies as directed in the recipe card below. They will look a tad puffy on the cookie sheet right out of the oven, but will settle down as they cool. Let cookies cool on the pan a few minutes before transferring to a cooling rack.
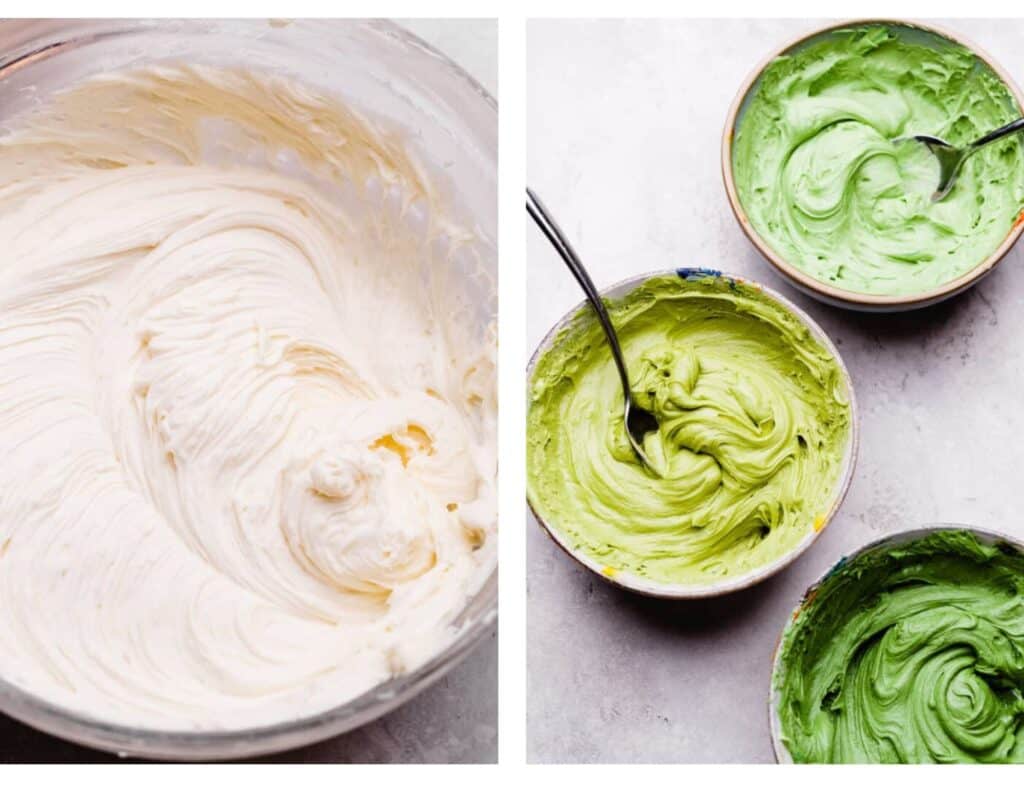
Step 4: Make the Frosting. Cream together butter, cream cheese, powdered sugar, and honey. Divide it into smaller bowls and use gel food coloring to make desired colors.
How to Make Green Frosting:
When working with food coloring, start small, and add more as needed. Gel colors are very concentrated – you don’t need much. To make the three shades of forest green that I used, you’ll need to mix golden yellow, blue, and black gel food coloring.
Or, you can sometimes find a forest green shade at stores (vs. a leaf or kelly green, which are hard to turn into a deep green).
How to Decorate Christmas Tree Cookies:
You’ll need a few piping bags, and an open round piping tip – like the Wilton 2A tip. Start at the bottom of your tree, and pipe dollops of frosting, then use an offset spatula to swipe each dollop upwards.
Pipe the next row of dots over the edge of these swipes, and continue until your tree is finished. You can also pipe dollops with an open star tip – like the Wilton 4B tip, overlapping them as you work up the tree (see the dark green tree to the right in the photos below).

Expert Success Tips:
- Cool Cookies – Never put frosting on a warm cake, cookie, etc. It will melt and be a disaster! The cookies must be completely cooled to room temperature before starting.
- Working with Frosting – If your frosting is too soft, pop it in the fridge before or after you’ve mixed the colors in, until it’s a little firmer for piping.
FAQs:
Yes! Roll the dough, chill it, and cut your shapes. Then, freeze them in a single layer on a lined baking sheet. (You can also chill or freeze the dough as a disc, wrapped in plastic wrap.) Once frozen, transfer to airtight containers with parchment or wax paper between layers. Bake from frozen in the same way as if you were baking them right away. Baked cookies can also be cooled, stored in in an airtight container at room temperature for 1-2 days before decorating.
Yes, because of the cream cheese in the frosting, these do need to be refrigerated.
Yes, absolutely! Feel free to make a double batch or half batch.
When I tried baking some of the dough balls as regular cookies, they didn’t spread at all. If you really want to bake them without cutting shapes, I recommend dividing the dough in half, rolling into logs, chilling as directed, then slicing into 1/2″ thick rounds, as the cookie dough balls were a bit too thick.
Use clover honey or raw clover honey as opposed to buckwheat or manuka honey. Clover is the type of lighter honey you’d typically buy at the grocery store, as opposed to these darker versions.

Serving + Storing:
Store frosted cookies in a single layer in an airtight container in the fridge for 1-2 weeks. See make-ahead tips above.
Special Tools:
- Offset Spatula – An offset spatula is what I used to decorate these cookies. They can also be used for spreading cake and brownie batters evenly.
- Piping Bag – I like to use a reusable piping bag.
- Rolling Pin – Use a basicyou’ to roll out the cookie dough.

More Christmas Cookie Recipes:
- Best Soft Gingerbread Cookies
- Bakery-Style Monster Cookies
- Key Lime Slice & Bake Cookies
- Peppermint Hot Cocoa Cookies
- Peanut Butter & Jelly Thumbprint Cookies
- Cherry Pie Cookies
- Triple Chocolate Chunk Cookies

Did you make this recipe? Leave a comment & star rating!
Click the little stars in the header of the recipe card below to leave a comment & star rating, letting me know how you liked the recipe. I take all feedback seriously, & leaving a rating helps my small business immensely!

Soft Honey Cutout Cookies
Ingredients
For the Honey Cookies
- 1 cup salted butter, softened at room temperature , 226 grams
- 1 cup light brown sugar, packed, 220 grams
- 1/2 cup honey, 170 grams
- 3 cups all-purpose flour, spooned & leveled , 405 grams
- 2 tsp cinnamon
- 1/4 tsp nutmeg
- 1/2 tsp salt
- 1/2 tsp baking soda
Honey Cream Cheese Frosting
- 3 ounces cream cheese, softened at room temperature, 85 grams
- 3/4 cup salted butter, softened at room temperature , 170 grams
- 2 and 1/4 cups powdered sugar, 260 grams
- 1-2 tbsp honey, 21 to 42 grams
- Pinch of salt
- desired food coloring
Instructions
- Make the Cookie Dough: Beat butter in a large mixing bowl with an electric mixer on high speed until creamed. Add the brown sugar and mix until well creamed together, about 1 minute. Add the honey and mix until combined. Add the dry ingredients, and mix until a dough forms. Add 1-2 tsp of milk if your dough is a bit crumbly – it shouldn't be if you measured the flour correctly. Check it by pressing it together in your hand – it should be smooth and not crumbly.1 cup salted butter, softened at room temperature , 1 cup light brown sugar, packed, 1/2 cup honey, 3 cups all-purpose flour, spooned & leveled , 2 tsp cinnamon, 1/4 tsp nutmeg, 1/2 tsp salt
- Roll and Chill: Divide the dough into two halves, and roll each one out to 3/8" thickness between sheets of parchment paper. (Use a ruler to check this, or just eyeball halfway between 1/4 and 1/2 inch. This is the perfect thickness for these cookies – trust! Even 1/2" is perfect – but don't go lower than 3/8")Place the rolled dough, still sandwiched in parchment paper, on a baking sheet and cover loosely with a clean kitchen towel. Chill for about 2 hours in the refrigerator or about 1 hour in the freezer, until chilled and firm.
- Cut out Cookies: Preheat your oven to 350° F. Line baking sheets with parchment paper or silicone baking mats. Cut shapes out of the chilled dough and place cookies a couple inches apart on your prepared baking sheet. If the cookies are no longer firm and cold to the touch from working with the dough, pop the pan back in the fridge or freezer for 5 to 15 minutes to re-chill so that the cookies hold their shape when baked (it's fine to bake them from frozen).While the cookies are baking, combine your dough scraps, roll out, and cut more cookies. Repeat this until all remaining dough is gone! You will need to chill the dough for a bit again once you roll the scraps back out so that it's firm enough to cut the shapes easily. (Roll it back out between the parchment each time for ease.)
- Bake: Bake cookies for 9-10 minutes. The cookies should appear just set, and will look a tad puffy. Don't be tempted to over bake them! Let them cool on baking sheet for 5-10 minutes and then transfer to a wire rack to finish cooling.
- Make Frosting: In a large bowl, cream together butter and cream cheese for 2 minutes. Add the powdered sugar in 3 additions, mixing between each until combined. Add honey, vanilla, and salt and mix until combined. Divide into a few small bowls and tint with desired colors, using gel food coloring. To make the shades of forest green in the photos, you'll need to mix golden yellow, blue, and black gel food coloring.3 ounces cream cheese, softened at room temperature, 3/4 cup salted butter, softened at room temperature , 2 and 1/4 cups powdered sugar, 1-2 tbsp honey, Pinch of salt, desired food coloring
- Decorate Cookies: Use a Wilton 2A open tip and 4B tip for the trees pictured. Pipe dollops with the 2A tip, in a row at the bottom of the tree, then sweep each dollop upwards with the tip of an offset spatula. Pipe the next row of dots over the end of this row, continuing all the way up the tree. Pipe overlapping swoops with the 4B star tip for a textured look.
- Serve + Store: Enjoy cookies once decorated! Store cookies in a single layer in an airtight container in the fridge for 1-2 weeks. These need to be refrigerated due to the frosting. Cookie Dough and Cookie Make-Ahead Tips: Dough can be made, rolled out, and covered well and stored in the fridge for 1-2 days before baking. The cookies can be baked, cooled, and stored in an airtight container at room temp for 1-2 days before decorating. See more make ahead tips in the "expert tips" above.
Nutrition
Nutrition information is automatically calculated, so should only be used as an approximation.


These are beautiful! I can’t wait to try them.
Thanks, Melinda! Let me know how you like the recipe!
These cookies are amazing dangerously delicious. Such a great different cookie instead of a sugar cookie with all the great flavors of Xmas. Easy to make, I made honey buttercream frosting instead of cream cheese, so I did not have to worry about the frig so much. I also added a little more cinnamon as I am a huge cinnamon lover. Lol.
I did put them in the freezer to speed up my time. I do think an was too much. I will be making again for my holiday treat baskets. Thank you Stephanie
Thanks so much for the rave review, Holly!
I want to make these quick question can I just make regular buttercream frosting so I don’t have to refrigerate because of the cream cheese frosting and can I put honey in the buttercream they have the honey flavor
Hi Holly! Yes and yes! ☺️ i recommend using your own fav buttercream recipe as I’m not sure how to adapt mine to account for the missing cream cheese off the top of my head. And i would start with 2 tbsp honey and add more to taste. Let me know how you like the recipe! Happy baking!
I’ll be making this recipe year round! These were an absolute hit at my cookie exchange – so much so I had people reaching out for the recipe. Thank you, Stephanie!
So glad that these were a hit, Hayley! 🙂
I plan to make these for Christmas with my boyfriend! Where did you get your cookie cutters from? 🙂
Hi Sarah! Glad to hear that. 🙂 I’ve picked them up over the years at target and local baking shops. Let me know how you like the recipe and Merry Christmas!